Posts in Plant Care
Why Are The Tips of My Kentia Palm's Fronds Browning?

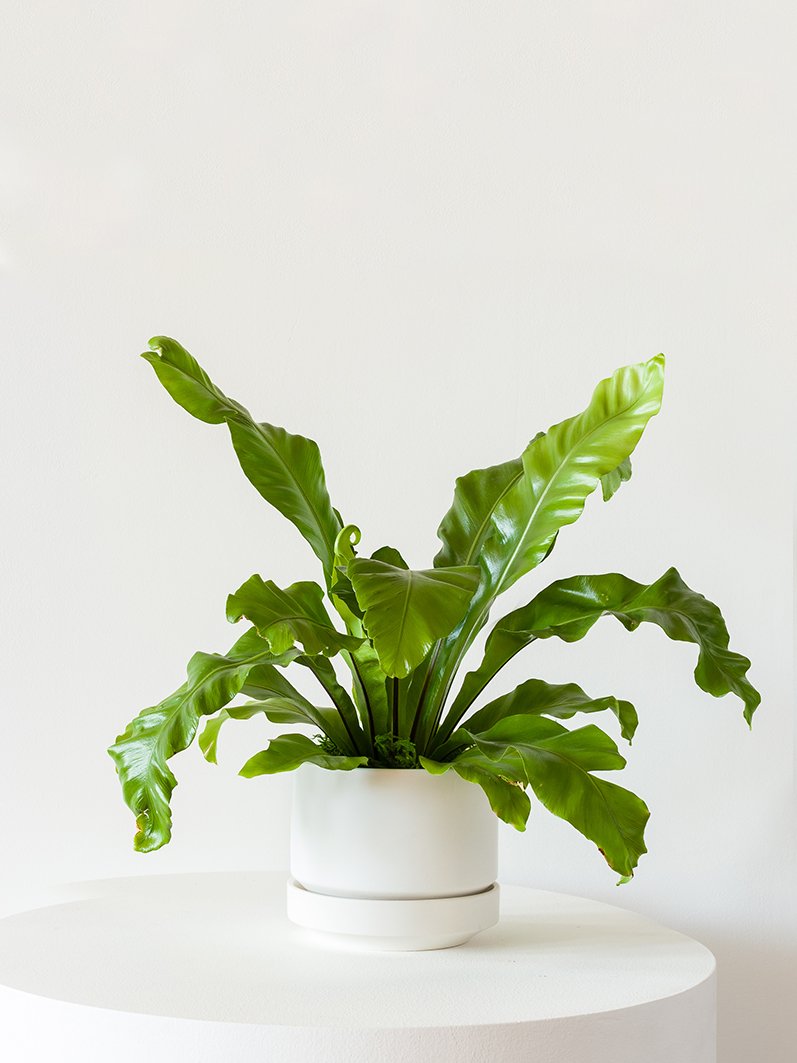
The Kentia Palm is a classically elegant statement floor plant with gorgeous fan-like fronds of vibrant foliage. With its height and full canopy, this plant packs a punch: they’re an ideal choice for any space that needs a statement plant with real gravity and a luxurious, jungle aesthetic. Native to Lord Howe Island, off of the east coast of Australia, they appreciate humidity. So when your Kentia Palm exhibits dryness in its fronds or frond tips, the source of the issue often comes down to moisture. Read on to learn more about how to keep your Kentia Palm vividly green from stem to tip of leaf, and steps for resolving any brown tips it may become afflicted with.

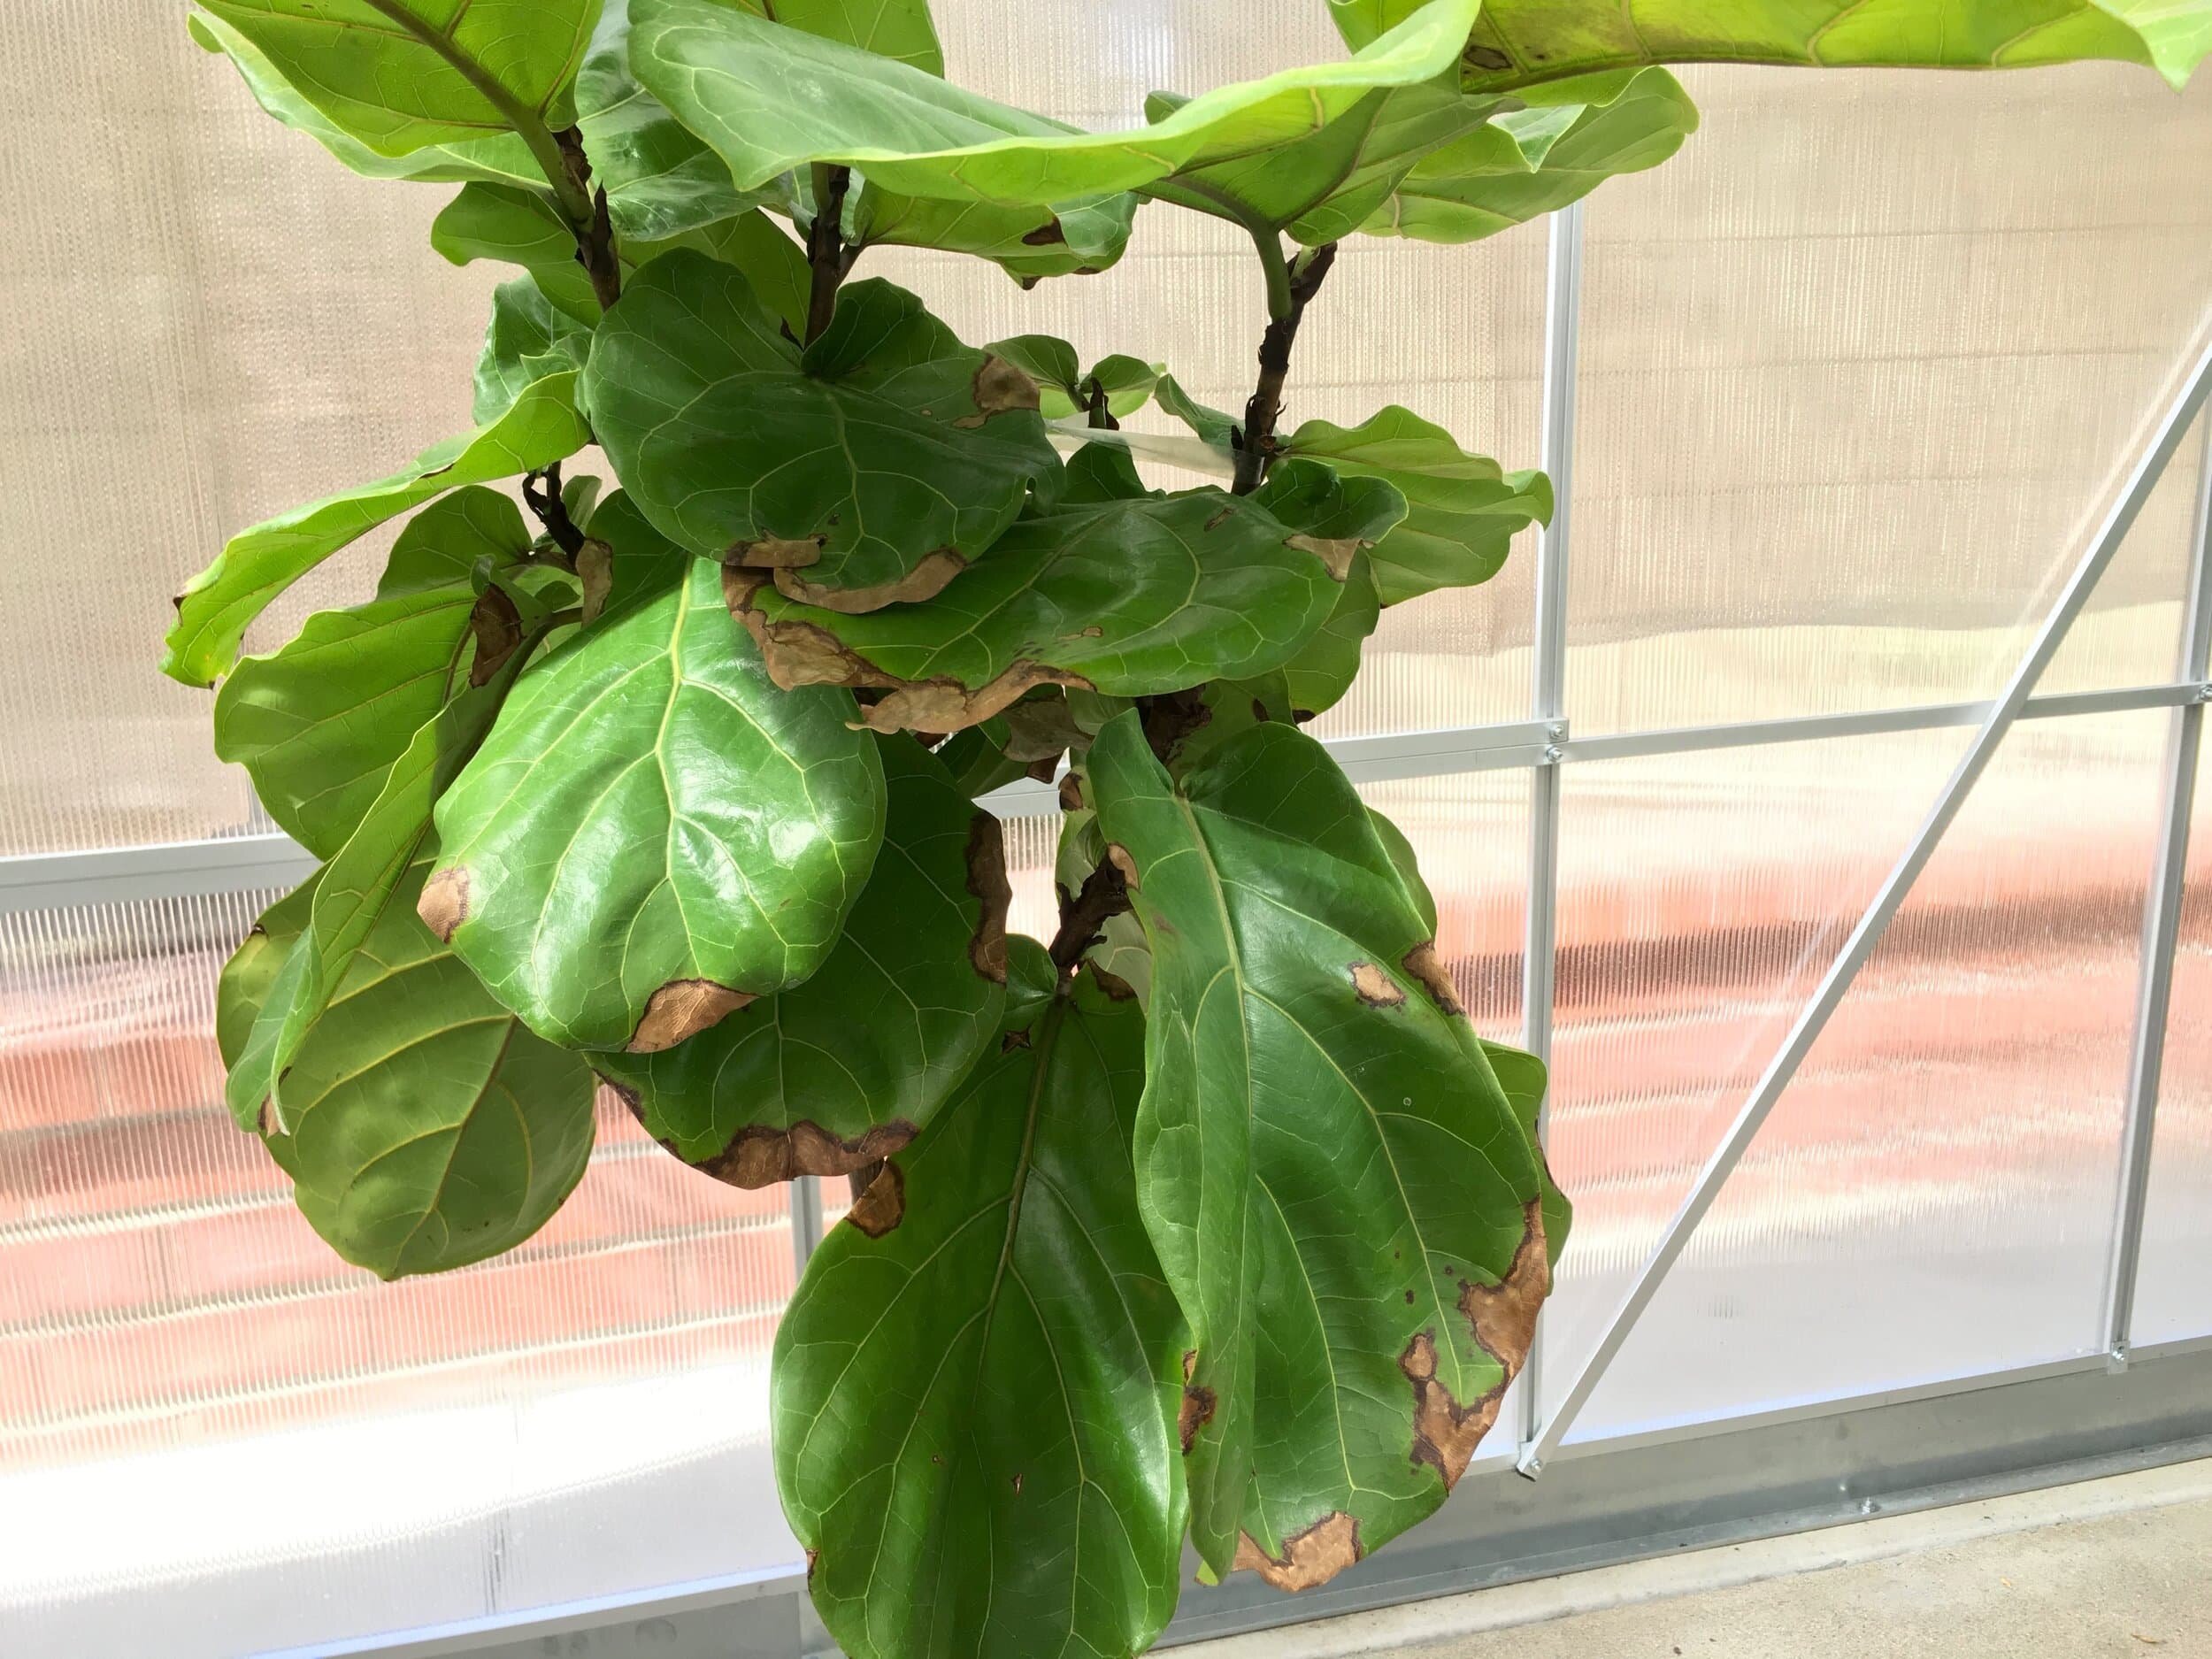
Brown Tips: Insufficient Humidity

Kentia Palms are big fans of humid environments, which can be challenging to recreate at home. If you can’t bring yourself to run a humidifier for the sake of your plant friends, consider the following: it’s important to keep your Kentia Palm away from running ACs, heaters or vents, and any dry drafts from windows and doors. Dry and crispy frond tips are a sure sign that your Kentia is craving moisture, so plan on boosting its misting routine as well. Misting your plant liberally (up to 3-5 times a week) will make a tremendous difference. And if your Kentia Palm is placed within a few feet of an appliance that emits dry air, you will want to consider moving it.

Brown Tips: Underwatering

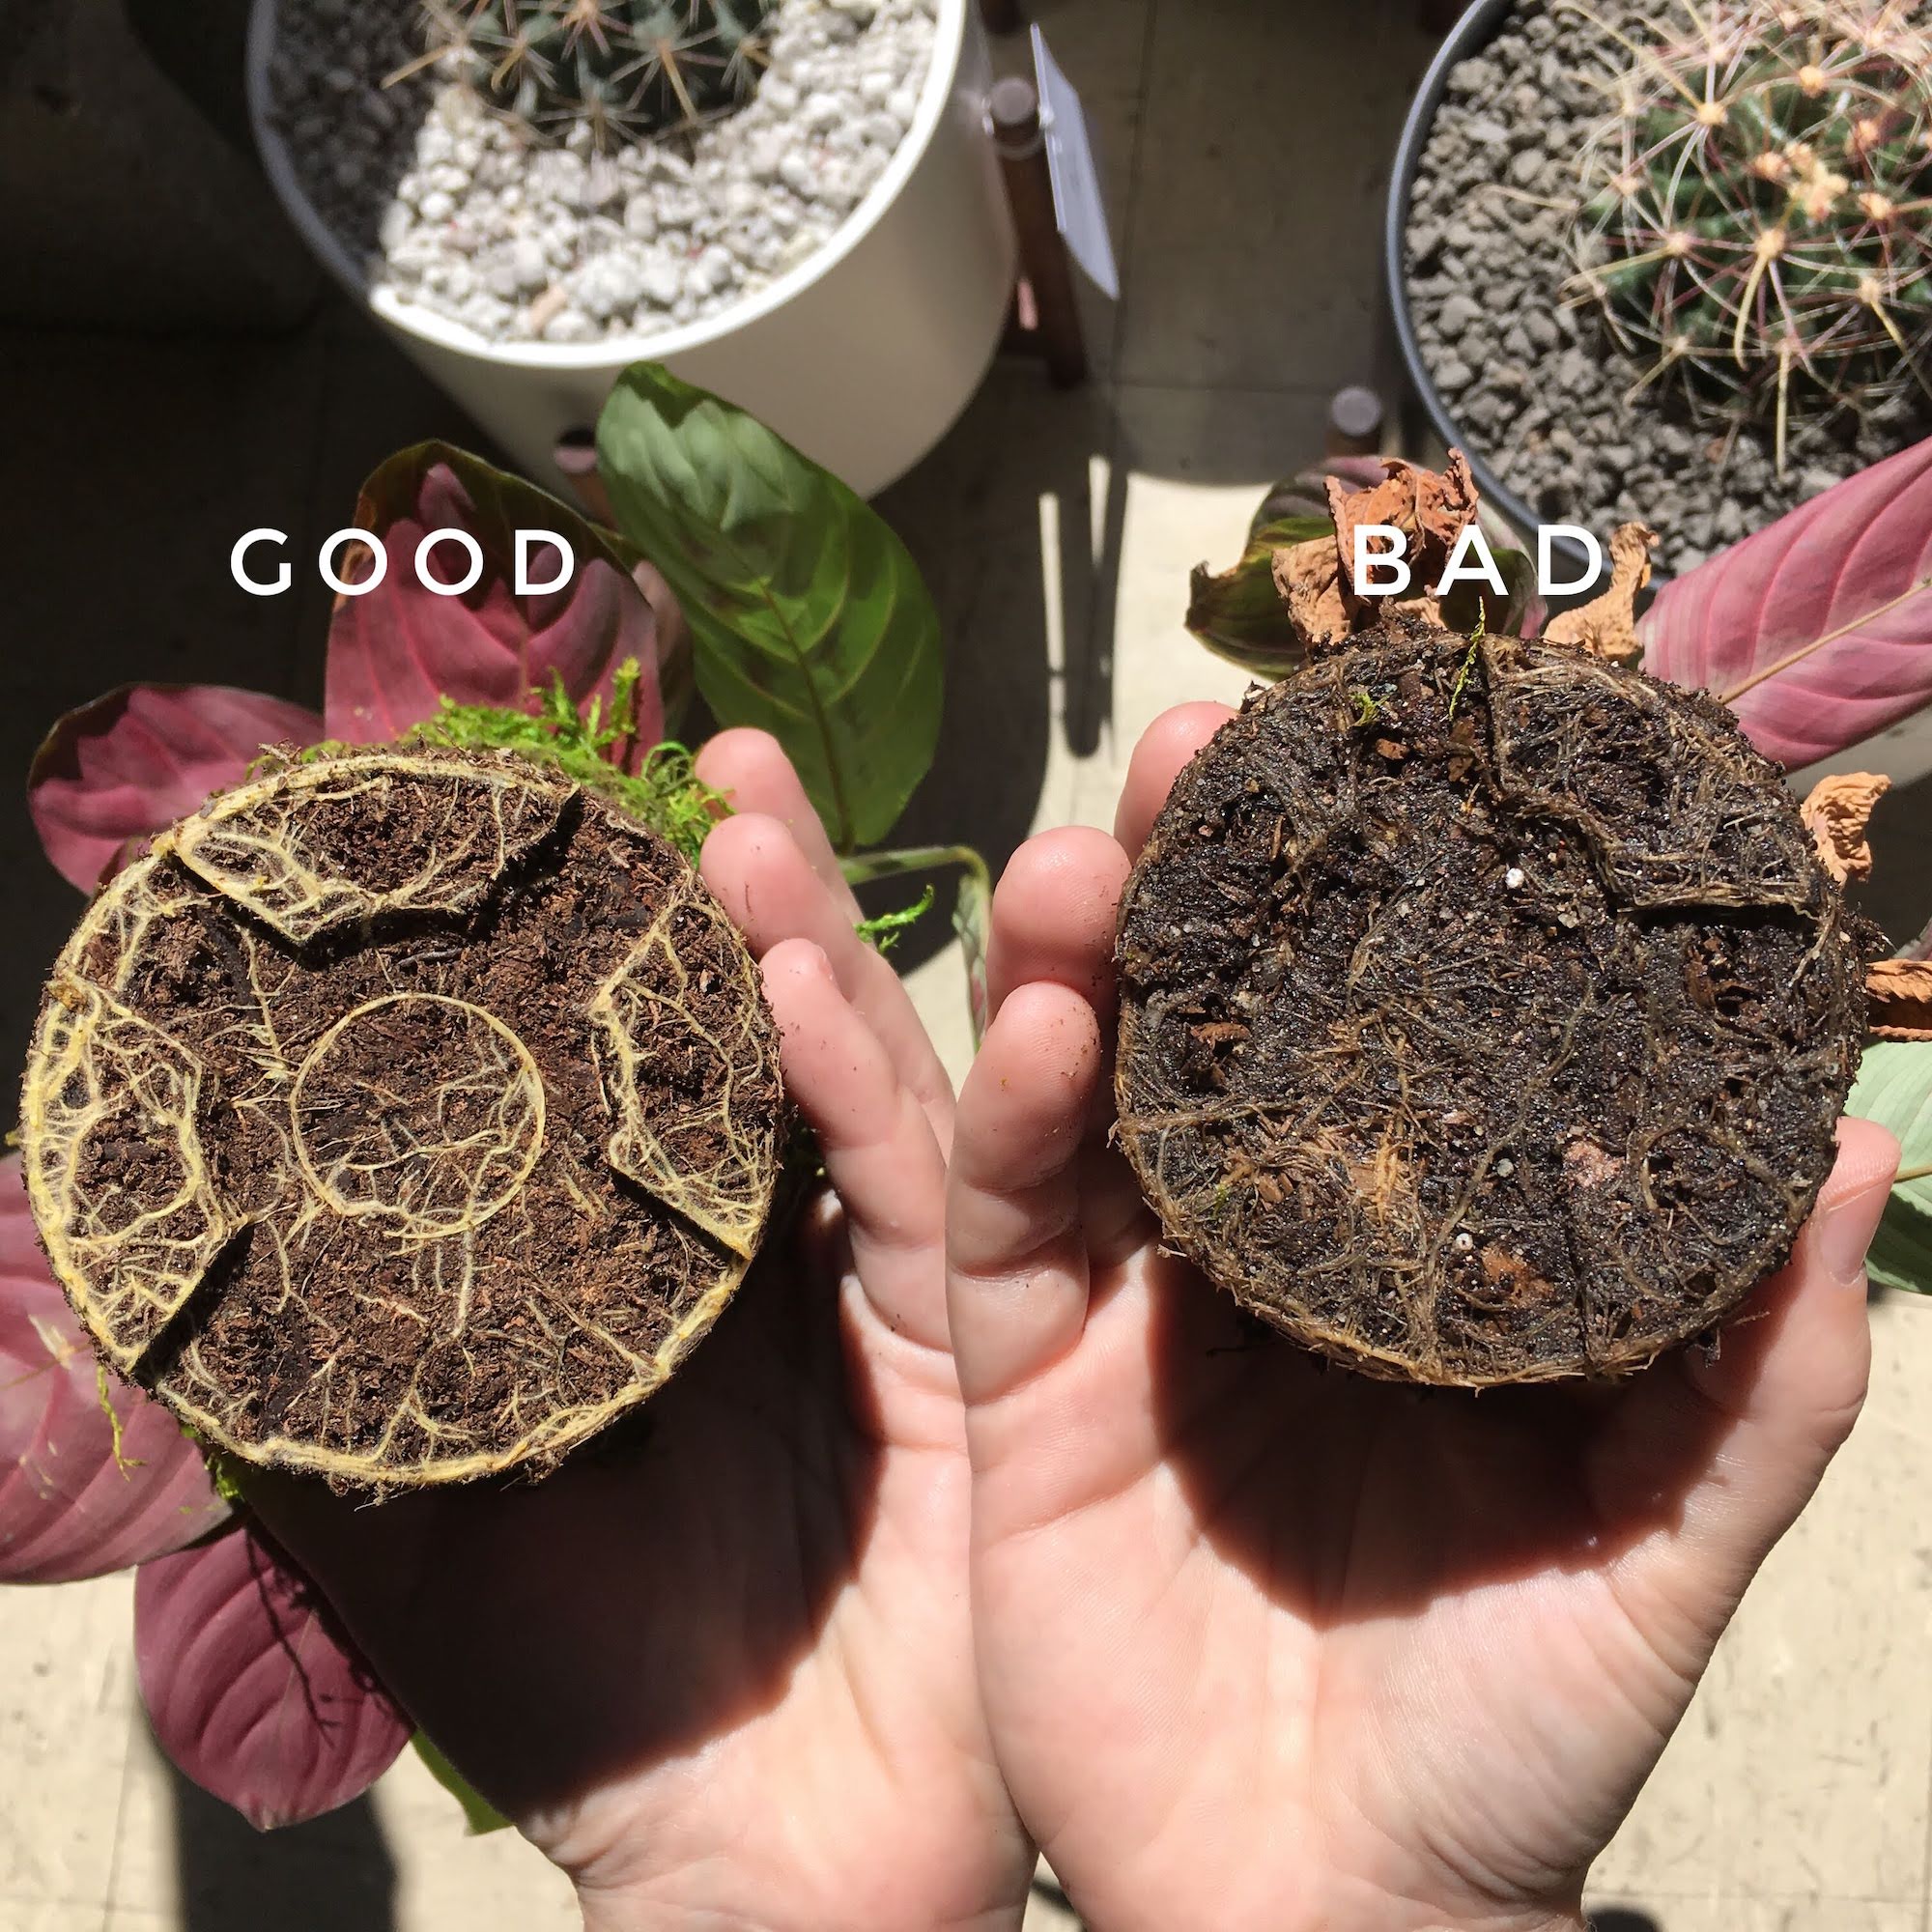
Ensure that you follow a consistent schedule when watering your Kentia Palm: keeping its topsoil slightly moist and watering when the top 2 inches of soil are dry to the touch is best.

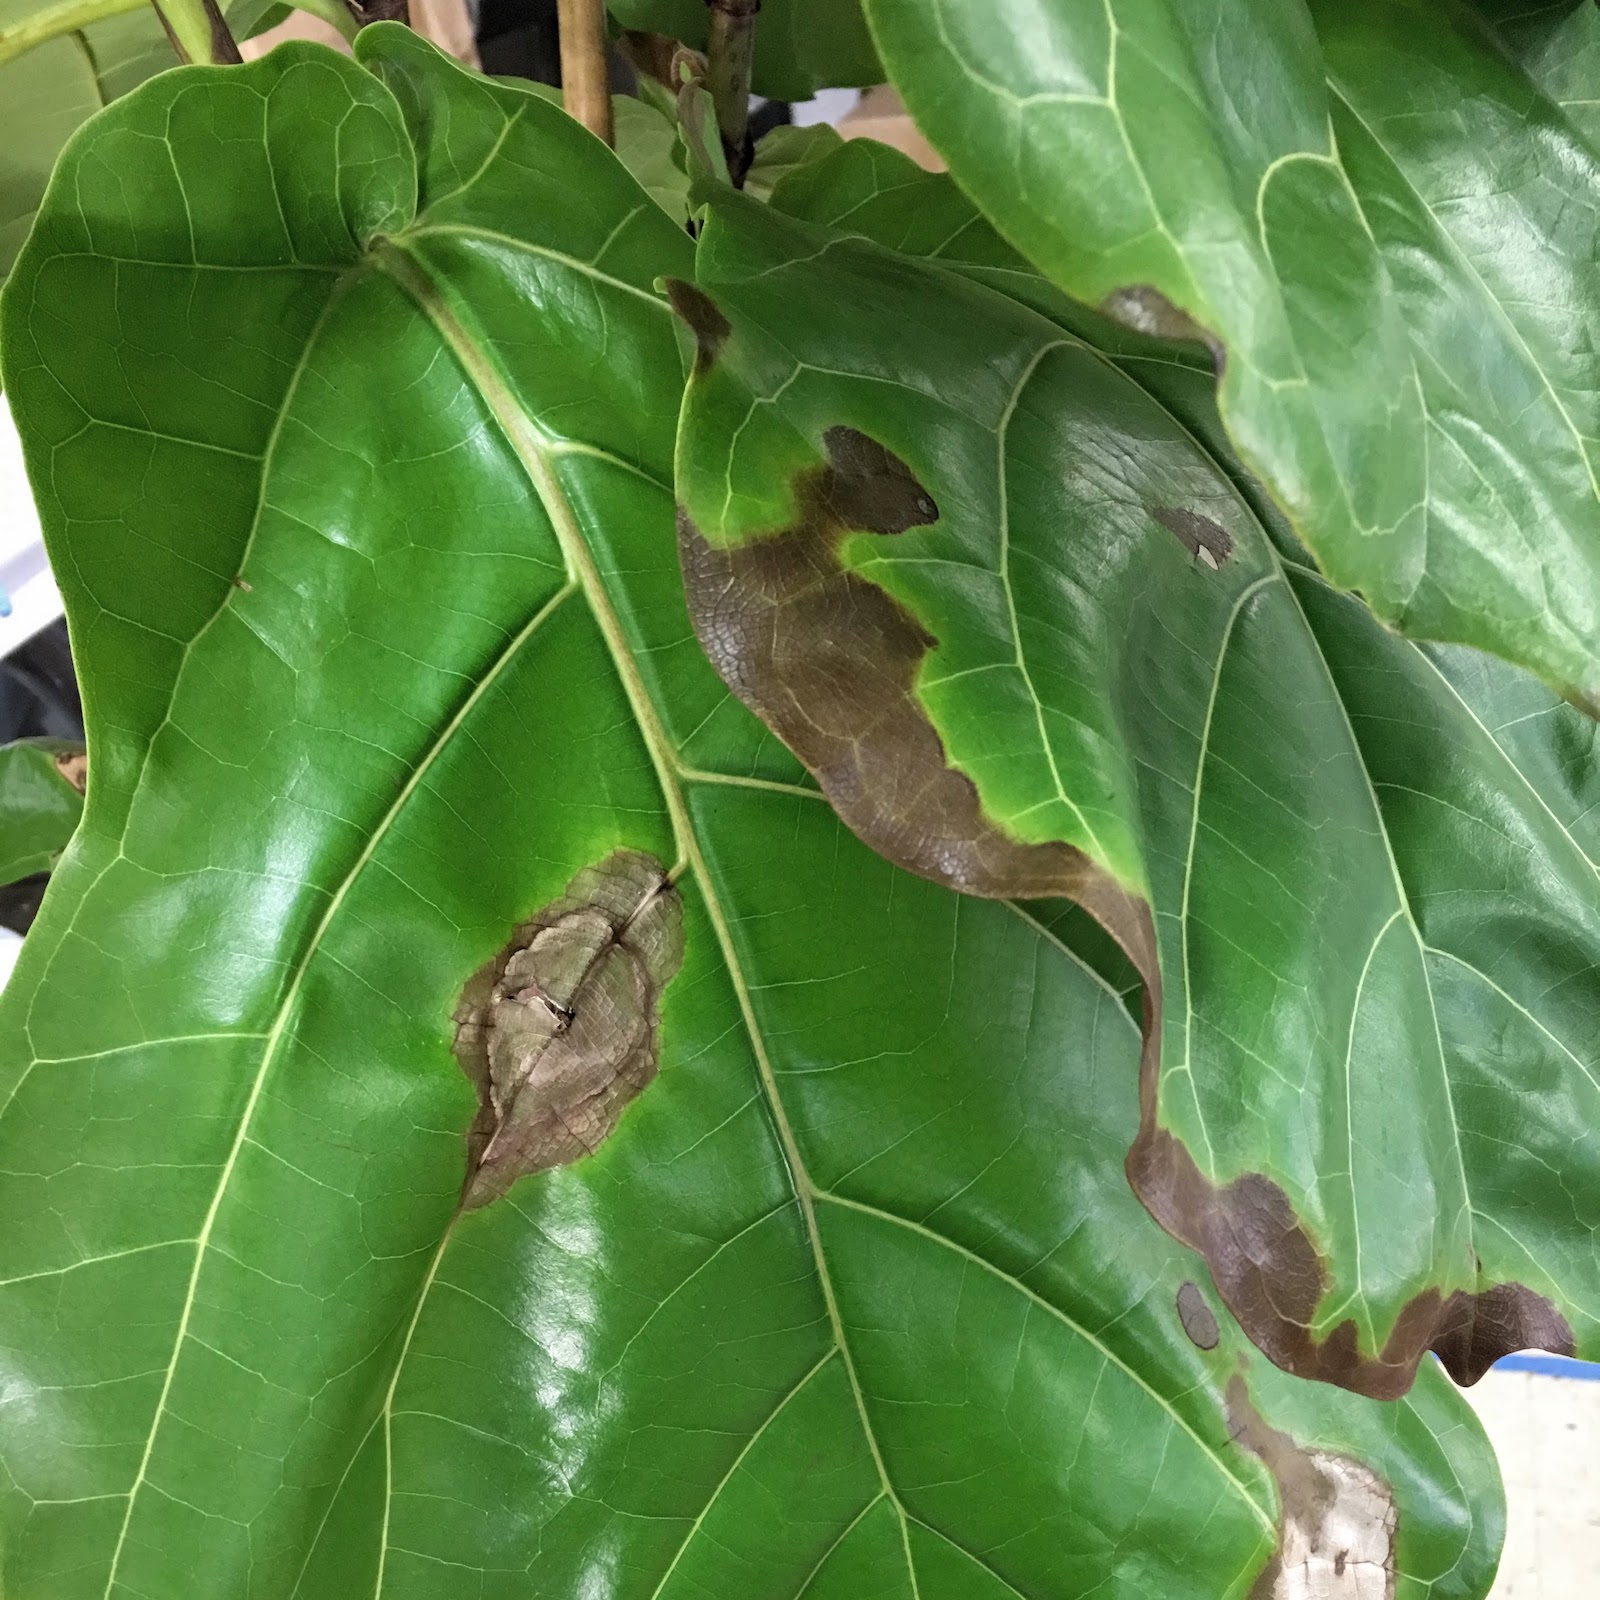
How to fix brown tips: Trim, Trim, Trim!

Don’t be afraid to clean up your Kentia Palm’s brown tips by trimming them. Simply cut the brown areas off with clean, sharp scissors or shears, while following the natural curve of the blade. Give the tips a misting when you’re done.

Plant Doctor Support

If you follow the steps listed here and and your Kentia Palm continues to exhibit frond tips, reach out to our Plant Doctor service for a detailed assessment and support. Simply log into your Léon & George account, select “Contact Plant Doctor”, and attach images of both the Kentia Palm as a whole and close-ups of its brown tips. The Plant Doctor team will reach out to you with their assessment and guidance for care within 2-3 business days.

Read our full Kentia Palm care guide here.


Kentia Palm

Classic, lush featuring full, fan-shaped fronds, the Kentia Palm is a stunning statement floor plant with plenty of presence and an unforgettable aesthetic.

This Is How You Tell the Difference Between a Dry and Over Watered Fiddle Leaf Fig

Striking the perfect watering balance Fiddle Leaf Figs is a key factor in ensuring the health and beauty of this popular indoor plant, and funnily enough, two of the most common problems Fiddle owners face are either overwatering or underwatering their plant. What’s more, telling which is which is a task in and of itself!

Because Fiddle Leaf Figs are prone to leaf drop and browning, it may seem simple to jump to conclusions about your plant. But keep in mind that the amount you water your plant is also tied to the conditions it lives in—what type of light, temperature and humidity levels the plant experiences in its home. Underwatering, for example, may be more common in homes that are very very bright and also very warm, as the plant dries out faster than you water it. Being aware of your plant’s light situation is the first step in ensuring a proper watering cadence.

But even if you think you’re watering your Fiddle properly, it might not always be clear what’s going on. In a nutshell, overwatering leads to root rot, a fungus in the roots that can eventually damage leaves and even kill your plant. Underwatering, however, can also lead to leaf damage and potential demise. At first glance, the brown spots, dropping leaves, and curled edges can be a symptom of either one, but here are a few subtle differences between an overwatered and underwatered Fiddle Leaf Fig.

Symptoms of a dry Fiddle Leaf Fig

Determining if your Fiddle is underwatered or overwatered requires a bit of intuition, but chronically dry Fiddles do show a few kew differences from overwatered ones, and one is curled leaves.

Another way to tell your plant is underwatered is noticing where the brown spots lie. Oftentimes, brown spots on a dry Fiddle will show up on the edge of the leaf, versus in the middle near the “veins”. The brown spots will also often appear all over the plant, from top to bottom, whereas root rot usually starts to affect only the bottom leaves first.

Finally, and probably most importantly, the leaves of your dry fiddle leaf fig may look otherwise healthy, whereas the leaves of a plant with root rot will begin to look sickly, with either yellow, droopy, or “spotted” leaves. Furthermore, while both cases will show leaf drop, usually overwatered Fiddles drop their bottom leaves first, whereas a dry Fiddle will drop leaves from anywhere on the plant.

Symptoms of an overwatered Fiddle Leaf Fig

A telltale sign of too much water and/or root rot in Fiddle Leaf Figs is brown spots near the center of the leaves, as well as around the edges. Multiple yellow almost always means too much water.

Overwatered Fiddles will also show a general browning, with tiny dark spots or shady areas, that can spread quickly from one leaf to another over the course of a week.

As mentioned above, you may also notice that your plant drops its bottom leaves first. That could be a sign of root rot, as plants tend to protect their new growth and shed the older leaves first.

If you’re still not sure, try using a moisture meter to check the moisture levels in your plant’s roots.

What about erratic watering?

To make things even more confusing, sometimes plants will show signs of both underwatering and overwatering. You aren’t going mad! Your plant may experience both, and that could be a result of erratic watering.

Fiddle Leaf Figs thrive on routine, so if necessary, set reminders to water your plant more or less at the same time every week (or two!)—whatever makes the most sense to water your plant consistently to ensure that the roots dry out just enough between waterings.

Our ultimate watering guide for Fiddle Leaf Figs has more information on determining the best watering situation for your plant. Léon & George customers also have 24/7 access to our digital plant doctors, should you need personalized assistance. Good luck!

This post was adapted from the Fiddle Leaf Fig Plant Resource by expert Claire Akin. Head to their website to learn more about caring for the Fiddle Leaf Fig.


1 TO 1 VIDEO CALL WITH AN EXPERT

Yellow leaves? Worried about watering or struggling with incorrect lighting? Book a call and get truly personalized support for all your plant-related needs.

Why Are The Tips of My Dracaena Compacta's Leaves Browning?

Why Are The Tips of My Dracaena Compacta’s Leaves Browning and Dry?

The Dracaena Compacta or JC (Janet Craig) Compacta is an elegant floor plant with an engaging, laddered silhouette and charming pom-poms of foliage. Its slender vertical trunks make it ideal for placement in narrow spaces and corners, and its easy-going disposition in regard to lighting and water means that a Dracaena Compacta is often the perfect choice when no other plant will quite do the trick. They’re gorgeous, textural and easy to care for, and issues with this plant are rare. But when a challenge appears, it is usually in the form of browning leaf tips. Never fear! There’s a solution. Read on, and you should have no issue getting your Dracaena Compacta’s leaf tips back on track and vibrantly green.

Insufficient Humidity

Like so many indoor plant varieties, the Dracaena Compacta is native to tropical climates that boast naturally high humidity levels. This is often a far cry from the spaces Compactas end up in, which may contain running ACs, heaters or vents, or dry drafts from windows and doors. So if your plant begins to exhibit crispy, brown leaf tips, chances are high that it is due to low humidity levels in your space. Combat the dryness by misting your plant regularly (up to 3-5 times a week). If your Dracaena Compacta is situated within a few feet of an appliance that emits dry air, you will want to consider moving it as well.

Trim It Up

Once you’ve begun a consistent misting routine and ensured that your Dracaena Compacta is out of the path of direct gusts of dry air from appliances, windows and doors, give it a trim. Carefully cut the brown edges and tips off of your plant’s foliage with clean, sharp scissors or shears, by snipping the leaf in the direction of its natural growth. Once your plant’s foliage has been trimmed, give it a thorough misting, and it will look brand-new. No more brown!

drying bottom leaves

A common occurrence and not related to browning tips, the lower foliage of each of the Dracaena Compacta’s trunks will start to dry out once it is time for the frond to be pruned. This is part of its natural cycle and allows the plant to maintain energy for new growth at the top.

More Support

If you follow the guidelines above and your Dracaena Compacta continues to experience newly browning leaf tips, contact the Plant Doctor service for an assessment and custom guidance. You can do so by logging into your Léon & George account, clicking “Contact Plant Doctor”, and attaching images of both the Dracaena Compacta as a whole and close-ups of its problem areas. Our Plant Doctor team will reach out to you with their thoughts and instructions for care within 2-3 business days.

Read our full Dracaena Compacta care guide here.


Dracaena Compacta

Textural and low-maintenance, the Dracaena Compacta is a gorgeous statement floor plant with a slender, laddered silhouette, making it ideal for narrow spaces and corner areas.

How To Correct a Leaning Dracaena

Dracaenas are a gorgeous example of nature’s love of texture. And with their unique foliage and vertical height, plants like the Dragon Tree, Dracaena Lisa, and Dracaena Compacta are a perfect option for tricky areas like corners and hallways. Their trunks are long and slim, which is a fantastic aesthetic feature, but can also come with a minor caveat: a slight lean. There’s nothing more standard in nature than a curved or leaning plant, so they can certainly be allowed to grow naturally in whatever direction they choose. But if the lean of your Dracaena’s drunk bothers, you can simply stake it! 

The Benefits Of Staking Your Dracaena

The benefits of staking your Dracaena are largely aesthetic. Plants enjoy growing at their own rate in whatever direction they prefer (generally toward the light!) but if a leaning trunk bothers your style sensibility, your plant will not be harmed by staking.

Staking Your Dracaena

To stake your Dracaena, the best option for a stake will be either a bamboo pole or a slender green-toned garden stake, which are typically plastic or coated metal. Both are widely available at nurseries and home improvement stores.

Utilize Support Ties

You don’t need a particular variety of support ties for staking your Dracaena. Plant tape, twine, or strips of fabric can all be used. Just ensure that when you tie the trunk of your plant to the stakes, you do not tie them tightly enough to damage the trunks. Think efficiently anchored, but not strangled. 

You can add support ties about 1-2 inches up from the point where your plant’s trunk meets the soil. Repeat at intervals of several inches (about every six to twelve inches, depending on the size of your plant).


Dragon Tree

A gorgeous statement plant ideal for narrow spaces, the Dragon Tree has lush, spiky foliage and beautifully tonal trunks. Low-maintenance and tolerant of varied lighting conditions.

Help! Why Are My Bird's Nest Fern's Leaves Wilting?

The beautiful Bird’s Nest Fern is far from your typical fern variety. Named for the way its foliage grows from its nest-like center, Bird’s Nest Ferns are a hardy and lush indoor fern variety with thick, verdant leaves that unfurl luxuriously. But although its care routine is very simple in comparison to most ferns, it does require a specific watering regimen. Diverting from this is the most common cause of curling leaves in Bird’s Nest Ferns. Don’t fret! Just read on to learn how to correct your Bird’s Nest Fern’s curling leaves.

Overwatering

Like most ferns, Bird’s Nest Ferns prefer for their soil to be consistently moist, but not drenched. If you suspect that you’ve provided your fern with too much water, you’ll need to allow its soil to dry out: not entirely, but to reach an even and consistent level of moisture, before watering again.

Incorrect Watering

It is paramount that you never water the Bird’s Nest Fern’s center. Always water around the outermost edges of your Bird’s Nest Fern, which will allow the water to be pulled in by the plant in all the right places. Watering directly in the center of the “nest” can result in a bogged-down, waterlogged fern which may ultimately require repotting to rectify.

Repot When Needed

If your Bird’s Nest Fern has become severely waterlogged, it is at risk of root rot, which can ultimately result in the plant losing all viability. Don’t be afraid to repot in instances like these. Simply plan on getting a little dirty. Move outside or spread newspaper on the floor, then remove the fern from its plastic nursery pot and shake off as much of the old soil as you can, so that you can see the roots. Roots that are severely rotted can be trimmed off with clean, sharp scissors. Then, place the plant in the center of the pot, add new soil (avoid replacing more than 1/3 of the overall soil at one time) and pat the soil down firmly. Water the soil thoroughly until moist, not drenched, and place the plant in an area with bright indirect light. Your plant will take 2-4 weeks to settle from the shock and adjust, but it should mitigate the issue of further root rot developing.


Bird’s Nest Fern

Verdant, resilient and deeply hued, this indoor fern variety boasts lush foliage, which grows in wavy fronds from the plant’s center, resembling a bird’s nest. The Bird’s Nest Fern prefers medium to bright light, consistent moisture and steady humidity.

The Ultimate Guide to Watering Your Fiddle Leaf Fig

Watering can prove challenging to even the proudest houseplant owners, especially when it comes to members of the ficus family. The Fiddle Leaf Fig (ficus lyrata) is especially notorious for frustrating its owners with its picky watering needs. First-time owners of these plants are prone to overwatering, which can lead to health issues such as root rot. Those fearful of overwatering thus underwater their Fiddle Leaf Figs. So how to find a happy balance when watering? Read on to find out.

How to Tell How Much Water Your Fiddle Leaf Fig Plant Really Needs

It can be hard for some to diagnose whether their Fiddle Leaf Fig has been getting over or under-watered. But your plant will always tell you what it needs through its leaves and soil. Luckily, reading these signs gets easier with time. Some simple questions to ask yourself to know if you are overwatering are:

  1. Am I watering more than once a week? Watering once a week at most is what your Fiddle Leaf Fig needs. Depending on the conditions of the environment (light, humidity, temperature), it could be even less!

  2. Do I feel my plant’s soil before watering? You should always stick your finger an inch or two into your plant’s soil to feel how damp it is. If the soil is wet to the touch from the last time you watered, wait until it dries out more. If you aren’t checking in before watering, it can be easy to overdo it.

  3. Do my plant’s leaves have dark spots or edges? Brown spots around the edges or center of leaves is a symptom of overwatering and root rot.

  4. Is there a musty odor coming from my plant? Make sure that your plant is not sitting in a pool of water in its decorative container. Besides leading to fungal infections, this can also attract insects.

  5. Does my plant’s pot have a drainage hole? Ideally, your plant should be in its plastic nursery pot inside of its decorative container. This allows for the best drainage and lets you maneuver your plant more easily. If you want your plant to just be in a decorative container make sure that it has a drainage hole.

For all the reasons listed above, owners of this plant can become leery of overwatering. But being too withholding with water can lead to its own batch of health issues for the Fiddle Leaf Fig. Here are some questions to ask yourself if you suspect you’ve been under-watering your plant:

  1. Are the newer leaves smaller than the older leaves? If the newest leaves on your Fiddle Leaf Fig are much smaller than older ones your plant is likely struggling to get what it needs. Smaller leaves can point to a lack of water, nutrients, or light.

  2. Is your plant rapidly dropping leaves? This can be caused by low humidity or thirst. Make sure that your plant isn’t in front of a vent where it is getting blasted with dry air.

  3. Is the top inch of its soil dry to the touch? While you should let your Fiddle Leaf Fig dry out a bit between waterings you do not want to let your plant become bone dry. Allow your plant to dry out for brief periods before watering.

  4. Are the edges of leaves brown and crumpled? These brown patches will start at the edges of leaves and work their way inwards. If they feel dry then your plant is probably thirsty.

  5. Are the leaves curling inwards? This is a sign of a severely underwatered Fiddle Leaf Fig. You can give your plant a shower but it will probably need some time to fully recover.

If asking yourself these questions did not make it any more clear whether you are over or under-watering your Fiddle Leaf Fig, it’s usually safe to assume that you are overwatering. You are not alone! Concerned plant parents tend to overwater, and most indoor plant failures are a result of loving the plant a little too much when it comes to water! Try to check in with your plant more regularly and take time to inspect its leaves. Your plant will communicate to you what it needs through them. Once you have learned to properly read the signs, taking care of it will feel far easier.

Natural Plant Food

Nourish your plants with this specially-formulated organic liquid plant food. Our Boost Vitaminé is made with potent nutrients from nature to help your plants grow and thrive all year long.

$24

So How Often Should You Water Your Fiddle Leaf Fig Plant?

A general rule of thumb is that Fiddle Leaf Figs do not need to be watered more than once a week. This can of course depend on the time of year, the amount of sunlight your plant receives, and the temperature and humidity levels of your home. But picking a day of the week to water on can take some of the guesswork out of when you need to water next. If on your designated day your plant still feels moist to the touch simply check back in with it later. Over time you may be able to determine exactly how many days your unique Fiddle Leaf Fig needs between waterings!

But remember — this strategy will only work if your plant has proper drainage. If your plant is in a pot without a drainage hole or has compacted soil you will struggle to improve its condition. If your plant’s soil is still wet to the touch a week after you watered it likely needs better drainage. If you’re unsure how to give your plant the drainage it needs try reading our guide on how to create the perfect drainage for Fiddle Leaf Figs.

The thing that your plants want most from you is consistency— don’t stress and change too many things at once. Simply make small changes, like moving your plant to a new window or adjusting your watering routine, and observe how your plant responds. Once you’ve found a rhythm, also try to give your plant the same amount of water every week.

How Much Water Do Fiddle Leaf Figs Need?

The amount of water your Fiddle Leaf Fig needs each week is unique and depends on the conditions of your home.

A simple rule that many owners like to follow is to give a cup per two feet. So if your plant is two feet tall from the base of the soil to the tallest leaf then you would give it one cup of water a week. This scales upwards, two cups if it is four feet, and so on. This rule can be helpful if you are just figuring things out but it doesn’t take the unique needs of your plant into account. So if you are following carefully observe how your plant responds. Is it drying out quickly? It needs more water. Is it still wet after a week? Scale back the water. Most importantly, always make sure that your plant is not sitting in water!

How Should You Fertilize A Fiddle Leaf Fig?

The growing season for most plants is the spring and summer. This is when your Fiddle Leaf Fig will be dedicating most of its resources to developing new branches and leaves. You will want to supplement your plant’s soil with fertilizer during this time to make sure that it is getting all of the nutrients that it needs. This is quite easy and can be done when you water. During the growing season simply dilute some liquid fertilizer into water and water your plant like usual. When your plant is winding down for a restful winter in the fall you should only fertilize every other time you water. You don’t want to fertilize in winter because your plant is dormant and not growing.

It’s best to use a liquid house plant fertilizer like our Boost Vitaminé, formulated to provide optimal nutrition for your plant.

This post was adapted from the Fiddle Leaf Fig Plant Resource by expert Claire Akin. Head to their website to learn more about caring for the Fiddle Leaf Fig.


fiddleleaffigbush.jpg

Indoor plants, potted & delivered.

Premium plants paired with stylish ceramics, plus lifetime plant care support. Order online at leonandgeorge.com

Help! Why Are My Bird's Nest Fern's Leaves Yellow and Pale?

The Bird’s Nest Fern is the champion of the indoor ferns. Both low-maintenance and vibrant, its unique foliage sets it apart, and it’s far and away the easiest indoor ornamental fern to care for. Named for the way its quill-like leaves grow from a nest-like center, the Bird’s Nest Fern is a lush choice for tabletops and they make gorgeous centerpieces. But although it is low-maintenance, it is somewhat sensitive to light, which can result in pale and/or yellowing leaves. Not to worry! Read on to learn our simple steps on how to correct leaf discoloration and keep your Bird’s Nest Fern healthy and happy.

Pale Leaves: Too Much Light

Bird’s Nest Ferns have a preference for medium, indirect light. Too much bright light is simply too different from the light that they receive in their native, tropical environments, which are both moist and filtered by the canopies of other plants inhabiting the same biome. If your Bird’s Nest Fern is in a spot where it receives direct natural light, it will need to be moved to a space that receives diffuse, medium light. Similarly, if it is in a spot that receives bright light from artificial appliances, it will likely need to be moved to a space with light that is more gentle and less direct.

Yellow Leaves: Overwatering

Yellow leaves are one of Mother Nature’s most common signs of overwatering. This symptom can be seen consistently across many plant families, and the Bird’s Nest Fern is no exception. If its leaves are yellow, sagging, and have the appearance of holding a lot of moisture within them, the fern is likely overwatered. Remember that your Bird’s Nest Fern needs its soil to be kept consistently moist, not drenched. And never water directly within the center of the plant’s nest- always water along the outer edges of the plant’s soil. A watering can with a narrow spout can assist you with this.

If you’re concerned that your fern has been severely overwatered, lift it out of its ceramic pot (still within its plastic nursery pot) and check the ceramic for any signs of standing water. If water has pooled within it, dump it out. Allow the plant’s soil to dry to a consistently moist state before returning the fern to its ceramic pot, then resume your watering schedule: always aiming for consistent moisture, not soaking.

Further Support

If you follow the steps above and the condition of your Bird’s Nest Fern’s does not improve, don’t hesitate to reach out to our Plant Doctor Service. Just log into your Leon and George account and select “Contact Plant Doctor” from the menu. Then, upload photos of your plant as a whole, as well as close-ups of any areas exhibiting a pale or yellow tone, and provide details on the water your fern receives (both how much, and how often) as well as a description of its lighting environment. The Plant Doctor team will get back to you within 1-2 business days with an assessment, and guidance on how to get your fern back on track.


Bird’s Nest Fern

A resilient, low-maintenance and beautifully full indoor fern, the Bird’s Nest Fern’s claim to fame is its luscious, quill-like foliage, which grows in ample fronds from the plant’s center, resembling a bird’s nest. Bird’s Nest Ferns require medium light, consistent moisture and steady humidity. Ideal for tabletops and renowned for their use as eye-catching centerpieces.

Home At Last: Find the Perfect Placement For Your Fiddle Leaf Fig!
fiddle-bush-cobalt.jpg

When it comes to owning a Fiddle Leaf Fig, the best thing that you can do for your plant is place it in the optimal spot in your home (with watering properly a close second!). Fiddle Leaf Figs are incredibly picky about their placement, and need the perfect balance of bright sunlight without direct exposure to harsh rays. Too much sun and your plant will burn, but too little sun and you will have a plant that seems to barely grow, drops its leaves, and is susceptible to all sorts of illnesses. Read on if you want to place your Fiddle Leaf Fig in the best light!

Where to place your Fiddle Leaf Fig

Whenever you add a new plant to your collection try to consider the natural conditions in which they thrive. Fiddle Leaf Figs naturally grow under the bright African sun, although they are actually banyan trees in the wild. This means that they grow high up in the branches of other trees and are protected from the sun’s direct rays. As such, bright, filtered light is what is best for these plants.

If you have a large window that receives lots of light and has a sheer curtain, that is perhaps the most ideal setup. You want to find a happy balance between lots of light without it being too direct.

In certain temperate areas, such as parts of southern California, you can actually keep Fiddle Leaf Figs outside in full sun. Outside in domestic conditions these plants will typically only grow to 25 feet tall. If you’re going to keep one outside try to place it somewhere where it isn’t in the shadow of larger plants and where it cannot cast a shadow on smaller plants. Remember that if your plant normally lives indoors, you will want to slowly acclimate it to direct sun if you plan on moving it outdoors.

Natural Plant Food

Nourish your plants with this specially-formulated organic liquid plant food. Our Boost Vitaminé is made with potent nutrients from nature to help your plants grow and thrive all year long.

$24

Assessing Light for Fiddle Leaf Figs

While it can be tempting to place your Fiddle Leaf Fig wherever it best complements your decor, you (and your Fiddle!) will be better off in the long run if you consider first its light needs. It should be at least a couple feet away from any windows, although near a window is fine. You just want to avoid it getting too much direct sun. If you have a gauzy curtain that can filter the sun’s light for you Fiddle Leaf Fig that’s even better. Ideally, the window should be facing either south or east. You just don’t want to put a Fiddle Leaf Fig near a north-facing window as it likely won’t get enough light.

If you don’t know which direction the windows in your home face a simple way to find out is to use a compass app on your phone. Having this knowledge will make you an even better plant owner.

Which Direction Should Your Fiddle Leaf Fig’s Window Face?

Check to see which direction your window faces to be sure it’s a good match for your Fiddle. This guide should be helpful for those who live in North America:

North-facing windows receive the least amount of sunlight, so you don’t want to put your Fiddle Leaf Fig in front of one if you can help it. However, if you live in a southern temperate region such windows might receive enough light. The farther north of the equator you are the less light such windows receive.

East-facing windows receive a good amount of early morning sun, but they catch little of the sun’s afternoon light. This is a problem because your Fiddle Leaf fig needs at least 6 hours of cumulative sunlight a day. Consider the size of your window carefully and observe whether it receives any midday light.

West-facing windows receive the most midday light. This is when the sun’s rays are most intense. So you need to be careful is you are going to put your Fiddle Leaf Fig in front of one, its leaves could get scorched. Keep your plant at least a couple of feet away from the window to protect it.

South-facing windows receive the brightest sunlight for the longest period of time. This makes them ideal for Fiddle Leaf Figs. Just make sure you don’t place your plant directly by the window or you could risk burning its leaves.

Fiddle Leaf Figs are known for being finicky but they are able to adapt to less than ideal lighting. If you don’t have the best lighting for your plant just focus on making the rest of their care as good as possible. Be careful not to overwater and fertilize with fiddle leaf fig plant food. And don’t forget to rotate your Fiddle Leaf Fig when you water! You plant craves sunlight and will lean towards its light source over time. Leaves without regular exposure to sunlight will also be less healthy.

This post was adapted from the Fiddle Leaf Fig Plant Resource by expert Claire Akin. Head to their website to learn more about caring for the Fiddle Leaf Fig.


zzgemwhite.jpg

Indoor plants, potted & delivered

Premium plants paired with stylish ceramics, plus lifetime plant care support. Order online at leonandgeorge.com

Root Rot: How to Avoid it, and How to Fix It
How to fix root rot indoor plants

Have you ever dealt with an ugly case of root rot?

Root rot is a common issue with potted plants, and one that’s fairly easy to avoid by simply following a few basic rules of watering and drainage. And if it’s too late? Fret not! There may still be time to save your plant. Below are tips on how to prevent root rot in the first place, and how to fix root rot once it’s too late.

What is root rot?

Root rot is exactly what it sounds like — the rotting of a plant’s roots — and is the consequence of too much watering and/or not enough drainage. Though it can occur in outdoor plants, it is much more common with potted indoor greenery and can lead to the quick demise of your plant.

What are signs of root rot?

Catching root rot early is crucial to saving your plant! Some of the most common signs of root rot are:

  • Significant yellowing and wilting of the leaves

  • Dark brown edges or spots on leaves, particularly common with Fiddle Leaf Figs

  • Stunted growth

  • Mushy roots

  • Heavily dampened soil that does not dry out over time

How can I prevent root rot?

Preventing root rot is simple. It’s all about watering and drainage. Follow these simple rules and you will never see root rot in your plants.

  • Give your plant proper drainage - Make sure your plant is potted in something with drainage hole(s), either a plastic nursery pot or a decorative pot that has a drainage hole. If your decorative pot does not have a drainage hole, simply leave the plant in its plastic pot and place it inside the decorative pot.

  • Keep a regular watering schedule - Most plants appreciate regular watering schedules. Sporadic watering is a quick way to hurt your plant as it often means the plant does not have time to dry out at all between waterings (thus leading to root rot)

  • Check the soil - If you don’t do this already, always check the soil of your plant before watering. Most plants like to dry out a bit, so depending on the plant you have, you may want to hold off on watering until the top two inches of the soil is dry.

  • Aerate the soil - Aerating the soil helps loosen it up, allowing for a more even distribution of water and better flow of oxygen, preventing moisture build up in the roots of your plant.

A sure sign of root rot, particularly in the popular Fiddle Leaf Fig plant, is browning on the edges of the leaves. Read more on how to fix root rot on Fiddle Leaf Figs here.

A sure sign of root rot, particularly in the popular Fiddle Leaf Fig plant, is browning on the edges of the leaves. Read more on how to fix root rot on Fiddle Leaf Figs here.

How do I fix root rot?

If your plant has root rot and you catch it early on, you may be able to save it by acting fast. Follow these steps to fix root rot in most common houseplants.

  • Diagnose the issue - If your plant has been dropping leaves, yellowing, or getting soft, mushy leaves, you may have root rot. Remove the plant from its pot and inspect the roots. If they are soft, wet, brown, and/or mushy, it’s time to roll up your sleeves and treat the roots.

  • Clean the roots - Once your plant is out of its pot, carefully remove as much soil as possible and cut the affected roots off with clean shears or scissors. Under running water, gently wash the remaining roots clean of any soil.

  • Repot - In a pot with proper drainage, repot your plant using fresh soil (and if you’re using the same pot, make sure to clean it thoroughly first!). If it was a serious case and you removed many roots, you may also prune the top of the plant a bit so the plant has less leaves to send its energy to.

  • Place in a bright spot - Water only when the top of the soil is dry. After a few weeks, your plant should take root and return to the healthy specimen it once was!

Good luck, don’t panic, and remember — the more in touch you are with your plants, the more likely they are to thrive. Water them regularly, watch for issues, and enjoy the many benefits they bring to your physical and mental health!


blogsnake.jpg

Indoor plants, potted & delivered.

Beautifully potted plants, delivered directly to your door. Order online at leonandgeorge.com

Plant Food 101: What is Foliar Feeding?

Natural Plant Food: Foliar Feeding

Fertilizing your indoor plants is an important step in caring for your plants, as it ensures they get the nutrients they need to grow strong and healthy over time.

While most people think of indoor liquid fertilizers to use in the soil, what many don’t know is that your plant can also actually consume food through its leaves, or foliage. This is called foliar feeding, and it’s an excellent addition to your plant care routine.

Here’s a simple rundown on the ins and outs of foliar feeding, the most gentle (and most fun!) method of fertilizing your plants.

Plant Food Through Foliage

It would be understandable to assume that by applying foliar feed only to a plant’s leaves, you would be nourishing its leaves exclusively. But that’s just not the case! The natural, nurturing plant food that you apply to your plant’s foliage travels throughout your plant, boosting its health from root to leaf. 

It makes sense: the leaves of your plant do most of the work in terms of photosynthesize. They capture more light than any other part of your plant, and contain the most chlorophyll to absorb it (you can think of chlorophyll as the “net” that captures rays of light and converts them into the sugary carbohydrates that make every part of your plant grow). 

Stems and branches also photosynthesize, but to a lesser degree, because they contain less chlorophyll. So when using foliar feed, it is best to focus on applying it to your plant’s leaves. 

How to Apply Foliar Feed

One of the great benefits of foliar feed is that, unlike regular liquid fertilizer, it is gentle enough to apply across all of the year’s seasons. Traditional fertilizers like Boost Vitaminé are typically applied during spring and summer, and usually only once every few weeks, and foliar feed can be used in alternation with them.

Our natural foliar feed, Potion Magique, should be diluted with water in a spray bottle or mister. The formula calls for three drops of Potion Magique to be diluted for every eight ounces of water. The spray bottle or mister should then be shaken lightly to mix ingredients. Once blended, the mix can be sprayed directly onto your plant’s leaves and voilà- that’s that! You do not need to wipe the mixture off of your plant’s leaves. Simply allow it to do its work, and enjoy the results. 

Our new collection of plant care essentials, L’Alchimie Botanique, comprises a few gold-star products that we know our customers will use and love. From two varieties of plant food (liquid fertilizers) to our organic, olive oil based black soap, L’Alchimie Botanique has all the plant elixirs you crave--  but none has been more hotly anticipated than Potion Magique, our new foliar feed. This gentle indoor plant fertilizer was designed to provide your plant with health-boosting nutrients all year round, and as the name implies, its results are truly magical! But if you don’t spend your time in deep studies of recreational horticulture, you may be at a loss as to what “Foliar Feed” really means. We hear you! 


A nourishing plant mist and foliar feed, derived from nature’s most potent ingredients. Experience the drift of Potion Magique’s soothing aroma as you care for your plants.

NATURAL FOLIAR FEED - Potion MagiQUE

A nourishing plant mist and foliar feed, derived from nature’s most potent ingredients. Experience the drift of Potion Magique’s soothing aroma as you care for your plants.

Plant Care Essentials

L’Alchimie Botanique

Natural plant care essentials by Léon & George.

Why Is My Rubber Tree Losing Leaves?

rubber tree losing leaves

Why Is My Rubber Tree Losing Leaves?

Ah, leaf fall. We love to see it outside on a blustery autumn day, but it’s not something that any plant parent wants to see affecting their indoor greenery! And when it comes to the Rubber Tree, whose crowning glory is their profusion of glossy, high-shine leaves in shades of emerald and burgundy, their foliage is truly the stuff of legend. So, it’s natural to be concerned if you notice that your Rubber Tree, alias Ficus Elastica, is experiencing falling leaves. But not to worry- there’s a solution for every plant problem, and falling foliage is no exception. Read on as we relate the most common causes of falling foliage on Rubber Trees, and how to quickly and effectively correct the problem.

Unstable Temperatures and Humidity Levels

We’ve said it many times, but it bears repeating: indoor plants do not like cold drafts. In fact, they also don’t particularly like gusts of hot air, either. What they do like is a stable climate, with stable levels of humidity and light. So if your Rubber Tree is dropping leaves, the first step is to assess its location and make sure it is not situated near any appliance that causes drafts or fluctuations in temperature: ACs, vents, heaters and frequently opened and closed doors can all cause temperature shifts that may affect your Rubber Tree’s foliage.

Note that if you need to move your Rubber Tree, it will need to be situated in a spot that will fulfill its needs for light. Spots with bright, indirect light are best. If you suspect your plant is dry, you can mist it up to three times weekly-- but be sure that it is not close to an appliance that emits gusts of cold air before doing so.

Plant Doctor Support

In the event that you follow the steps above and your Rubber Tree’s condition does not improve, or if you’re simply having a hard time determining the cause of your plant’s particular issues, you can always reach out to our Plant Doctor service. Simply log into your Leon and George account, then select the option “Contact Plant Doctor”. Include photos of the Rubber Tree as a whole, and close-ups of any stressed area, drooping or fallen leaves. The Plant Doctor team will respond to you with their assessment and advice within 2-3 business days.


Rubber Tree

The Rubber Tree, or Ficus Elastica, is renowned for its glossy, emerald and burgundy foliage. This lush, high-shine Ficus is a low-maintenance floor plant that lends intrigue and deeply nuanced color to any space. Low-light adaptable, the Rubber Tree requires watering only sparingly.

What's with the Brown Edges on My Rubber Tree?

Why Are The Edges of My Rubber Tree's Leaves Browning?

Rubber Trees are a standout indoor statement plant because they have gorgeous foliage. Glossy, richly colored and burgundy-tinged, the super-shiny leaves of the Rubber Tree (or Ficus Elastica as it’s also known) are its crowning glory, and make it the perfect plant to elevate spaces with minimalist aesthetics. As far as plant care goes, this variety of ficus is very easy to care for. But like any plant, it can exhibit signs of stress in the form of less-than-perfect foliage if its needs are not being met. Read on to learn why your Rubber Tree’s leaves may be experiencing browning and the edges, and what you can do to correct it.

Overwatering

It may sound counterintuitive, but Rubber Trees can exhibit browning foliage as a result of overwatering. We know that this may sound strange, given that these plants appreciate humidity and originate in the Amazon— but your indoor space differs considerably from their natural habitat. When grown indoors, within the confines of a pot, Rubber Trees simply don’t require (or desire!) copious water. You should water your plant only when its topsoil is dry to the touch-- and note that that may mean as seldom as once every three weeks or so. If you probe the soil and find that it is soggy or drenched, allow the soil to dry out entirely before watering again.

Next Steps for Light and Water

Your Rubber Tree utilizes the water it receives in accordance to its environment. The humidity and dryness of the air, as well as the amount of light it receives, have a direct effect on its water consumption, so be mindful that less bright light = water is used up more slowly by the Rubber Tree. This does not necessarily mean you need to move your plant- just that you may need to cut down on your watering. Prepare your plant for a new era of success by trimming off any significantly browning foliage by cutting the leaves off with clean, sharp scissors or shears. You an also manicure the brown areas off of otherwise healthy leaves, by trimming the brown parts off in the direction of the leaf’s growth. Once trimmed, allow your Rubber Tree to dry thoroughly before resuming your watering routine, and measure its moisture before watering by pushing a bit of the preserved reindeer moss out of the way and sticking your finger two inches down into the plant’s soil. If it is dry to the touch, you may water. Plan on using this method of manually gauging its moisture regularly.

Call The Plant Doctor

If you follow all of the instructions above, but your Rubber Tree continues to exhibit a high percentage of troubling brown foliage, reach out to our Plant Doctor team for an assessment and guidance. You can do so by logging into your Leon and George account, selecting the option to “Contact Plant Doctor”, and attaching photos of your Rubber Tree as a whole, as well as close-ups of its leaves’ brown edges. The Plant Doctor support team will respond with their thoughts and instructions for care within 2-3 business days.


Rubber Tree

Lush, glossy emerald and burgundy foliage is the crowning glory of the Rubber Tree, a stunning and low-maintenance statement plant for any space. Adaptable to low light, the Rubber Tree requires watering only sparingly.