Posts in Plant Care
Does Daylight Saving Time Affect Your Houseplants?
daylight saving time houseplants

It’s that time of year again: the sun’s rays have slowly been diminishing (we’ve lost about five hours of daylight since the summer solstice in June!), and as we “fall back” for Daylight Saving Time, our days will feel even shorter than before. Along with the loss of daylight, the sun’s highest point is also lowering, meaning sunlight is softer and less intense than it was a few months ago.

All these changes affect not only us but also our leafy friends. While our plants might not find the clock shift as disruptive (or debatable) as we do, they definitely note the change of light.

Here are a few things to look out for and keep in mind as you nurture living plants in your home:

  • Leaf drop might occur. And there’s nothing to worry about! Your plant is just adjusting to less light and possibly beginning to save energy til spring. If the leaf drop feels excessive or persists over several weeks, there might be something else going on.

  • You’ll need to water less. As plants get less light, they get less thirsty. Adjust your watering routine as needed.

  • You might need to move things around. Some plants will benefit from a sunnier spot during the winter, or at least getting some extra light here and there a few days a week.

  • Your plant will most likely grow more slowly. It may even stop growing for a while.

  • You can reduce fertilizing. Most fertilizers are too strong to use in the winter, but if you’d like to give your plants a little something extra, you can fertilize once a month with Boost Vitaminé, a very gentle liquid plant food, or foliar feed a few times a week with Potion Magique plant mist, or both!


DESIGNED TO THRIVE

Premium plants paired with stylish ceramics, plus lifetime plant care support. Order online at leonandgeorge.com

What You Need To Know Before You Buy A Pilea

Could the Pilea Peperomiodes be right for you?

Pilea peperomioides, often shortened to simply “Pilea”, are popular houseplants due to their beauty, ease of care and propagation, and the belief that they bring good fortune into a home or family. 

The Pilea is known by many names, such as “pancake plant,” “UFO plant,” and “friendship plant,” for its appearance and ease of propagation (pass it on to friends!), but perhaps its most common nickname is the “Chinese Money Plant.” Native to the Yunnan and Sichuan provinces in Southern China, Pilea wasn’t a well-known cultivar in the West until the last few decades, when it exploded in popularity. 

the Pilea makes a great gift

Over the years, the Chinese Money Plant has come to symbolize good luck and fortune, making it a well-loved housewarming gift. In fact, even The New York Times believes it to be the perfect housewarming gift to mark this special milestone in your recipient’s life! Anyone can care for and enjoy a thriving Pilea plant, so it’s a lovely gift option for plant-lovers of all skill levels and any aesthetic, from elegant neutrals to funky bohemian spaces. 

THE FRIENDSHIP PLANT

In addition to its reputation of bringing luck and prosperity to its owner, these gorgeous plants represent friendship. The Pilea plant was first introduced into the West by Norwegian missionary Agnar Espegren (hence its additional nickname, “missionary plant”), who brought cuttings of Pilea to Scandinavia in the 1940s. Thanks to how easy it is to propagate, cuttings circulated throughout communities as gardeners gifted cuttings to one another. Today, we’re lucky to have Pilea readily available online and in local plant stores, but there’s still something special about gifting someone a baby Pilea plant grown from a specimen of your own!

Pileas Do Best WITH INDIRECT LIGHT

Pilea plants can grow in a variety of lighting conditions, but do best in bright, indirect light with brief periods of light shade. Too much sun can scorch the coin-shaped foliage, while dark corners can stunt the plant’s growth. 

Pro tip: Pilea plants tend to grow in the direction of the sun, so be sure to rotate larger plants periodically to make sure it’s growing nice and evenly. 

Where to place your Pilea

These hardy plants can handle most temperatures in the home -- cooler conditions can even encourage blooms, but it’s best not to put it in conditions that reach below 50 degrees Fahrenheit. Put your new Pilea a few feet away from an East- or West-facing window, if you’re in the Northern Hemisphere. Avoid extremely bright windows to avoid sunburn, or put up a sheer curtain to help filter the light. You may want to follow Feng Shui guidelines to determine where to place your plant, too, which may require supplementary grow lights. 

water only when dry

Water your Chinese Money Plant when the top few inches of the soil are dry, with care not to overwater it. These plants are also a great candidate for bottom-watering -- placing the full plant pot in a shallow tub of water for several minutes and allowing it to absorb moisture through its root system. 

As with the rest of the plants in your collection, Pilea do not like having “wet feet,” so ensure your plant is in well-draining soil and in a receptacle with adequate drainage holes. 

fertilizing your pilea

These easy-going plants don’t require significant attention or fertilizing. If you choose to fertilize your Pilea, select a high-quality, natural fertilizer and use it sparingly, only during the growing season of spring and summer. 

PILEAS CAN SOMETIMES BE TRICKY

Adorable and quirky, the Pilea is known to bring good luck and fortune to its home.

The most common challenges people experience with Pilea peperomioides care are related to watering or too much sunlight. 

Browning stems, yellowing leaves, or loose petioles (the part of the stem that reaches the leaf), are likely due to overwatering or root rot. Make sure your plant is draining excess water whenever you water it, and if it seems like it is beginning to experience root rot, repot it in fresh, chunky soil and wait longer in between waterings. 

Pilea plants aren’t pest magnets, but if insects start to make a home in your plant, it requires swift attention. Apply a natural insecticide, castile soap, or diluted horticultural oil to treat the issue and prevent future infestations. 

Propagating This Plant is easy

The Pilea peperomioides plant practically propagates itself -- the process is incredibly simple, which is why it’s become a go-to green gift over the years. 

These plants produce small offshoots off the base of the plant’s main stalk. To propagate your plant for a gift or for yourself, carefully cut off these “babies” once they’re a few inches tall, and place either directly in soil or in a shallow cup of water to root. Check out step-by-step instructions here -- happy Pilea gifting!

How to select a healthy Pilea

A healthy Pilea has vibrant, glossy, emerald green leaves that won’t wilt or droop. Petioles should be firm and not detach from the stalk when you give it a gentle tug. Extra-healthy plants might already have small baby offshoots and will be ready to propagate.

Pileas are non-toxic and safe for pets

These gorgeous plants are extra lucky because they are non-toxic, making them a good housewarming gift even for homes filled with pets and children. 

Avoid purchasing your Pilea from a garden center 

You should always purchase your plants from a trusted supplier to ensure you’re purchasing and gifting the highest-quality plants. Plants from garden centers often experience root rot due to being overwatered and watered in batches. To make sure you’re getting a healthy Pilea peperomioides plant, order one from a quality retailer or seller, or get a cutting from a friend! 

Try your Pilea in a terrarium!

Pilea peperomioides are excellent candidates for terrarium planting. They like humidity (they are native to the base of the Himalayas, after all), and make for a lovely accent to an enclosed foliage arrangement. 

Discover the PILEA

A giftable beauty representing friendship and fortune

What You Need To Know Before You Buy A Ponytail Palm

Could the Ponytail Palm be right for you?

The Ponytail Palm is a unique plant that requires little attention. Despite its ease of care, Ponytail Palms bring a dramatic and lush presence to any style space. Here’s what you need to know before you buy one.

What is a Ponytail Palm?

Beaucarnea recurvata, known as the Ponytail Palm or the Elephant Foot Palm, is a well-loved houseplant for its ability to thrive in a variety of environments. Part of the Asparagaceae family, these plants are closely related to agave, yucca, and other common houseplants like Dracaenas. Despite its nicknames, these plants are surprisingly not true palms. These evergreen perennials are native to Mexico, but have become popular houseplants all over the world for their ability to bring a tropical, bohemian vibe into any space

They need lots of light

Ponytail Palms, while easygoing plants, love as much light as possible. These gorgeous plants are good candidates for the bright, sunnier parts of your space. However, they are prone to sunburn, so ensure that the light is indirect so as not to scorch the plant’s leaves. 

Where to place your Ponytail Palm

In addition to being placed in an indirectly bright area -- morning light from an east or southern-facing window in the Northern Hemisphere -- Ponytail Palms should be kept away from cold drafts, air conditioning units, and cold windows, especially in the summer. 

The Ponytail Palm’s unique shape helps add a burst of fresh color into bright corners or other areas of a home or office. They can survive in partial sun, but are unlikely to grow as quickly as they would in optimal conditions mirroring their native habitat. 

ponytail palm care

How to water the Ponytail Palm

The number one rule of Ponytail Palm care is to be cognizant of overwatering! While they are colloquially known as Ponytail Palm trees, they are not trees at all -- they’re succulents and should be treated similar to any other succulent or agave-type plant

Though incredibly easy to care for, they are sensitive to moisture and prone to root and stem rot, so ensure your plant is in a well-draining, chunky soil mix in a pot with a drainage hole to avoid water buildup. Léon & George Ponytail Palms are “staged” in their ceramic pots for maximum drainage and airflow. In terms of a watering schedule, it’s better to err on the side of dryness with these unique ornamentals -- known to thrive on neglect, these make for excellent home decor for people who travel a lot or simply forget to water their plants. 

Ponytail Palms don’t need to be fertilized

Ponytail Palms don’t require a lot of attention, therefore fertilizing isn’t necessary -- this is one of the many reasons why Ponytail Palm care is so straightforward. If you choose to fertilize your plant, opt for a natural, organic fertilizer for succulents and use it during the spring/summer growing season. 

Common problems with Ponytail Palms

The most common problems people have with their Ponytail Palm trees are due to overwatering. Often, people report their plant experiencing brown tips, which is more often than not an issue with overwatering. Their native area of Mexico is dry and hot -- not humid like most people think of when they think of palm-looking plants. 

To mitigate brown tips on your Ponytail Palm, reduce watering to a steady schedule of every 2-3 weeks once you notice them occurring. If the discoloration is only occurring at the tips, you’re able to prune the leaves with a sharp, sterilized pair of clippers to maintain the lush green aesthetic. 

Is the Ponytail Palm a good air purifier?

Yes! Ponytail Palms have been identified as among the best indoor air-purifying plants. Along with their cousins the Dracaena and the Snake Plant, these beauties help freshen and purify the environment in your home. 

How to select a healthy Ponytail Palm

Adorable and quirky, the Ponytail Palm makes for the ideal accent to any decor.

When selecting your Ponytail Palm tree, pay close attention to the leaves, ensuring they are lush, firm, and healthy-looking (be careful as you inspect, as the leaves have serrated edges!). Though it's normal for the plant to drop leaves over time as it grows, a Ponytail Palm tree whose leaves come off with a light yank is likely suffering from overwatering or another issue. Carefully inspect the soil as well for pests, weeds, or musky smells. 

They’re safe for pets

Ponytail Palms are an excellent choice for homes with pets, as they are nontoxic to cats and dogs. If your cat loves to nibble on your plants, the Ponytail Palm is a safe option to keep in their reach.

Avoid purchasing your Ponytail Palm from a garden center

Because plants at garden centers are watered en masse, they spend a lot of time saturated -- and often aren’t in chunky enough soil to weather the amount of moisture they are given. In fact, it’s common for them to experience root rot before even leaving the store. While they may have an appealing price tag, it’s not worth the issues of overwatering, from creating an attractive environment for pests to root rot. 

They can propagate themselves!

Ponytail Palms aren’t easy to propagate on their own, but they will sometimes produce offshoot babies from the base of the stump. Once they reach a few inches, they can be carefully cut off as close to the base as possible, scabbed over at the cut part, and planted in a well-draining succulent soil mix.

Discover the Ponytail Palm

An easygoing addition to any style or space.

5 Simple Fall Plant Care Tips

The Bird's Nest Fern basking in fall light.

Though houseplants generally live indoors, they, too, note the changing of the seasons. Fall typically means less light, colder temperatures and drier air. Read up on some simple fall plant care tips and set your indoor greenery up for success.

Adjust your watering schedule (hint: water less frequently!)

Less light and cooler temperatures mean that your plant may not need as much water as it did during the summer. Make sure to always check the soil before watering and, if necessary, give your indoor plant a few extra days in between waterings to dry out.

Excess moisture in your plant's soil is dangerous for a handful of reasons (most notably root rot), but maybe none more annoying than insects, specifically flying insects like gnats and mosquitos. While typically harmless, always make sure to treat any infestations as quickly as possible to prevent serious damage.

Make sure your plant is getting enough light

As the days get shorter and shorter, make sure your plant is getting enough light: plants that sometimes do well in one area of your home may not be as happy as they were before.

Signs that your plant is not getting enough light may include pale or yellowing leaves, leggy branches, or leaning towards the light. If you suspect your plant needs more light here are some things you can do:

  • The best way to make sure your plant is getting enough light is to move them closer to a window, preferably one that is south or east-facing if you’re in the Northern Hemisphere.

  • If your house has limited natural lighting you might want to consider using an artificial light source to meet your plant’s needs.

  • Clean its leaves of any dust or grease to make sure they can absorb as much light as possible.

  • Rotate your plant every few weeks to ensure the entire plant gets enough sunlight.

Scale back your fertilizing routine

The best time to fertilize your plant is when it’s actively growing in the spring and summer. As the winter approaches, they become less interested in new growth, which means they're less hungry and less thirsty. Here are simple feeding adjustments to make:

  • Feeding - shift to fertilizing once a month. Our natural plant food, Boost Vitaminé is an organic plant food with just four ingredients, gentle enough to use year round. 

  • Exceptions for new growth - if your plant decides they're up to the task and it sends out new growth, they can have a snack afterward. Never fed? If you've never fertilized your plant and you’ve had it for more than 4 months, give it a nutrient boost. We suggest starting with diluted liquid fertilizer and observing how your plant responds. 

Remember every plant species has different wants and needs, so read up on your plant friends and monitor their changes closely to see what works best.

Watch the temperature

We might love getting cozy in the fall but our houseplants are sensitive to temperature changes. Too cold and they’ll get a kind of frostbite, run the heat too much and you risk drying out their soil.

Indoor plants generally come from tropical regions so they prefer temperatures between 65 and 75 degrees F. Make sure the leaves of plants aren’t touching a windowpane that gets too cold or sitting in front of a vent where they’ll get lasted with air. To mitigate dryness, mist your plant throughout the week, or use a humidifier.

Prune yellow leaves

While it is natural for the leaves of outdoor plants to turn yellow and drop their leaves in the fall, indoor houseplants should be able to stay green all year with the right care. Your plant’s leaves might turn yellow for any of the reasons mentioned above, so carefully monitor the conditions in which you are keeping it. It’s okay to remove dead leaves in the fall but save any major pruning for the growing season!

Good luck, plant parent! And head back to our blog for more simple plant care tips for your indoor greenery.


IMG_0689.jpg

INDOOR PLANTS, potted & DELIVERED

Premium plants paired with stylish ceramics, plus lifetime plant care support. Order online at leonandgeorge.com

What You Need To Know Before You Buy A Ficus Audrey

Could the Ficus Audrey be right for you?

The Ficus Audrey has been growing in popularity– it may even be the next Fiddle Leaf Fig! And with its abundant rounded foliage and easy-going nature, it’s no surprise why. Here’s everything to know about this ficus before bringing one into your home or office.

Ficus Trees 101

The Ficus genus comprises 850 plants in the Moraceae family, often colloquially referred to as the mulberry or fig family. Among this family of gorgeous, woody trees, shrubs, vines, and more are commonly loved houseplants such as the Fiddle Leaf Fig Tree (Ficus lyrata), Rubber Tree (Ficus elastica), and the Ficus Audrey (Ficus benghalensis).

These popular plants are a favorite among plant collectors and designers alike for their ability to bring elegant foliage into any indoor or outdoor space. The Fiddle Leaf Fig Tree in particular has emerged in the last decade as a reliably chic go-to in living rooms and offices everywhere, but not without gaining a reputation as a diva. The Ficus Audrey tree is currently exploding in popularity, too -- but this plant is even better-suited for novice plant parents for its more forgiving nature and simpler care requirements compared with other ficus varieties.

In cultivation, many ficus grow up to 10 or 12 feet, but reach towering heights in their native areas across Asia and in the wild. The Ficus Audrey boasts velvety, emerald-colored leaves, with striking lime green veining, creating an attractive and jungle-like canopy or striking accent piece to brighten any corner. 

ficus audrey

It’s Easier to care for Than The Fiddle Leaf Fig Tree

Ficus Audreys have less finicky light requirements than their fiddle leaf fig cousins -- it can handle minimal direct sun or slight inconsistencies in lighting. Similar to the rubber tree and other ficus such as the genus’ bonsai-like varieties, the Ficus Audrey prefers bright, indirect light.

They’re the same as the Banyan Tree!

The Ficus Audrey, or Ficus benghalensis, is the same species as the banyan tree, the massive trees that create “accessory trunks” with their robust aerial root system. Banyan trees are the world’s largest tree in terms of area coverage. They are also the national tree of India -- it’s not often that you can have a tree with such status growing in your home! 

Where to place the Ficus Audrey

Ficus Audrey plants do well with filtered light, and are susceptible to burning if placed in too bright of an area. In most zones of the northern hemisphere, the ideal spot for an indoor Ficus Audrey tree is a few feet from an eastern-facing window. A southern or western-facing space would also work if placed further from the light source.

Most ficus plants are not low-light tolerant. If you’re hoping to utilize the Ficus Audrey or its close cousins as a way to brighten up a dark corner, use an alternative light source, such as a grow light, to keep the plant healthy. Remember, these are tropical plants and need light, warmth, and humidity.

You’ll Need to water it regularly

Ficus Audrey care differs from that of other ficus trees in that they can tolerate being kept a bit more moist between waterings. Unlike Fiddle Leaf Figs which must be entirely dry before watering, the Ficus Audrey’s ideal scenario is being kept evenly moist with short periods of dryness. However, if that dry period is too long, the plant is bound to drop leaves and experience stunted growth.

They love humidity

To keep your Ficus Audrey thriving, provide the plant with some additional humidity with a humidifier, pebble tray, or by grouping the plant with others. Its native habitats are humid, and allowing the plant some moisture in the air helps to avoid browning or crisping leaves. 

Fertilizing will help spur new growth

These plants are easygoing in regards to fertilizing, but if you choose to incorporate this additional step into your Ficus Audrey care routine, opt for a natural or organic fertilizer and use it during the growing months. 

As always, make sure your plant is in fresh, high-quality, and well-draining soil that contains adequate nutrients. Good substrate additives include coco coir and orchid bark to help aerate the soil to bring the roots oxygen and provide plenty of nutrients.

The adorable Ficus Audrey.

They can sometimes lose leaves

The most common problem people experience with Ficus Audrey is leaf loss or crisping. While these plants can lose leaves for multiple reasons (underwatering, overwatering, or lighting issues), crisp or brown edges can usually be solved with an increase in humidity. 

Ficus Audrey plants are also susceptible to pests such as scale, mealybugs, thrips, and fungus gnats. You’re more likely to experience a pest issue if you’re overwatering the plant, but ficus plants are prone to pest issues across the board. If you spot a pest on another plant in your home, make sure you quarantine it away from your Ficus Audrey and treat your collection proactively with horticultural oil or by removing the infestation by hand. 

How is the Ficus Audrey different from other Ficuses?

In terms of care, the Ficus Audrey is less forgiving than the Rubber Plant, but significantly easier than caring for a Fiddle Leaf Fig -- it’s not as prone to disease or quite as finicky. Many experienced plant parents think of the Ficus Audrey as a happy medium between these plants in  terms of difficulty, but each of these gorgeous ficus varieties are uniquely rewarding in their own way. 

It also offers a different look from common ficus plants. It can be pruned to create a tree-like shape that branches out on top, or can be trained to grow up a single pole, depending on the style of your space. The foliage on Ficus Audrey also stands out from others in the genus. Its leaves are less glossy than those of other ficus varieties, with a more velvet-soft sheen texture. 

How to select a healthy Ficus Audrey

Signs of a healthy Ficus Audrey include plump, large, and vibrate green foliage, strong and thick light-colored trunks and branches, and a healthy-looking root ball free of rot or pests. Because of their tropical nature, Ficus Audrey trees grow aerial roots, which can also indicate a growing, healthy plant.

Are Ficus Audreys toxic for pets or humans?

Ficus Audrey are mildly toxic to pets and humans, so it’s best to keep your plant out of the reach of pets and children. If you’re looking for a pet-friendly, treelike plant to bring into your home, consider a nontoxic option like the Braided Money Tree (Pachira aquatica).

Avoid purchasing your Ficus Audrey from a garden center

Plants at big-box stores tend to be overwatered, and Ficus Audrey are especially susceptible to root rot and pests: two perils of overwatering. Unfortunately, some plants at garden centers experience the beginnings of root rot before leaving the store, and it can be difficult to tell before purchasing. 

Because Ficus Audrey are sensitive to transport as well, it’s prudent to purchase your new plant from a trusted supplier that offers secure packaging and careful delivery. These plants dislike sudden drops in temperature, drafts, and the cold in general, so it’s best to purchase from a grower or supplier that understands how to minimize the impact of the change in environment on your new plant. 

Discover the Ficus Audrey

A gorgeous, easy care member of the Ficus family

What You Need To Know Before You Buy A Staghorn Fern

Looking to bring a Staghorn Fern into your life? With sage green, velvet like fronds, these gorgeously unique plants are popular for good reason. Easy to care for but with a few quirks, read up on what makes the Staghorn Fern so special, and how to select a perfect fern for your home.

What is a Staghorn Fern?

Staghorn Ferns, or Platycerium bifurcatum, refers to a commonly cultivated group of ferns in the genus Platycerium. Staghorn Ferns are epiphytes, which means that in the wild, they grow on other plants and objects for support, such as on tree trunks or branches. Other examples of common epiphytic indoor plants are hoyas and bromeliads. Uniquely, the Staghorn Fern doesn’t even require soil to grow at all -- in fact, it requires stable support to reach its mature stage, and absorbs most of its nutrients from the air rather than its soil.

Staghorn Ferns can thrive indoors or outdoors, and are particularly well-suited to grow outdoors in humid, warmer climates. But that doesn’t mean you can’t enjoy one of these beauties in your home! Their jagged fronds (fern leaves) make for stunning statement pieces in a variety of interior and outdoor spaces, especially when mounted.

Many plant collectors choose to mount their Staghorn Ferns, which creates a beautiful display reminiscent of moose or deer antlers in the home. This is how they got their common name, and are also often referred to as “Elkhorn Ferns.” In ideal conditions, these gorgeous horticultural oddities can grow up to several feet tall and wide and create a massive, unique focal point in any room or patio. These showpiece houseplants are truly a work of art, especially if it is on your wall!

Staghorn Ferns Need More Light than Most Ferns

Many people think of ferns as a low-light houseplant, but remember that Staghorn Ferns uniquely require more sunlight than most ferns. Put your plant near a good light source, such as an east-facing window or near a skylight.

Another excellent placement option for the Staghorn Fern is the bathroom! When placed in a well-lit bathroom in an indirect sunny spot and periodic humidity from the shower, you may find that your Staghorn Fern grows surprisingly quickly.

They love a humid environment

staghorn fern care

Staghorn Ferns grow natively in tropical parts of Australia and other parts of Oceania, thriving in these warm, humid environments.

Unlike many other common houseplants, these plants absorb moisture and nutrients through its fronds. Both its basal fronds and front, more prominent fronds, sometimes referred to as “antler fronds” because of the resemblance to deer and elk antlers, are able to absorb water and nutrients. This makes them an ideal candidate for periodic misting between waterings.

To keep your Staghorn Fern thriving, ensure you’re accounting for misting in your watering schedule and avoid overwatering your plant!

Indoors, Staghorn Ferns Need Fertilizer

Staghorn Ferns are hearty plants whose older, browning leaves serve as mulch-like nutrient preservers as they break down on the plant. In their tropical environments, they are able to absorb nutrients from the moist rainforest air to help them thrive, but this is not possible in the home. For that reason, a natural fertilizer is a prudent choice to keep your Staghorn Fern healthy and happy.

Like with most houseplants, use fertilizer conservatively and only during the plant’s growing season. Staghorn Ferns enjoy monthly or bimonthly doses of diluted liquid fertilizer to prompt growth during the warm summer months. Some people report good results utilizing another ingredient you already may have in your compost pile -- banana peels! These potassium-rich resources can serve as a cheap and natural source of nutrients as they decay over time.

Understand your plant’s natural habitat

A common problem that leads some people to fail in Staghorn Fern care is underestimating the plant’s light requirements. Most ferns grow in the ground level of the forest, and it’s these darker, moist environments that we usually think of when we buy ferns. But the Staghorn Fern prefers significantly more light than other plants in the Polypodiaceae family, so make sure you have an indirectly sunny spot for this unique fern.

While relatively unfussy plants, Staghorn Ferns can also be susceptible to common pests, such as spider mites and scale. To treat this, simply do so as you would any other houseplant, such as with neem oil or another natural pest deterrent. Avoid overwatering your plant to proactively prevent pests from turning your houseplant into their home.

You Should Eventually Mount Your Staghorn Fern

Once your Staghorn Fern is mature, it will require mounting to continue its growth. Young Staghorn Ferns can thrive wonderfully in a ceramic or terracotta pot with a chunky soil mix, but after a year or so, it will do best in an arrangement that takes its fascinating epiphytic habits into account, such as mounted on a wooden board, piece of bark, or even in a kokedama (beautiful Japanese moss balls) arrangement. You can choose how to mount a Staghorn Fern based on your own style and preferences, but it’s easy to do with supplies you may likely already have around the house.

How to mount A staghorn fern

To mount your plant, remove your plant’s root ball from its pot, removing some of the excess soil, and wrap it securely into some sheet moss or other organic substrate. Using twine, fishing line, or a combination of each, affix the plant onto your board or chosen mounting material. Some people choose to use nails and wrap the string around the nail heads, or wrap the plant directly. Either way, once your Staghorn Fern is established and settled onto its board or another source of support, its roots secure the plant in place.

Staghorn Ferns are safe for children and pets

Worried about furry friends or small humans getting into your plants? Staghorn Ferns are nontoxic, making them a great houseplant option for homes with cats, dogs, or young kids.

Staghorn Ferns Propagate Easily

Staghorn Ferns generate offshoot “babies,” which can be propagated into an organic substrate like moss or coco coir and eventually grown into a gorgeous, large Staghorn Fern.

They’re Furry!

Ever wonder what makes the foliage so special on a Staghorn Fern? The velvet-like fronds of this plant actually have a purpose! The tiny, silvery hairs help protect them from insects and pests in the wild (and probably in your home, too!).

Discover the Staghorn Fern

Staghorn Fern: an gorgeous epiphyte for a pot or wall.

What You Need To Know Before You Buy An Aglaonema
aglaonema
aglaonema care

Well-loved for their patterned leaves and many varieties, Aglaonemas (commonly referred to as “Chinese Evergreen” or “Silver Evergreen” plants) are popular houseplants. They are easy plants to care for, but there are some considerations to make before bringing one into your home.

Read up on this gorgeous, easy-care plant and see if it’s the right match for you!

What’s an aglaonema?

‘Aglaonema’ is a genus within the araceae, or arum, family. Closely related to well-known houseplants like the philodendron and monstera, aglaonemas are popular choices for homes and office spaces alike because of their vibrant foliage and ease of care.

Their diversity of color and tendency to grow steadily make collecting and caring for aglaonemas fun, and rewarding. There are many species and cultivars of aglaonemas to choose from, and most are beginner-friendly plants. These hearty plants are an excellent addition to any houseplant collection, or a great starting plant to develop your green thumb.

Aglaonemas don’t need a lot of light

One reason why aglaonemas are such popular plants for the home and office is their ability to survive in relatively low light. In their native environment, aglaonemas love the shady tropics, so keep that in mind when you’re deciding where your new aglaonema plant should live.

Aglaonemas are also prone to sunburn, so avoid direct, bright light, such as a southern-facing window exposure (in the northern hemisphere). Too much or too little light can result in decreased color vibrancy on your plant’s leaves. Aglaonemas that live indoors also benefit from light adjustment throughout the year; during the shorter winter days, you may find them to prefer a space closer to a window or light source, while in the summer months they can live closer to a room’s interior.

The optimal environment for an aglaonema plant is bright, indirect light with moderate to high humidity when possible.

How to water Aglaonemas

Aglaonemas prefer to dry out completely before watering. Depending on how much light your plant is getting, you’ll find yourself watering your plant every week or so.

It’s important to pot your aglaonema in a well-draining potting medium so it can drain easily and avoid getting soggy. For example, you can add perlite or orchid bark to make for a chunkier soil.

As always, make sure your aglaonema is in a pot with a drainage hole to avoid root rot. You can either pot up your aglaonema plant directly in a ceramic or terracotta pot with adequate drainage, or utilize a decorative pot with your plant potted in a plastic nursery pot.

Lastly, remember that aglaonemas are native to tropical and subtropical environments, so providing some additional humidity, such as with a humidity dome or by grouping plants together, can help your aglaonema thrive.

Should you fertilize your aglaonema?

These hearty plants can live for a long time with little or no fertilizing. That said, a liquid fertilizer works well during the growing season, and your plant will thrive with the extra nutrients! In good conditions, these gorgeous plants can grow several feet high, but aren’t extremely fast growers like many other popular aroids.

To help spur growth, you can also repot your aglaonema plant into a bigger pot with fresh soil when it starts to get rootbound or grow out of its current pot. Most aglaonemas living indoors can be repotted every year or so.

Because of aglaonemas’ tendency to thrive on neglect, aglaonema care is very straightforward and a great option for beginners to foray into houseplants.

Common problems with the Aglaonema variety

Aglaonema are resilient plants, but even the heartiest of plants can have problems.

Common problems with aglaonema include pests, such as scale, aphids, or mealybugs. To address pest issues, utilize your go-to pest management product, such as neem oil or castile soap.

Yellowing or dropping leaves on aglaonema plants is usually because of under or overwatering the plant. Large, brown splotches on leaves also show up if a plant is experiencing root rot or soggy soil.

Aglaonemas are resilient plants like their aroid cousins, but allow your aglaonema an adjustment period when you first bring it home. If you’re experiencing problems with a new aglaonema, such as yellow or dropped leaves, wait it out and let it acclimate, or try adjusting its lighting or watering schedule.

The many Aglaonema varieties

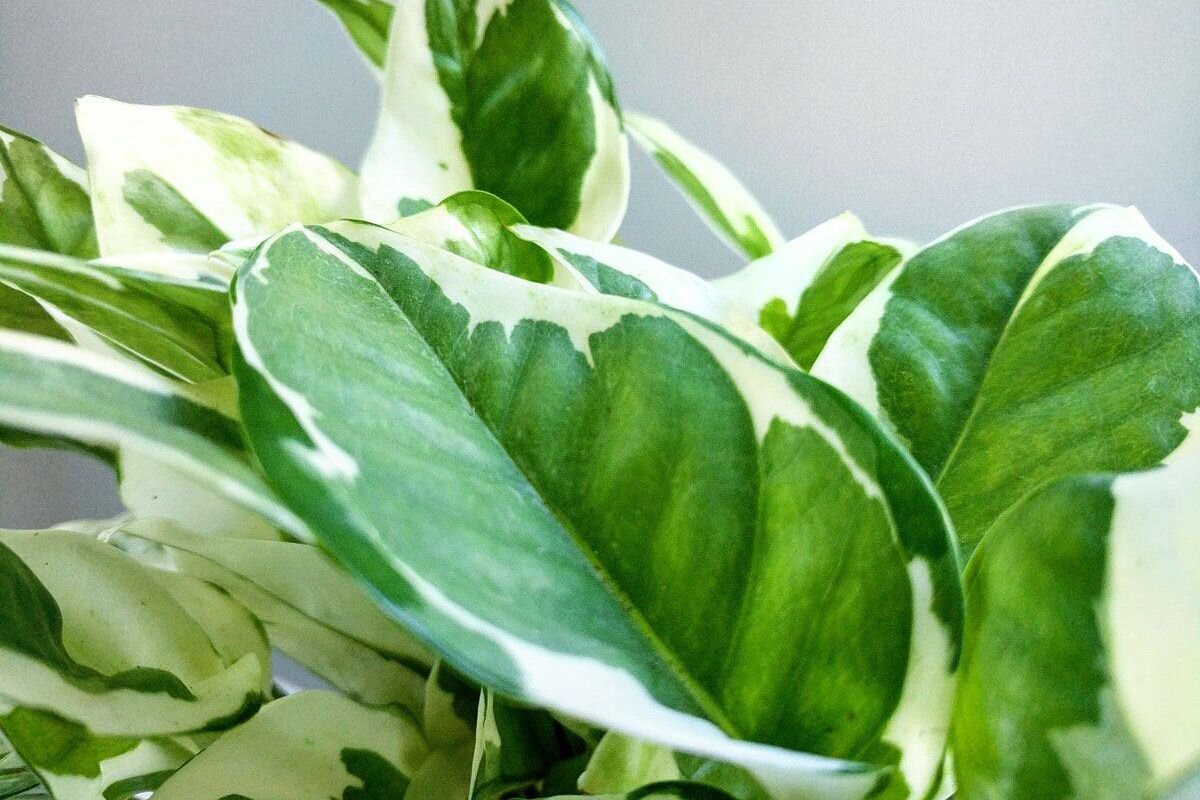
With 24 aglaonema species and hundreds of cultivars, aglaonema plants offer plenty of diversity in leaf shape, color patterns, and styles for plant lovers to choose from. Colors and patterns range from shades of bright green stripes to pink speckles to red undersides, so aglaonema plants fit beautifully into any style of home or office space.

The Aglaonema ‘Commutatum,’ or ‘Silver Bay’ Evergreen, is one of the most popular and loved varieties of aglaonema. With silvery leaves and variegated green patterns, this stunning variety is a fast grower that can bring color into any corner.

Another common example of aglaonema is the Aglaonema Creta, recognized for its attractive rose-colored veining and borders on its leaves. For people who want a low-maintenance plan that can provide a pop of color in their home, aglaonemas like the Creta are the perfect choice.

Aglaonemas Can be toxic to pets

Some species of aglaonema contain insoluble calcium oxalates, which is toxic to pets. To be safe, it’s best to keep your aglaonema plant away from pets and children. There are plenty of beautiful pet-friendly plants if you prefer to go the safest route!

They can have flowers!

Aglaonemas’ rare spathe flowers are reminiscent of a Calla lily bloom. That’s because these plants are closely related.Some Calla lilies even have spotted green leaves that look similar to the foliage of some types of aglaonema.

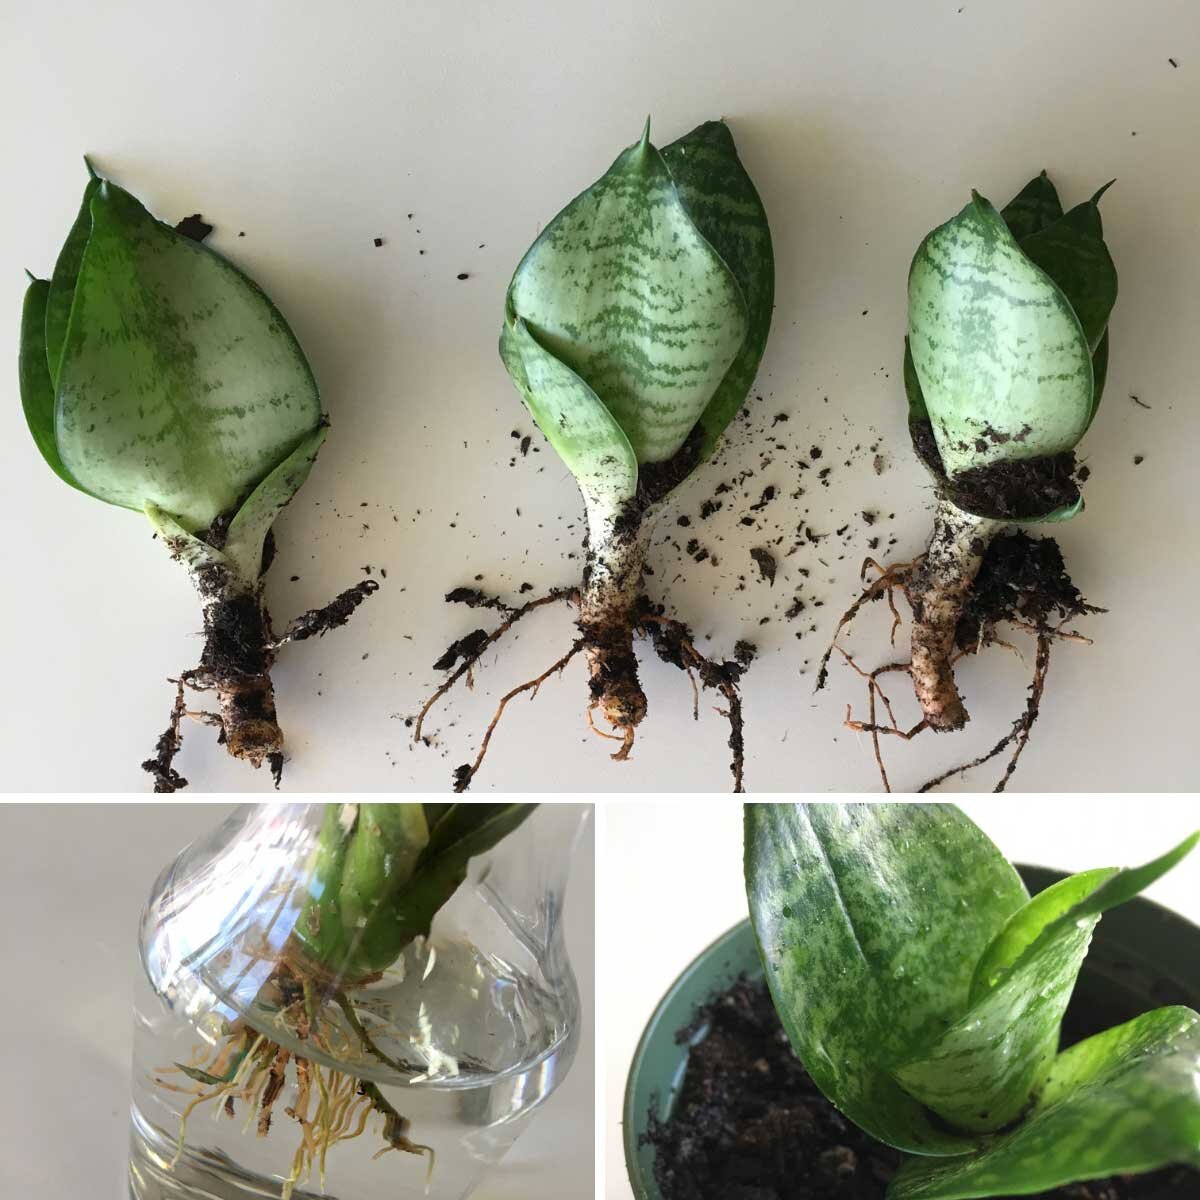
It’s easy to propagate Aglaonemas

Lastly, aglaonema are easy plants to propagate in water or even directly in soil. Much like a common pothos or monstera, roots grow from the nodes where leaves meet the stem. After a few weeks of rooting in water, your aglaonema plant cutting will be ready to be potted up to grow into a new plant. Small plants grown from aglaonema cuttings also make excellent gifts for people with and without houseplant experience.

Discover the Silver Evergreen Aglaonema

A unique, easy care plant to add an attractive lushness to any space.

Variegated Plants: Nature's Painted Beauties
The gorgeous variegated leaves of the N’Joy Pothos.

The gorgeous variegated leaves of the N’Joy Pothos.

When it comes to colorful plants, we’ve all fallen in love at one point or another, whether it be with a Pink Rubber Tree, an N’Joy Pothos, or the rare and elusive Variegated Monstera that seemingly only grows on Instagram. Variegated is indeed on trend, and these unique bicolored and tricolored beauties have become some of the most sought-after indoor plants in recent years. But what is variegation, where does it come from, and what do we need to know about variegated plants before bringing them into our home?

What is variegation?

The word variegation refers to flowers or leaves with more than one color. Though it is a term that is used rather loosely in the plant world, a variegated plant is one whose flowers or leaves usually have two or three colors, but can sometimes have more.

Variegated leaves come in many forms and may be the cause of natural occurrences or genetic alterations. Depending on the type of variegation, some plants may be more delicate than others, but all are incredibly beautiful and unique!

Pretty in pink! Seemingly painted on, these pink variegated plants add a gorgeous splash of color their surroundings. Pictured clockwise from left to right: Magenta Triostar, Pink Rubber Tree, and Calathea Medallion.

Pretty in pink! Seemingly painted on, these pink variegated leaves add a gorgeous splash of color their surroundings. Pictured clockwise from left to right: Magenta Triostar, Pink Rubber Tree, and Calathea Medallion.

Different types of variegated leaves

From “painted” leaves to patches of albino white or shimmering silver, there are many different types of variegated foliage. But what causes variegation, and how do the various types differ? Below are three of the most common types of variegation in popular houseplants:

  • Natural variegation - Sometimes also referred to as pigmented variegation, these plants are naturally patterned. The pattern of their leaves is written into their DNA, and every single leaf will grow with this pattern. Though this happens naturally, horticulturists often create cultivars, or hybrid species, to accentuate the natural patterning. Some popular indoor plants and cultivars with natural variegation include the Magenta Triostar, Silver Evergreen, Snake Plant, and Pink Rubber Tree.

  • Chimeral variegation - This type of variegation is caused by genetic mutation where some tissue of the plant is able to produce chlorophyll and other tissue is not. The result is a plant with white areas randomly mixed with green areas on leaves, like the incredibly popular yet hard to find Variegated Monstera.

  • Reflective variegation - Also known as blistered variegation, reflective variegation naturally occurs when tiny air pockets (blisters) are formed between the different layers or tissues of the plant. When light hits these areas, it is reflected, creating a type of silver shine like on the Satin Pothos.

Top plants with variegated leaves

variegated-leaves

Magenta Triostar

A member of the prayer plant family, the bright pink and green Magenta Triostar opens and closes its leaves throughout the day.

Shop now →

variegated-leaves

Golden Petra

With bright orange, yellow, and red veins, the Golden Petra is a uniquely vibrant plant that thrives with plenty of bright light.

Shop now →

calatheamedallionscandi.jpeg

Calathea Medallion

One of our top-selling gifts, the Calathea Medallion has patterned leaves of burgundy, fuchsia, and shades of green.

Shop now →

variegated-leaves

Silver Evergreen

Sage green leaves with silver undertones, this low-light dweller is one of our most popular variegated plants.

Shop now →

variegated leaves

Calathea Rattlesnake

With jagged purple and green leaves, it’s no surprise where this plant got its name, resembling the patterns on the skin of a rattlesnake.

Shop now →

How to care for variegated plants

Like all plants, each variety will require its own care regimen. That said, variegated plants tend to be on the more delicate side than their non-variegated counterparts, and generally require bright indirect light for their multi-colored leaves to thrive. Plants that are variegated as a result of genetic mutation are particularly sensitive, as they photosynthesize less due to the lack of chlorophyll on the white areas on their leaves.

In some cases, a branch or stem on a variegated plant may start to lose the white areas on the leaves, slowly turning all green. This is known as “reverting”, and is a sign that the plant is simply returning to its natural state. To avoid your plant fully reverting to green, prune stems whose leaves are turning green as soon as they appear.

Where to buy variegated plants

Certain variegated plants can be extremely hard to come by. Etsy is a great place for rare variegated plants, though generally will require some green thumb expertise as they often ship simple cuttings. If you’re in search of the Variegated Monstera, stay in touch by signing up for our newsletter or following us on Instagram — we are always trying to get our hands on them and occasionally hold giveaways when we do!

What are your favorite variegated plants? Let us know in the comments!


IMG_0689.jpg

Indoor plants, potted & delivered

Premium plants paired with stylish ceramics, plus lifetime plant care support. Order online at leonandgeorge.com

6 Tips & Tricks To Improve Your Watering Routine
watering plants

Watering an indoor potted plant seems obvious, right? You just take the water and pour it in – what more is there to know?

As it turns out— a lot! Watering plants is at once incredibly simple while also being a bit of an art. From the basics (don’t overwater!) to the tricks (ever tried bottom watering?), step up your watering routine with these simple tips and tricks.

1. Feel the soil before watering

The best way to know if a plant needs water is to check if the soil is dry. Gently stick your finger in the top part of the soil and check the humidity. If it’s still wet, it means it probably has enough water for now. If there’s some decorative moss over your soil, make sure to feel below it. Do note that generally plants in smaller pots will need to be watered more often simply because there’s not as much potting mix to keep the moisture in.

If you have a very large plant, you may consider a moisture meter to help you gauge when to water.

2. Water the soil evenly

Make sure to water all around the plant, not just in one area. The plant will develop more evenly and will be less stressed if it’s getting water through all its roots. Water around the edges of the pot since that's where the roots gather. This makes it easier for your plant to drink and get even saturation.

3. Use room temperature water

Don’t use water that is too hot or too cold. Room temperature water (about 68ºF) is optimum for nutrient absorption and doesn't give your plant the shock of being too hot or too cold. Plants like to be comfortable too!

Boost Vitaminé

All natural, highly effective plant food to use during your regular watering routine. Supports healthy roots and promotes new growth.

$24

4. Adjust your watering to the season

Your plant’s water needs will vary based of whether it is their growing season or their dormancy stage. You’ll want more in the spring and summer when your plant is growing. Plants use less energy during the fall and winter because they are resting. There’s less light and part of their natural lifecycle results in them being slightly dormant at that time of the year. As the days become shorter, even in the fall, adjust your watering routine to make sure your plant is not getting too much. But no matter the season be careful that your plant is not sitting in front of an air vent where it is getting hot or cold drafts, this can dry out its soil and cause health issues.

5. Try bottom watering

Bottom watering is a method of watering where you let the plant’s bottom half soak in water (versus pouring it over the top). This allows the plant to drink as much as it likes from its roots, and leave whatever it doesn’t want behind. Try it out! Leave your plant soaking in a few inches of water for a couple hours up until one day and notice how the water magically begins to disappear! Read more on this technique here.

6. Avoid overwatering

Last but certainly not least, and probably the most important thing to keep in mind when watering your plants: don’t overwater! Plants that have more water in the soil than they can consume will develop root rot. This happens when roots can’t get the air they need because they’re surrounded by water for an extended period of time and start to decay. Avoid this by using lighter soils (really when we say soil, we mean potting mix), as well as pots with drainage holes, and simply watering your plant in moderation. Make sure that you are letting your plant dry out a bit between waterings and occasionally lift it from its decorative container to make sure it isn’t sitting in water.

Good luck, and remember that for most indoor plants it’s best to err on the side of under watering — it’s much easier to fix a thirsty plant than one that’s been drowning!


fiddle-bush-white-stand-nude-leather-chair.jpg

Indoor plants, potted & delivered

Premium plants paired with stylish ceramics, plus lifetime plant care support. Order online at leonandgeorge.com

Growing indoor plants with artificial light
A Zanzibar Gem like the one pictured above can survive with next to no light, but some artificial light will definitely help!

A Zanzibar Gem like the one pictured above can survive with next to no light, but some artificial light will definitely help!

All plants need at least some light to survive, but does it need to be natural light? For those of us with limited sunlight in our homes, owning our favorite indoor plants can be tough. But luckily, having our favorite sun-loving plants in low light places is in fact possible, and that’s where artificial light comes into play.

Growing indoor plants with artificial light

First things first, not all artificial light is created equal. The typical lightbulbs in your home, for example, generally do not contribute much in the way of photosynthesis, especially if they aren’t on for 12+ hours a day. Low-light plants will grow just fine in areas with nothing more than overhead lights or lamps, but others will quickly deteriorate without proper grow lights.

What makes a good grow light?

So what is a proper grow light? The world of grow lights can seem technical and confusing, but it doesn’t have to be! When using artificial light for indoor plants, the goal is to simulate the light of the sun. You may see the words “full spectrum”, “cool light”, and “warm light”, and effective grow lights are simply full spectrum bulbs: bulbs that generate all useful wavelengths for plants with a mixture of cool (blue) and warm (red) light. While you can get extra specific about the exact needs of your plant, generally speaking a balanced ratio of cool and warm is just fine for indoor houseplants.

There are many different types of bulbs you can use to supplement your plant’s light intake and growth, but most would agree that LEDs are not only highly effective but also by far more efficient than their counterparts like incandescent, fluorescent, or high intensity discharge (HID) lights.

And as a tip: you don’t necessarily need an entire fixture to get the job done. The lamps in your home, if positioned correctly, will work just fine with the right bulbs.

Top grow lights for indoor plants

There are hundreds if options when it comes to great grow lights, but not all of them are attractive or take your home’s decor into account. Truth be told, grow lights up until recently were mostly manufactured for commercial purposes and not necessarily residential homes or offices.

Our favorite grow lights are ones that complement your style rather than detracting from it, such as Soltech Solutions for sleek, modern looks, or Modern Sprout for colorful and creative lights.


fiddle-bush-white-stand-nude-leather-chair.jpg

Indoor plants, potted & delivered

Premium plants paired with stylish ceramics, plus lifetime plant care support. Order online at leonandgeorge.com

3 Simple Ways To Propagate Snake Plants
Snake plant propagation

Share the bounty (and the legendary good luck!) of your Snake Plant by propagating it for friends! 

Snake Plant propagation couldn’t be easier, and there are three easy ways to approach the task. These hardy, low-maintenance houseplants love to grow, so check out the tips below and discover the world of plant propagation. It’s not nearly as intimidating as it sounds, and it allows you to give the gift of green to friends for free!

Snake Plant Propagation

1. Propagating Cut Leaves in Water

Talk about simplicity: this method is all about ease. For this method, you’ll need tissue, a vessel of hold water, and your cut Snake Plant blade.

Cut healthy leaves from your Snake Plant with clean, sharp shears or scissors and place them in a vessel with a tissue at the bottom. Add just enough water to cover that tissue, and place the container in an area that receives indirect light. 

Replace the water every few days, and you will soon be able to see that the cutting is growing a network of brand-new roots. When the roots appear hardy and strong, plant the new Snake Plant in sandy soil or peat moss, and follow our Snake Plant care instructions here.

2. Propagate Snake Plant Cuttings Directly in Soil

This method is similar to the previous, but it eliminates a step to make propagating even easier! 

After cutting your leaf with clean, sharp shears or scissors, allow it to rest in the air for a day, giving the cut edge time to develop a callous/hardened area. Then, plant the cutting in a pot of lightly moistened sandy soil or peat moss. Within a few weeks, it will have rooted all on its own. 

Keep in mind with this method you will not be able to see the roots forming, which is often part of the magic of propagation. Choose whichever method suits you best!

3. Propagating Snake Plant by Division

Snake Plants grow from rhizomes— hardy, bulbous root systems that resemble new potatoes. By removing your Snake Plant from its pot and shaking off some of its soil, you can separate individual blades of your Snake Plant while maintaining their connection to their rhizomes. It’s best practice to keep at least three rhizomes and one health blade together when you re-pot into a new container of sandy soil or peat moss. 

And that’s that! We told you it was simple, and with a resilient plant like the Snake Plant, your options for propagation are virtually endless. Share the love of indoor greenery and happy propagating! Oh, and don’t forget to share your results by tagging us @leonandgeorge on Instagram!

Looking to get your hands dirty with other plants? Check out our full post on plant propagation!


blogsnake.jpg

Snake Plant

A structural indoor succulent known for its air-purifying qualities and incredibly hardy nature.

Give Your Plants A Shower!
Photo by: Léon & George of a Peace Lily before and after shower time.

A Peace Lily before and after a shower.

Just like us, our indoor plants love a good shower. That’s right! Excess salts + fertilizer residue can build up in your plant's pots over time. This can contribute to wilting, dropping leaves, brown leaf tips, and reduced growth, so showering your houseplants once a season helps to flush out and refresh their soil.

How to properly give your plant a shower:

1. Remove your plant from its decorative pot so it has proper drainage through its nursery pot

2. Put the decorative moss aside, trim any dead, diseased, or discolored leaves

3. Shower your plant thoroughly in your sink or bathtub with room temperature water

4. Allow plants to fully drain before returning them to their pots, usually a few hours or overnight. Make sure their roots are not sitting in a pool of water.

This deep cleaning will promote future growth and leave your plants feeling refreshed. And since spring has sprung, now is the perfect time to shower your plants with care!


Indoor Plants, Potted & Delivered

Premium plants paired with stylish ceramics, plus lifetime plant care support. Order online at leonandgeorge.com