Posts in Plant Care
3 Main Differences Between The Olive Tree & The Black Olive Tree

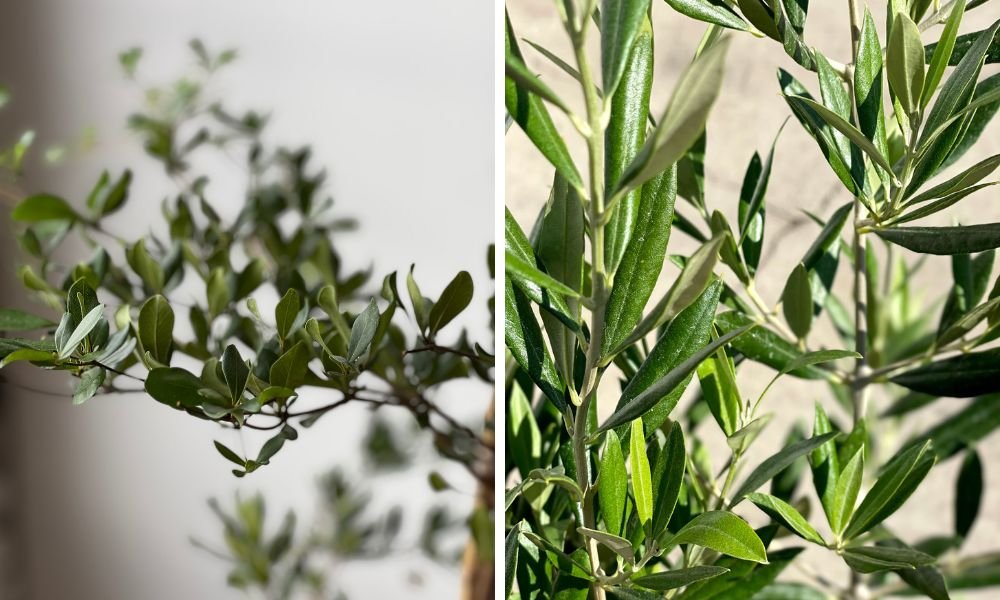
The Black Olive Tree vs. the “regular” Olive Tree — can you tell which is which?

Olive Trees and Black Olive Trees, also known as Bucida Buceras or Shady Lady, are both popular choices for landscaping and gardening. However, these two trees are not related beyond the similarity in name and look, and have some key differences that set them apart.

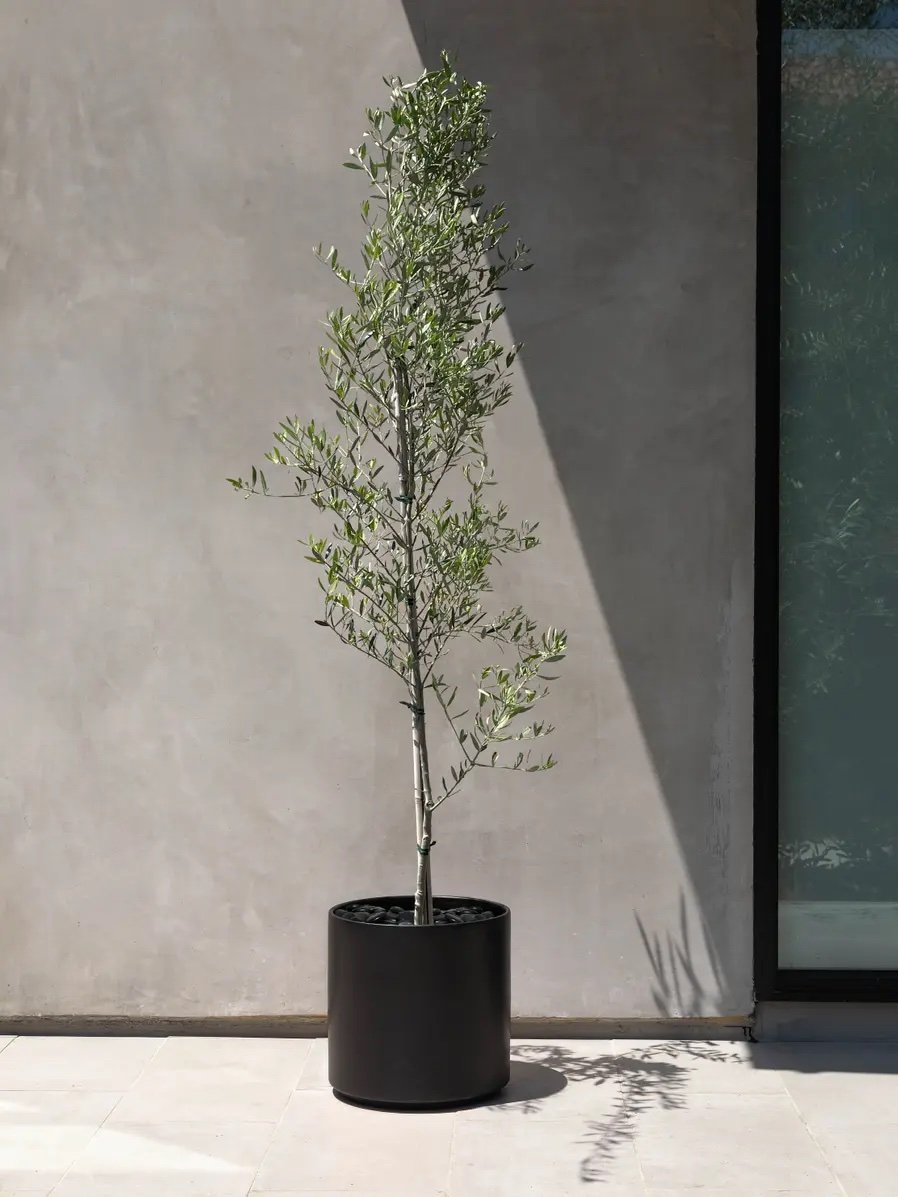
Olive trees, also known as Olea europaea, are native to the Mediterranean region and have been cultivated for thousands of years. They are known for their small, gray-green leaves and gnarled trunks, and can be cared for when placed in bright, direct light. Olive Trees can grow to be quite large, reaching up to 40 feet in height and width. They are also evergreen, meaning they keep their leaves year-round.

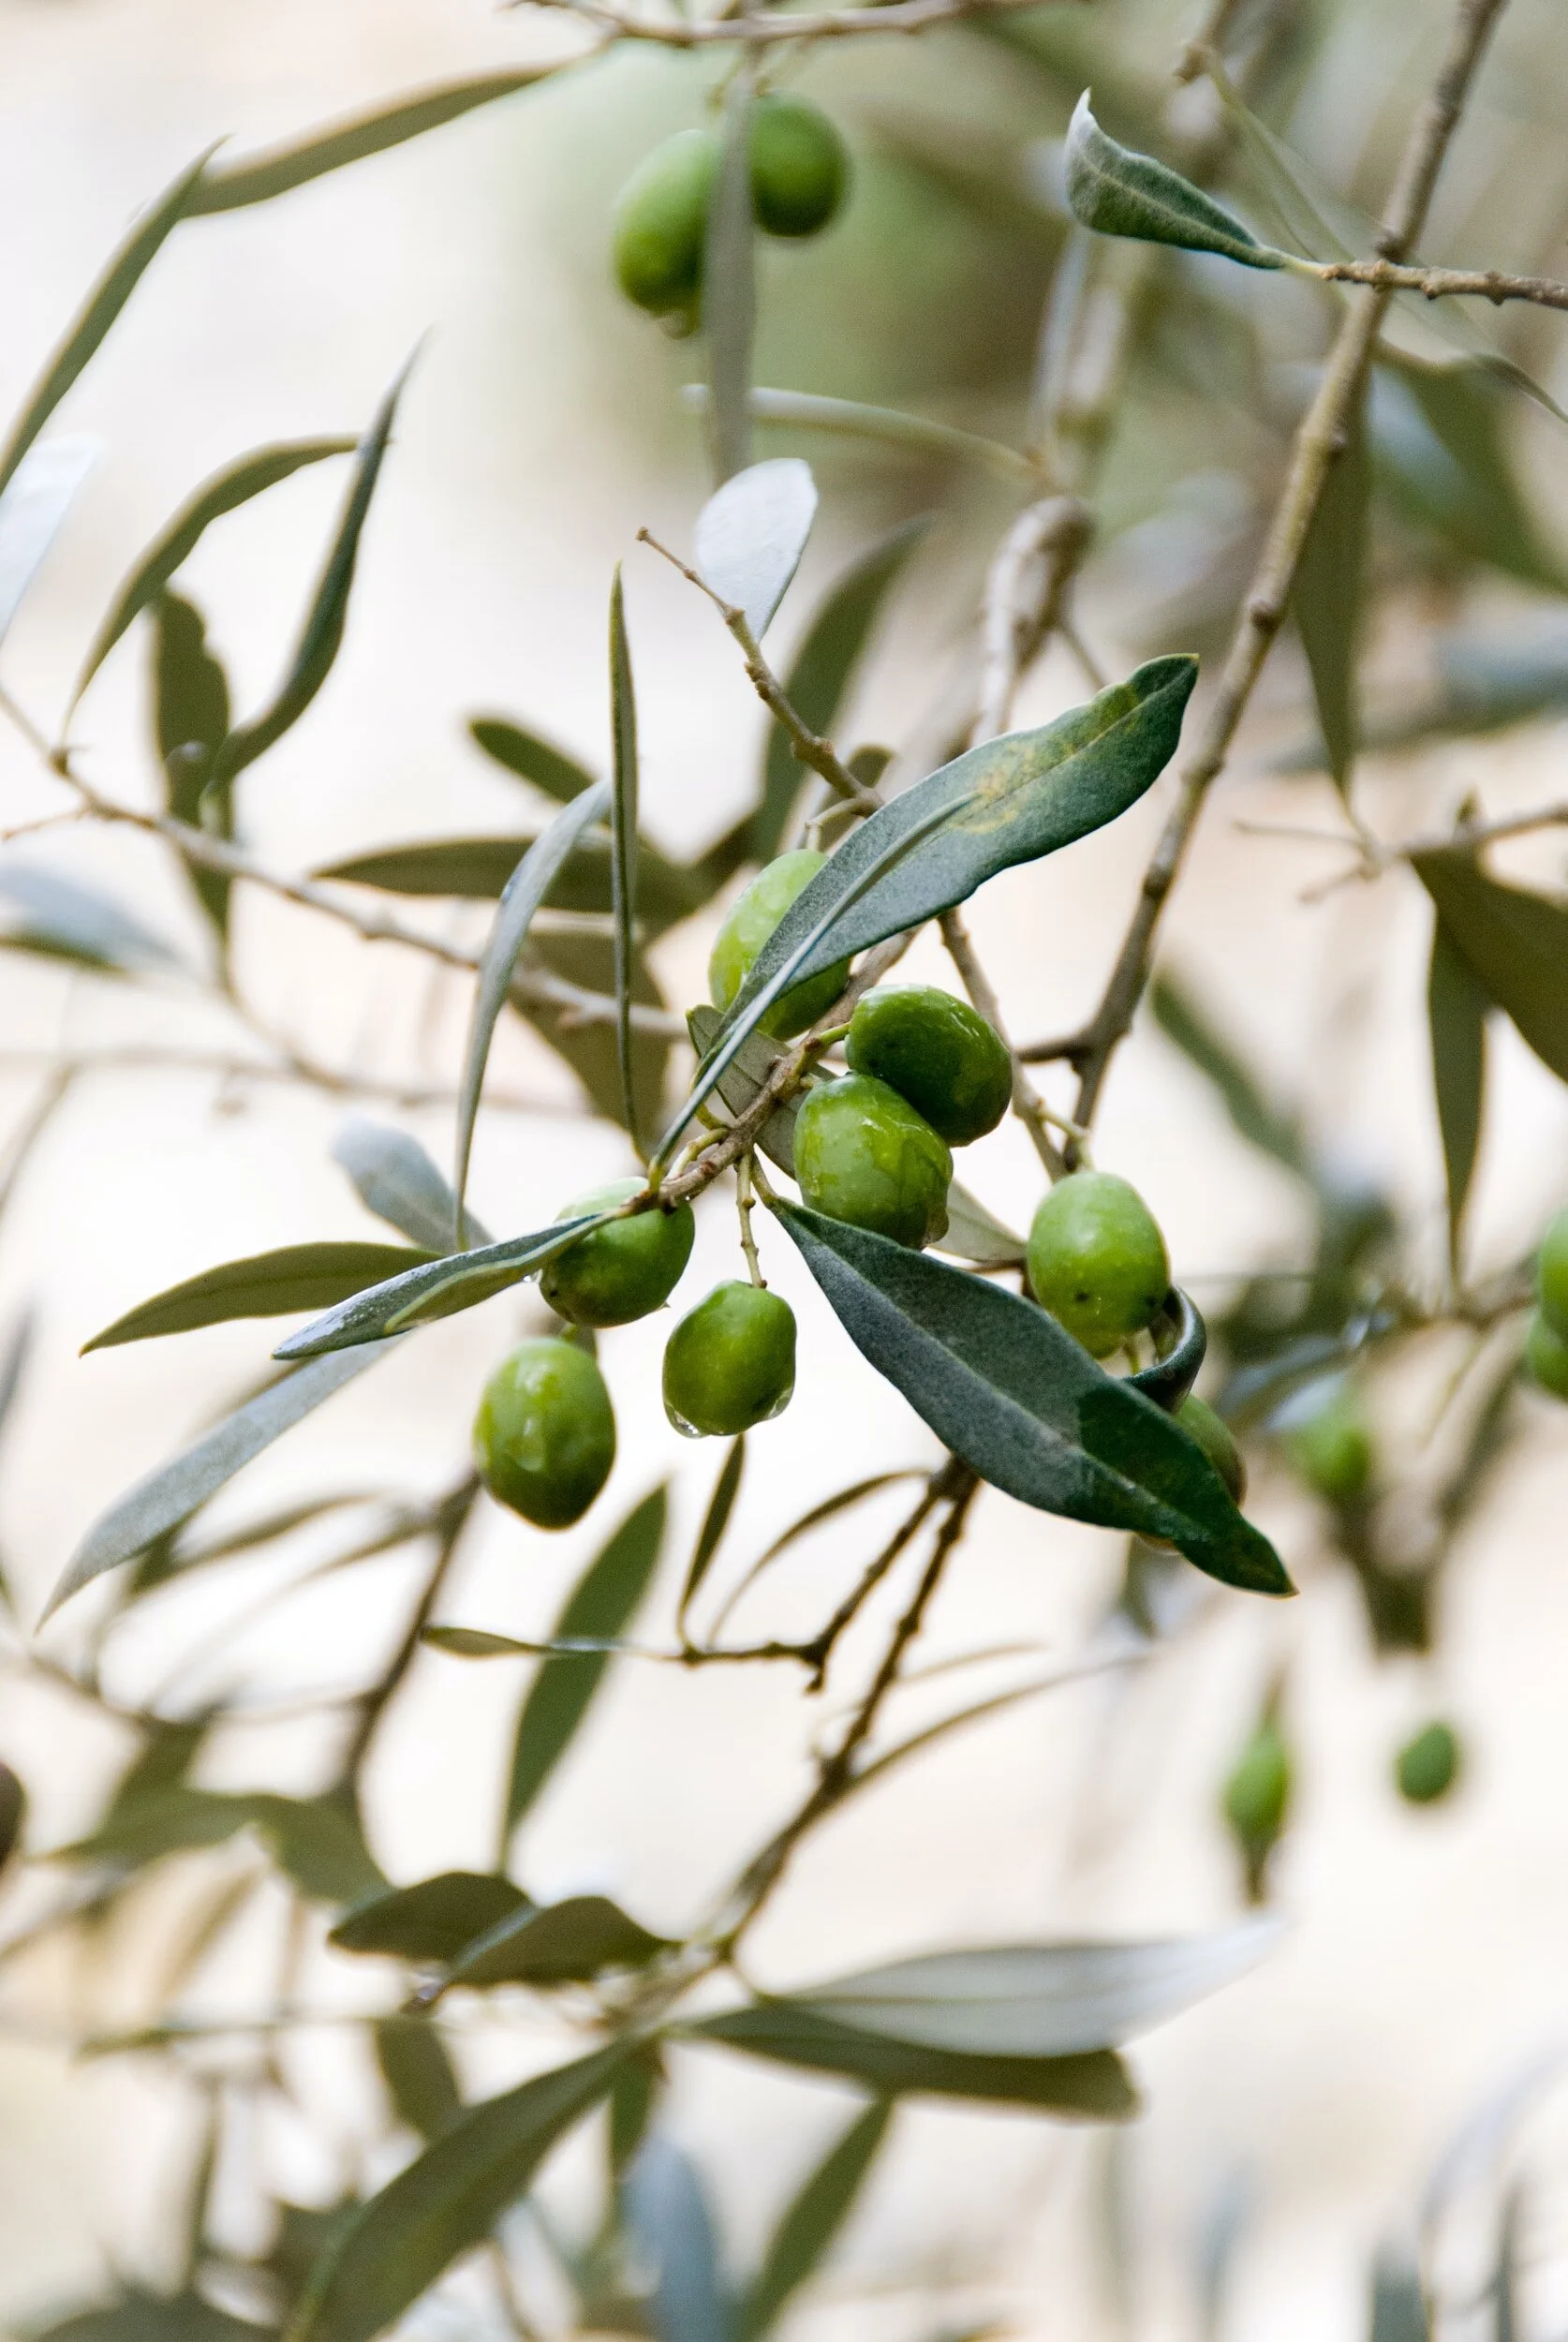
One of the most notable characteristics of Olive Trees is their ability to produce olives, unsurprisingly a staple in Mediterranean cuisine and are used to make olive oil, which is widely used for cooking and in cosmetics. Olive trees are also drought-tolerant, making them a great choice for dry climates. They prefer well-drained soil and full sun, and can be grown in a variety of soils including clay, loam, and sandy soil.

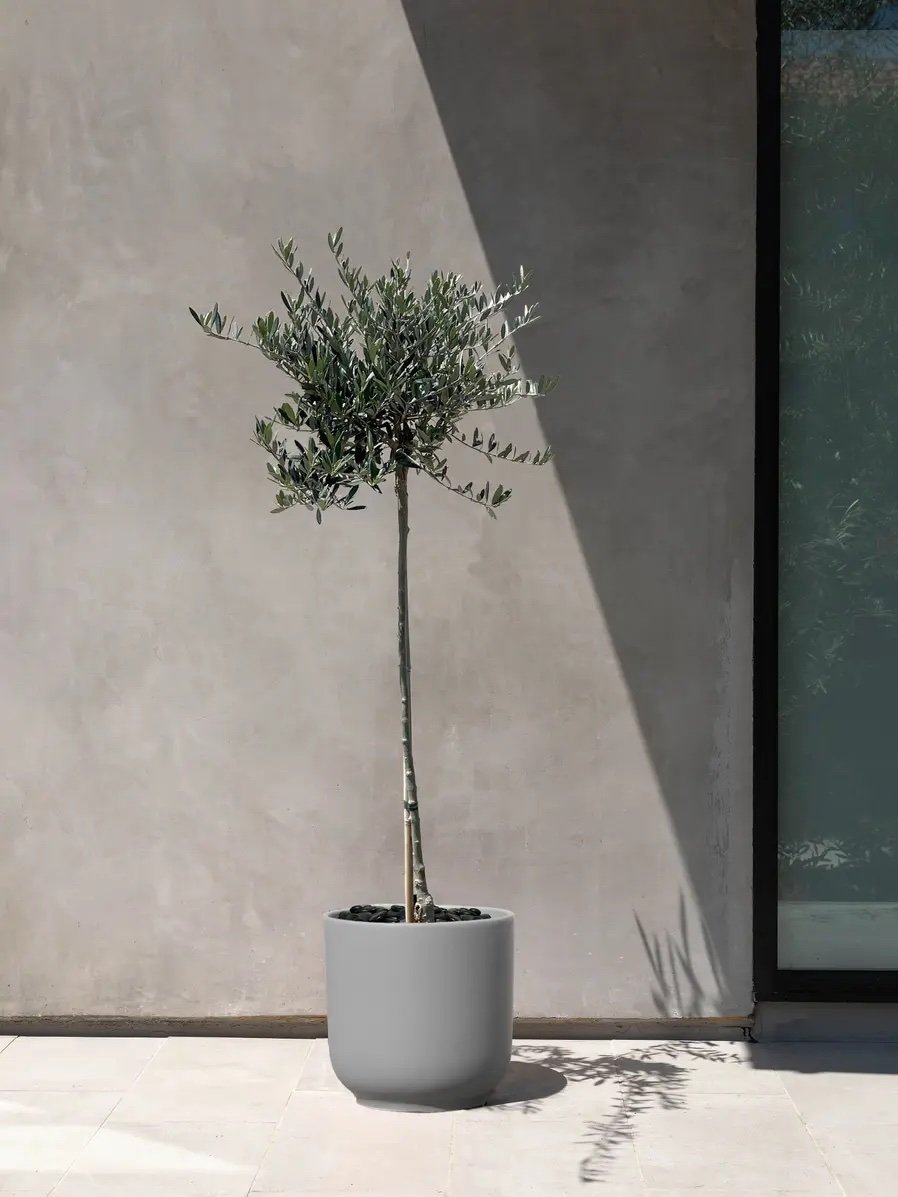
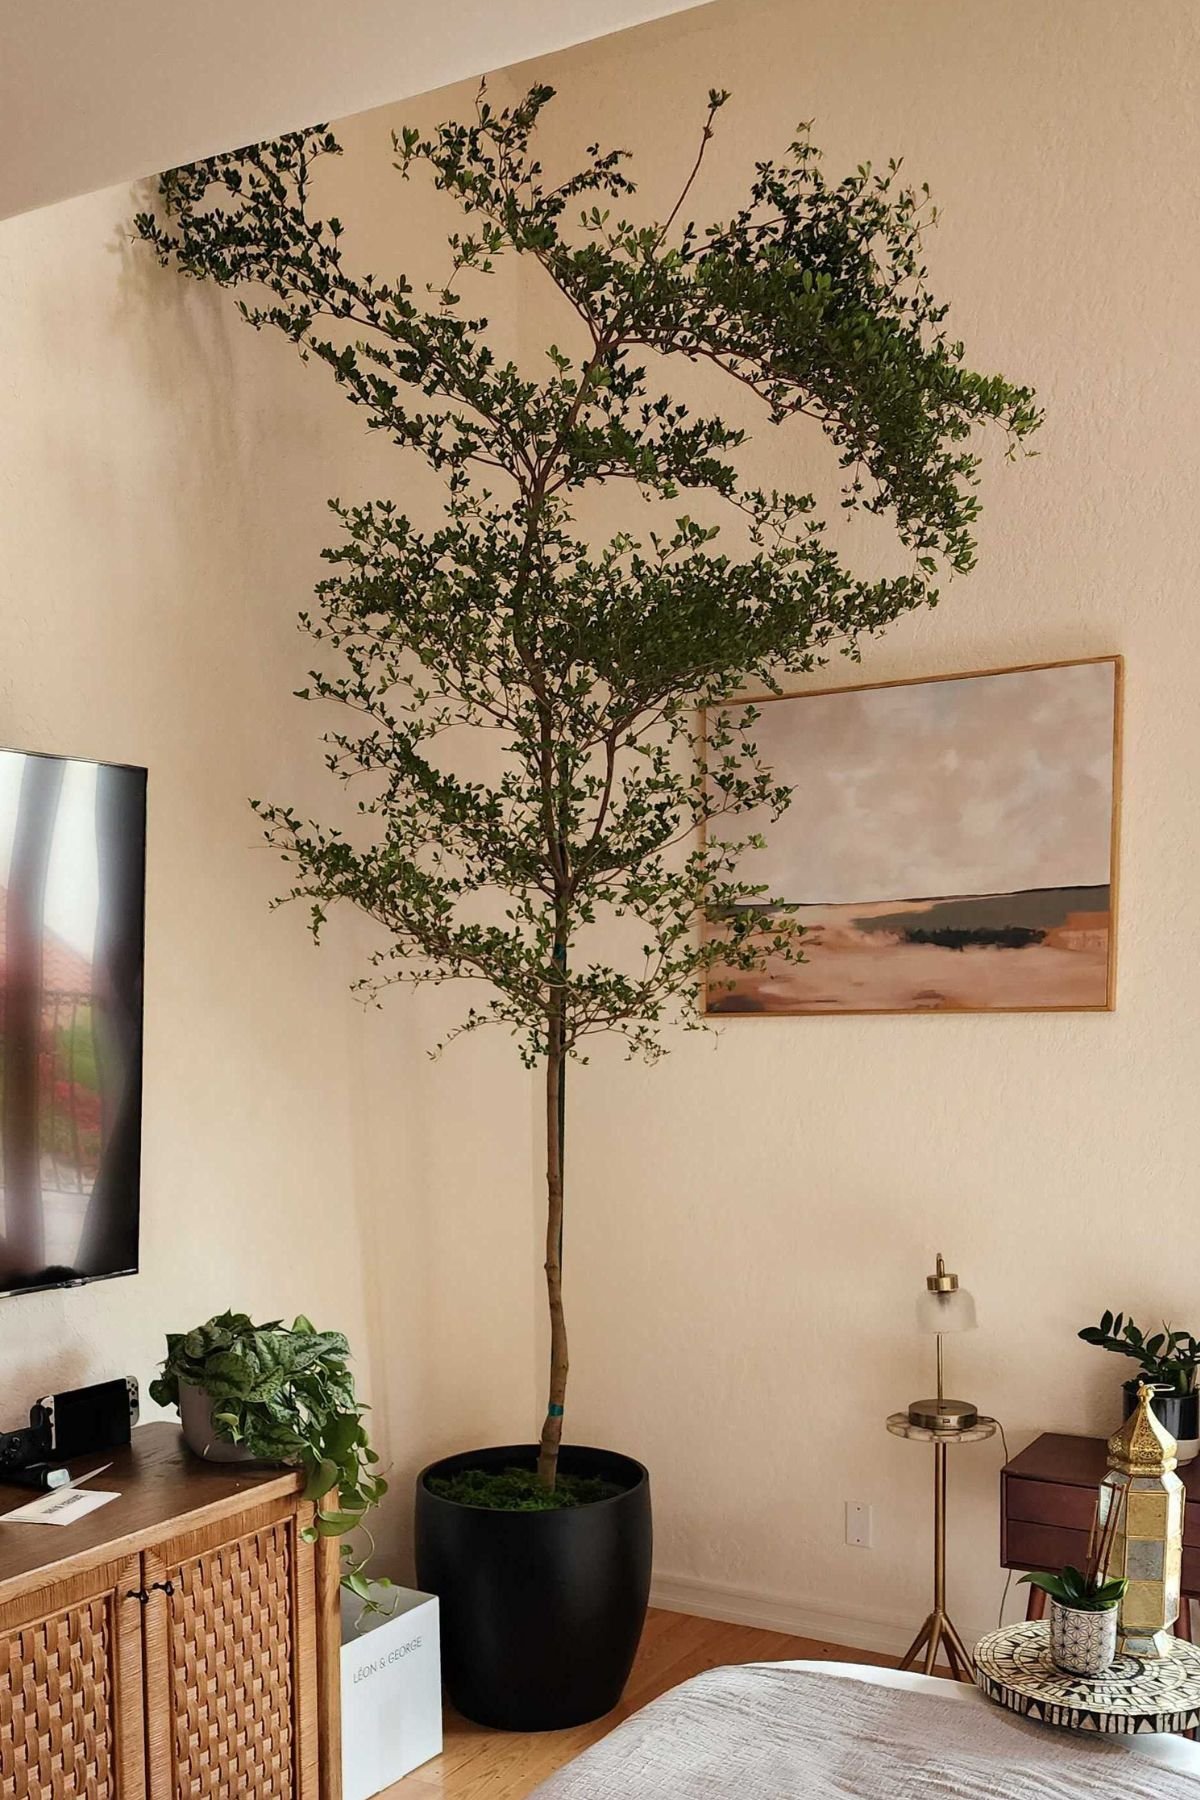
On the other hand, Shady Lady Trees or Black Olive Trees are much smaller and more compact than Olive Trees. They typically grow to be around 20 feet tall and wide. They are also evergreen, but their leaves are slightly more rounded than those of Olive Trees and have a glossy, dark green color. They are slow-growing, which makes them a great choice for small gardens or as a patio tree.

One of the key differences between Black Olive Trees and “regular” Olive Trees is their preferred growing conditions. While Olive Trees prefer full sun, Black Olive Trees are more tolerant of shade. In fact, they are often used as an indoor alternative to Olive Trees.

Another difference between these two trees is the fruit they produce. While Olive Trees produce olives, Black Olive Trees produce small, inedible black berries, and are used only for ornamental purposes.

Both trees are beautiful and versatile options but we generally recommend Olive Trees for outdoor settings and Black Olive Trees for indoors.
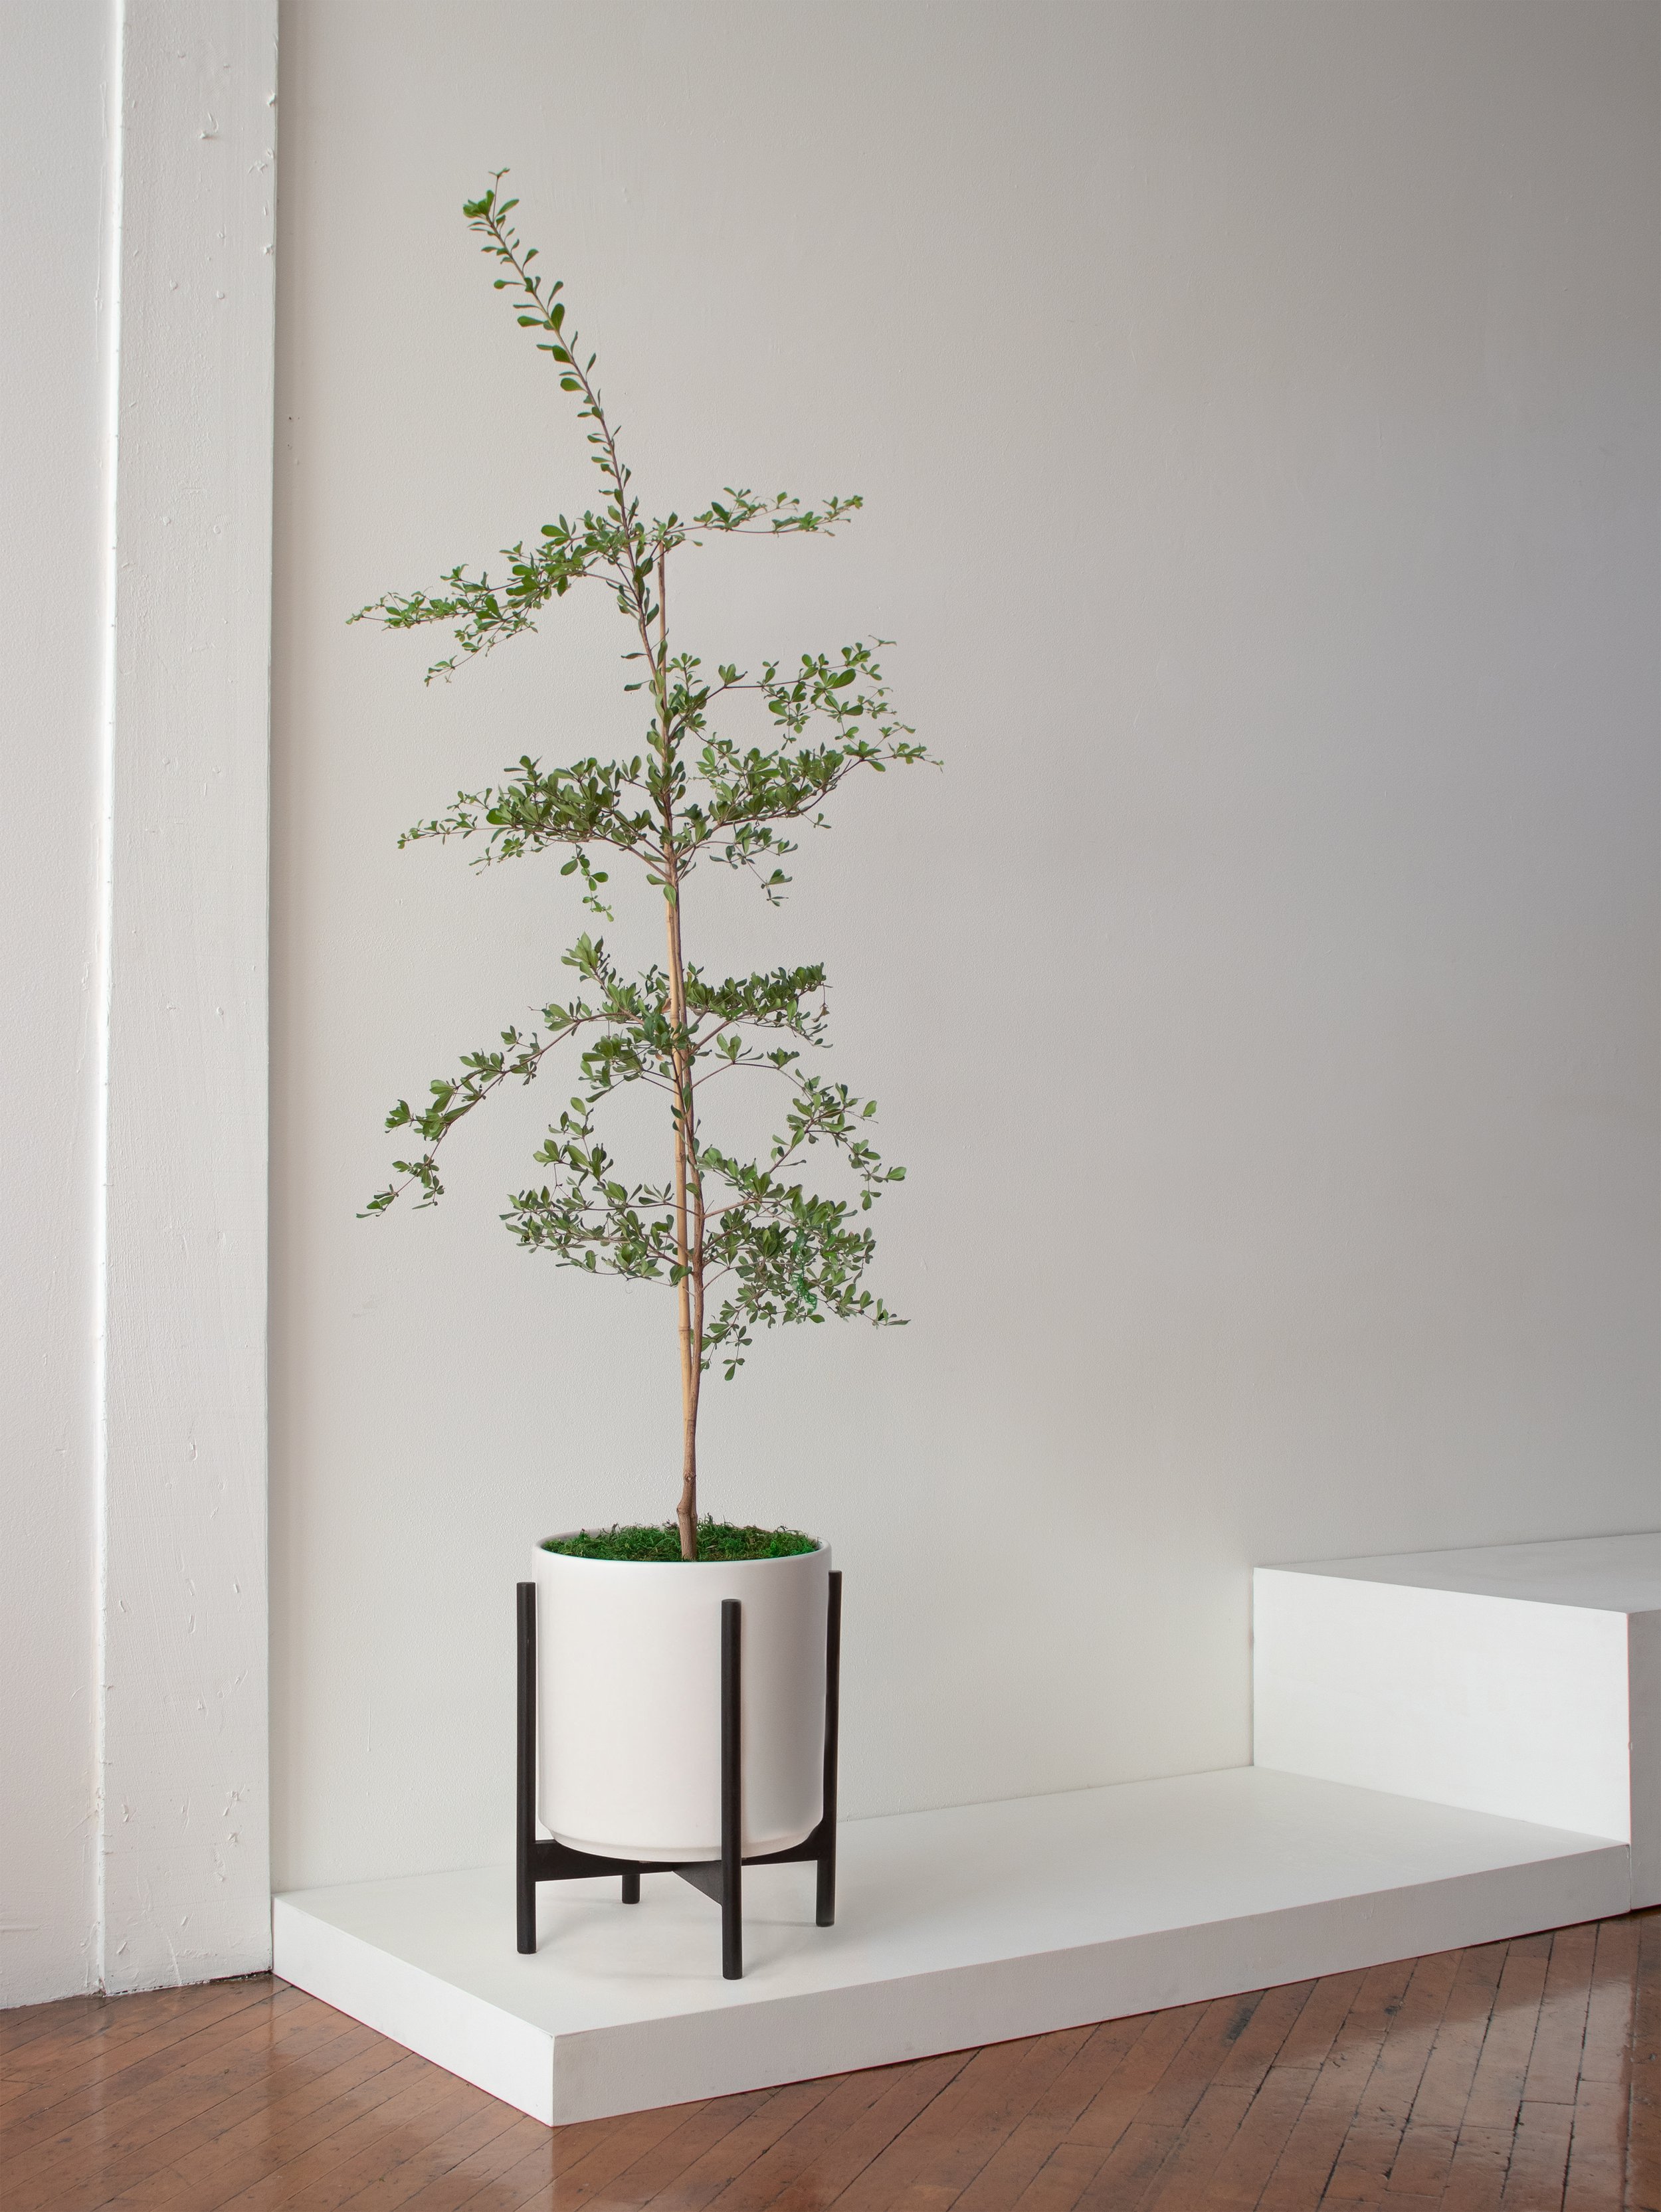

Black Olive Tree

Airy and bonsai-like, and a beautiful addition to any style and space.

Why Your Olive Tree Isn't Fruiting: 4 Potential Causes
olive tree fruiting

Watch your Olive Tree flourish with real fruit!

Olea europaea, commonly known as the Olive Tree, is a beautifully elegant plant that has recently risen in popularity for its airy nature and Mediterranean vibes. And beyond its ornamental value, many indoor plant enthusiasts are drawn to Olive Tree varieties due to the the prospect of growing fruit and harvesting their ripe olives. However, the journey from planting to fruiting can be a nuanced one, and your tree might not fruit for many years or until it becomes mature and only during the active growing season, such as spring and summer. Let's explore the intricacies of Olive Tree care and how to grow your beloved tree into a fruit-tree.

  1. Maturity Matters

  2. Ideal Conditions

  3. Troubleshooting

Maturity Matters

Like many horticultural endeavors and houseplants, patience is key when it comes to Olive Trees. These self-pollinating trees typically require about three years to reach maturity before they embark on their fruit-bearing journey. So, if your Olive Tree is still in its early years, rest assured, it might just need a bit more time for new growth.

The ideal conditions for Olive Trees to produce fruit

Balanced Watering

Proper watering is a delicate dance for Olive Trees. While they are typically known to be quite drought-resistant, they also appreciate regular watering and proper drainage to prevent root rot. Be sure not to let your Olive Tree dry out for too long, prevent it from a harsh soak, and allow it to be well drained. The rule of thumb is to water when 25% of the soil volume, or the top few inches, have dried. Overwatering can lead to drooping leaves and, eventually, leaf loss. Consistency, attentiveness to soil, ensuring your Olive Tree can be properly drained, and moisture are key for your Olive Tree to bear-fruit.

Plenty of Light

Light, the engine of photosynthesis, is paramount for fruit production. Olive Trees thrive in climates with full sun or lots of sunlight, and require a minimum of six hours of direct exposure daily. Placing your Olive Tree in a location with unobstructed light is crucial for optimal edible fruiting conditions, whether that’s indoors or out.

Strategic Fertilizing

Fertilizing is a supportive act during the Olive Tree's active growing seasons, primarily spring and summer. A well-balanced fertilizer, applied once in spring and once in summer, can provide the necessary nutrients for growing fruitful new growth. Additionally, incorporating compost creates nutrient rich soil that enhances the overall soil quality and contributes to the tree's health. However, abstain from fertilizing in winter or during inactive growth periods.

Troubleshooting for Non-Fruiting Olive Trees

1. Unfavorable Growing Conditions:

  • Symptom: Olive Tree not getting enough sunlight.

  • Remedy: Relocate your tree to a sun-filled, humid spot to optimize its exposure to sunlight. Remember, at least six hours a day of light is best and Olive Trees love humidity. To increase humidity in indoor air, we recommend a misting routine year-round. Refrain from placing in low-light areas. and remember that your Olive tree may not produce fruit during cold seasons.

2. Age Matters:

  • Symptom: Young Olive Trees not producing fruit.

  • Remedy: Exercise patience; fruiting often begins around the third year and may extend up to eight years.

3. Nutrient Deficiency:

  • Symptom: Soil lacking essential nutrients.

  • Remedy: Plant your tree in nutrient-rich potting mix or soil and fertilize during active growth periods. We recommend our fertilizer and foliar feed, Potion Magique.

4. Pruning for Sunlight:

  • Symptom: Insufficient sunlight reaching the center of the tree.

  • Remedy: Olive Trees like to be pruned. Prune stems strategically to allow direct sunlight, removing non-flowering branches. You can propagate the cuttings and create sprouts by transplanting in new soil to harvest new buds and blooms. Read more about propagation here!

5. Pest Prevention:

  • Symptom: Pest and insect sightings on your Olive Tree

  • Remedy: Keep an eye out for common insects like spider mites, aphids, fungus gnats, and mealy bugs, which can hinder plant growth. Regularly use neem oil to thwart diseases and pests, ensuring your Olive Tree thrives and produces abundant fruit.

6. Weeds:

  • Symptom: Weeds in your olive tree’s nursery pot.

  • Remedy: Weeds in your Olive Tree's pot and soil can hinder its growth, especially when it is trying to produce growing fruit. If you notice any unwanted plants in your Olive Tree’s container, promptly pluck them out, ensuring you remove the roots to prevent regrowth. While gentle herbicides can be used, they are often unnecessary for effective weed control in the pot. Regular weeding helps maintain a conducive environment for your Olive Tree's healthy development.

Growing an Olive Tree is an art, with a slightly different routine opposed to other indoor house plants, and coaxing it to fruit is a blend of science and care. Understanding the needs of your Olive Tree, from sunlight to watering, fertilizing, and using the correct pots can pave the way for a bountiful and deciduous harvest. As you navigate the journey from planting to fruition, savor the process, and your Olive Tree’s canopy will reward you with the timeless allure of its silver-green foliage and, eventually, its coveted olives.

At Léon and George, we're on a mission to bring the beauty of nature and house plants into your daily life. Our hand-selected, California native tropical plants such as the Olive Tree, Fiddle Leaf Fig, Ficus Audrey, and Bird of Paradise are carefully chosen for their quality, health, and beauty. We believe in simplicity, fairness, and sustainability, sourcing our plants from trusted local growers and gardeners who share our values. When you bring a Léon and George plant into your home, you're not just getting greenery – you're getting a piece of nature treated with our all-natural products and handmade planters that are staged for optimal and easy growth. Happy growing and gardening!


olive trees fruiting

Olive Tree Collection

Premium Olive Trees, potted and delivered, plus lifetime access to 24/7 Plant Doctor support.

Fact or Fiction: Will Olive Trees Grow Indoors?

The Olive Tree paired with the Black Mid-Century Ceramic pot and Light Wood Stand – the perfect addition to any space. But can it survive indoors like other houseplants?

The allure of cultivating an Olive Tree indoors is undeniable. The silvery-green leaves and the potential of growing fruit evoke the charm of the Mediterranean right in your very own living space for any gardening lover. But is growing an Olive Tree indoors a feasible endeavor? In this post, we unravel the truth about growing potted Olive Trees indoors.

  1. Can Olive Trees be Placed Indoors?

  2. Lighting Requirements

  3. Temperature and Humidity

  4. Watering

  5. Pest Prevention

  6. Moving Olive Trees Outdoors for the Summer

  7. Alternative Plants with Olive Tree Vibes

Can Olive Trees be Placed Indoors?

Native to the sun-soaked Mediterranean region, Olive Trees have a penchant for abundant sunlight. Ideally, they thrive outdoors, basking in at least six hours of direct sunlight daily. However, with thoughtful care, it's possible to bring the essence of an Olive Tree indoors.

Lighting Requirements

Keeping your Olive Tree indoors demands a strategic approach to lighting. These trees require ample sunlight, and an unobstructed south-facing window with high light is optimal for their growth. To ensure equal light exposure, rotate the plant bi-weekly and refrain from placing in low-light areas. In cases of insufficient natural full sun, supplement with a grow light for 6-8 hours daily, especially if outdoor relocation isn't feasible.

Unlock the full beauty of your Olive Tree by placing it near a sunlit South-facing window – the tree should receive at least six hours of sunlight a day.

Temperature and Humidity

Regarding temperature and humidity, Olive trees prefer a room temperature between 65 and 80 degrees Fahrenheit. They can tolerate dry air, but it's essential to keep them away from heat vents to prevent too much drying out. Occasional misting or placing near a humidifier can mimic the higher humidity levels these trees enjoy in their native Mediterranean climate.

Watering

Watering is a crucial aspect of indoor olive tree care. The soil and root-system should never fully dry out, but should not remain damp for long periods of time which may lead to root-rot. Watering is required when the top two inches is dry. During winter dormancy, reduce watering, but a dry soil surface signals the need for hydration. Olive Trees prefer high humidity, and misting your Olive Tree regularly can help introduce more humidity to indoor air.

Pest Prevention

In the realm of indoor gardening, proper pest prevention is paramount for the well-being of olive trees growing in planters. Olive trees are particularly susceptible to pests like aphids, spider mites, and mealybugs, which can compromise the health of your growing plants. Employing effective measures such as neem oil, a natural insect deterrent, becomes crucial for maintaining optimal conditions in the potting soils and ensuring a thriving indoor olive tree while safeguarding against potential pests in your planter.

Alternative Plants with Olive Tree Vibes

While the Olive Tree has a distinct charm, several alternative plants can grace your indoor space with a similar aesthetic that can thrive better in such conditions. Consider these alternatives:

  1. Bird of Paradise: With large, banana-like leaves, it brings a tropical touch to any space and is popular amongst other house plants.

  2. False Aralia: Elegant, finely-cut foliage for a sophisticated look.

  3. Fishtail Palm: Mimics the feathery appearance, adding a touch of the exotic.

  4. Schefflera Tree: Known for its lush, umbrella-like foliage and is easy-care.

While Olive Trees may not be the easiest indoor companions, with the right care and adjustments, you can infuse your living space with their distinct charm. However, for those seeking alternatives, there are several plants that capture the essence of an Olive Tree without the specific demands. Whether you opt for the Mediterranean allure of the Olive Tree and the potential for edible fruit or explore alternatives, each plant brings its unique green symphony to your space!

At Léon and George, we're on a mission to bring the beauty of nature into your daily life. Our hand-selected, California-grown house plants carefully chosen for their quality, health, and beauty. We believe in simplicity, fairness, and sustainability, sourcing our potted plants from trusted local growers who share our values. When you bring a Léon and George plant into your home, you're not just getting greenery – you're getting a piece of nature treated with our all-natural products and staged for easy, optimal growth. We're here to make plant ownership accessible and enjoyable for everyone, fostering a connection between people and the natural world.


The Olive Tree Collection

Premium Olive Trees, potted and delivered, plus lifetime access to 24/7 Plant Doctor support. Order online at leonandgeorge.com

Olive Trees & Yellow Leaves

Yellow leaves on your Olive Tree? Find out what could be causing them.

The Olive Tree varieties are without a doubt having a moment amongst other tropical potted houseplants and outdoor plants, with their effortlessly ornamental branches and Mediterranean vibe that may even bloom ripe edible olives. However, while Olive Trees can be incredibly low maintenance (they are highly drought-resistant, after all!) they can take some patience for new plant owners, especially when planted indoors. Seeing the emergence of yellow leaves on your Olive Tree can be disconcerting, and in this comprehensive guide, we’ll delve into the reasons and symptoms behind yellowing leaves and provide practical solutions to ensure the vibrancy of the foliage and help your Olive Tree thrive while increasing your green thumb and horticulture expertise.

  1. Yellow Curling Leaves

  2. Leaves Turning Yellow and Falling Off

  3. Leaves Turning Yellow and Drooping

  4. Yellow Leaves with Dry Brown Edges

  5. Normal Seasonal Drop: Nature's Course

  6. Avoiding Yellow Leaves on Olive Trees

Yellow Curling Leaves

Olive Trees, though hardy, can suffer from nutritional deficiencies, particularly in nitrogen. Signs such as yellow-tinged leaves, curling leaves and stunted growth indicate this issue. What causes this can be a nitrogen or magnesium deficiency. Using fertilizer regularly can assist in alleviating the issue, and if you’ve had your Olive Tree for a long period of time, you may consider repotting to replenish nutrients within the soil.

Leaves Turning Yellow and Falling Off

If your Olive Tree is shedding pale yellow leaves at a somewhat alarming rate, the most likely culprit is a lack of sunlight. Olive Trees typically don’t tolerate low light, and need at least 6 hours of direct sunlight per day, and are best-suited for outdoor areas. If you’d like to keep your Olive Tree indoors, make sure to place it in a bright, unobstructed window with no shade, ideally south-facing, and possibly even consider supplementing with an artificial grow light.

Leaves Turning Yellow and Drooping

The delicate dance of watering significantly influences Olive Tree health. If you see leaves that are yellow with discoloration, limp or drooping, begin to wilt, or are dropping overwatering is a common cause. Remember that Olive Trees are native to hot, arid climates and are very drought-resistant. Heavily overwatering any plant can lead to root rot, and if you suspect you’ve overwatered your Olive Tree, check the soil and roots to see if it will need repotting.

Yellow Leaves with Dry Brown Edges

Both insufficient and excessive water can make your Olive Tree susceptible to yellow leaves, cause them to begin wilting, or lead to brown spots. While Olive Trees are known for their drought tolerance, they still need regular watering. Prolonged periods of drought will result in yellow leaves with dry brown plant leaves and edges. While you won’t be able to bring these leaves back to their former state, giving your plant a good, healthy drink of water should prevent more leaves from drying and turning yellow and brown.

Normal Seasonal Drop: Nature's Course

Despite being classified as evergreens, Olive Trees can undergo a natural leaf-shedding process. Some yellowing leaves in spring for example are part of this seasonal cycle and are generally not a cause for alarm. Understanding this normal drop can ease concerns associated with the occasional yellow leaf and may need pruning, similar to other plants to encourage plant growth. Olive trees, typically tropical plants, may go dormant in the winter, even when kept as indoor potted plants. Despite being tolerant of full sun conditions and thriving in humid climates, their natural response to seasonal changes may involve a period of dormancy during colder months.

Avoiding Yellow Leaves on Olive Trees

Prevention is the best cure for any plant woe, but the good news is that many cases of yellow tree leaves and stems are easily fixable! Here are a few preventative measures as well as cures for yellow leaves on Olive Trees:

Find the Perfect Watering Balance

To avoid the yellowing blues, make sure you're not drowning, providing too little water, or soaking your Olive Tree. Ensure you are using a well draining, less compacted potting soil or potting mix and let the top two inches of soil dry out before giving it a good drink. Established outdoor trees are pretty low-maintenance in the watering department, but those young indoor ones may need to be watered more frequently, especially in hot and dry months. As always, ensure there is proper drainage included with the pot. This will ensure your Olive Tree does not remain damp and can be drained through the roots before placing it into your decorative planter.

Additionally, misting the foliage with a watering can mister creates a mini oasis for your Olive Tree, boosting the natural humidity around the plant. This pampering session helps keep those lush green leaves happy and thriving and combats dry indoor air. Adding a layer of moss or pebbles to the top of the soil not only enhances the aesthetic appeal but also serves as an effective natural mulch, helping to retain moisture in the soil and adding to organic matter for healthy soil.

Try this - The bottom watering method

In the pursuit of fostering optimal growth and combatting yellow foliage, the bottom watering method emerges as a horticultural game-changer and prevents your Olive Tree from taking in too much water. By employing this technique, you can maintain a delicate balance in the soil moisture crucial for your olive tree's well-being and prevent your tree from becoming rotted. This method allows your Olive Tree to self-water itself, ensuring that the root system receives hydration without the risk of drowning or waterlogging. This method not only promotes the longevity of your greenery but also simplifies the maintenance process, making it an excellent choice for a harmonious and hassle-free approach to watering your Olive Tree.

PROVIDE AT LEAST 6 HOURS A DAY OF DIRECT LIGHT

Light-intensity is important for your Olive Tree, as it is a light-lover through and through and enjoys at least 6 hours of bright light or full direct sunlight a day. If you aren’t sure what constitutes direct sunlight, think unobstructed exposure to the sun. Sunlight not only helps your tree become a quicker grower, but also helps keep those leaves nice and dry, preventing any unwanted mildew and fungus.

NUTRIENT BOOST

Olive trees are not too picky about about nutrient deficiency in their soil, but feeding your tree a nutrient-rich fertilizer or plant food during the active growing season will help keep yellow leaves at bay, increase your gardening expertise, balance the soil ph, and encourage new growth. Be careful not to over fertilize and refrain from fertilizing during dormancy, though, by following the correct dosage during active growing months— fertilizer burn can cause even worse damage on the foliage of your plant.

PESTS

Pests pose a significant threat to the vitality of an olive tree, often causing distressing consequences for its foliage. Various pests, including bugs like aphids, spider mites, and mealybugs, can infiltrate the leaves, compromising the overall health of the tree. Neglect in houseplant care can increase the issue, creating an environment conducive to infestations in their pots. Fungus gnats, attracted to moist soils, can further worsen the situation. To combat these unwanted guests, incorporating neem oil mixes into your plant care routine can be an effective solution. Neem oil acts as a natural repellent against pests, offering a sustainable and eco-friendly approach to safeguarding your olive tree from the potential harm caused by these pesky invaders. Prioritizing vigilant pest management is essential for ensuring the enduring beauty and health of your olive tree's foliage.


olive trees yellow leaves

Olive Tree Collection

Premium Olive Trees, potted and delivered, plus lifetime access to 24/7 Plant Doctor support. Order online at leonandgeorge.com

The First Six Months With Your Black Olive Tree: What To Expect

The Black Olive Tree is an indoor plant that thrives in bright light, making it an enchanting addition to any space topped with preserved forest moss for a touch of natural elegance.

With its delicate clusters of dark green, glossy leaves and enduring, one-of-a-kind charm, the Black Olive Tree, also known as Bucida Buceras or Shady Lady Olive Tree, is a striking addition to any space. Native to tropical regions, this tree-like beauty is often mistaken for other varieties like its outdoor-loving cousin, the Olive Tree, but it doesn't bear edible fruit and in reality is not an olive tree at all. Nonetheless, its airy, Mediterranean appearance has earned it the common name of Black Olive Tree, and if you’ve welcomed one of these treasures into your indoor plants collection or are considering it, prepare for a rewarding journey as you guide this elegant plant through its initial adaptation phase into its new home. Let’s learn how to grow and bloom your new Black Olive Tree!

The Early Days: Understanding Changes

When you first introduce your new Black Olive Tree to your home, don't be surprised or alarmed if it undergoes a period of adjustment or grows slow as it adjusts to new climates. Many houseplants react to new environments by dropping leaves, and the Black Olive Tree is no exception. This particular variety of plant is incredibly sensitive to shifts in light, humidity, and temperature, and it is not uncommon for some or even all of the foliage to dry up initially and fall off.

IMPORTANT! This does not mean your plant is dead. It is simply responding to the change in its environment, and this behavior is very common for the Black Olive Tree. Keep reading to see how you can best support your plant as it bounces back and begins to grow new leaves.

Leaves on the Black Olive Tree will begin to dry up and fall in the initial adjustment phase after moving your plant.

Patience While Shedding

The key to helping your Black Olive Tree adapt successfully is patience. Let your tree shed its leaves—there is nothing to be done while it goes through this phase besides regularly sweeping up the dry leaves from the floor. It can take anywhere from 1-4 weeks for your plant to lose all its leaves. If you’d like to reduce the amount of sweeping, once a week give your tree a gentle shake so that any leaves that are ready to go may fall all at once.

Providing the Right Conditions

To support your Black Olive Tree during this adjustment phase, ensure you provide the ideal conditions:

  1. Light: These trees thrive in plenty of bright indirect light and full sun, and also like some direct sunlight, so ensure they are planted in its pot near a sunny window with at least a few hours of direct sunlight year-round and refrain from placing in low-light areas.

  2. Watering: The Black Olive Tree can be particularly thirsty while its going through the adjustment phase. Ensure it is watered thoroughly every few days, or at a minimum once a week, and prevent drought or letting your plant dry-out.

  3. Preventing overwatering is crucial for Black Olive Trees, as excessive dampness can lead to root rot, affecting the root-ball and jeopardizing the health of the entire plant. To maintain the ideal balance for growing plants, it's essential to keep the soil moist but not waterlogged, ensuring the well-being of both foliage and root systems.

  4. Proper Drainage: Ensuring proper drainage in the potting soil is crucial for the well-being of black olive trees, as these easy-care plants are highly tolerant but require well-draining conditions. It is essential to avoid waterlogging and maintain a slightly damp environment when watering, promoting optimal growth for these resilient and adaptable trees.

  5. Temperature: Keep your Black Olive Tree away from drafts and sudden temperature fluctuations, as these can stress the plant further.

  6. Fertilizing: Hold off on feeding your plant during the initial adjustment period. Once you notice new growth emerging you can begin to fertilize, introduce a mild plant food to support its development during the growing season.

  7. Pests: In the care of Black Olive Trees, especially those in, maintaining a green thumb involves vigilant pest prevention. These trees may be susceptible to common pests like aphids and spider mites, so regular inspections and appropriate insect control measures are essential to ensure their overall health and vitality.

  8. Humidity: Black Olive Trees, thriving in humid conditions, tolerate soil moistness and benefit from a regular mist to prevent wilting. To maintain their optimal health, consider incorporating a mister into your care routine to provide the necessary humidity for these resilient trees.

In general, try to provide adequate light and water, and do not do anything else as your plant adapts. Patience is key!

Getting Past the Adjustment Phase

Between 6-12 weeks, you'll likely witness a remarkable transformation in your Black Olive Tree and notice that it is fairly easy-to-grow. New leaves will emerge, demonstrating the tree's adaptability and resilience. As you begin to see new buds and fast-growth forming, rest assured that your tree will become fuller and more beautiful in no time, enriching your space with its timeless elegance.

Despite swiftly losing many if not all their leaves as they adjust to their new space, your Black Olive Tree will astound you with how rapidly it begins to fill out again with new growth.

You've Got This!

While the Black Olive Tree might demand a bit more attention than other plants and low maintenance plants during its initial phase, the rewards are immeasurable. With patience and proper care, you'll have the pleasure of enjoying your new Black Olive Tree for years to come. As you observe its journey of renewal and growth over the first six months, you'll gain a deeper appreciation for nature's wonders and your Black Olive Tree's incredible resilience. Embrace the gardening adventure, and soon you'll have a thriving, magnificent tree!


black olive tree

Designed to Thrive

Premium Black Olive Trees, potted and delivered, plus lifetime access to 24/7 Plant Doctor support.

What To Know Before You Buy A New Planter

When it comes to potted plants, the pot or planter is often just as important as the plant itself! The pot your plant calls home goes far beyond aesthetics, and the planter you choose (and how you pot your plant in it) will dictate the overall health of your plant over time. 

But there's more to choosing a planter than meets the eye. From the best materials for plant pots to finding the ideal size and ensuring proper drainage, here's what you need to know before buying a new planter.

  1. Best Materials for Plant Pots

  2. Finding the Right Fit

  3. The Importance of Drainage

  4. What to Do If Your Pot Has No Drainage

  5. Where to Buy High-Quality Pots for Plants

Best Materials for Plant Pots

The first step in choosing a planter is picking the right material. There are various options available, each with its own set of advantages:

  • Ceramic: Ceramic pots are classic and come in a wide range of designs and colors. They're excellent for retaining moisture, making them suitable for plants that like consistent hydration. Many ceramic pots, like these Mid-Century style planters and our Scandinavian line of pots, are fully water-sealed as well, an added bonus if you’re worried about your pots damaging precious surfaces like wood floors or rugs.

  • Terracotta: These porous clay pots are great for plants that prefer well-draining soil. They allow air to reach the roots and are perfect for succulents and cacti. Note that terracotta pots will “age” overtime, changing colors as it absorbs minerals from the soil, fertilizer and water.

  • Metal: Metal planters, like those made from galvanized steel, are durable and often have a modern aesthetic. They can withstand the elements, making them suitable for outdoor use.

  • Wood: Wooden planters offer a rustic charm and can be a great choice for herbs or ornamental plants. They do require a liner to prevent water damage to the wood.

Finding the Right Fit

One of the common dilemmas plant lovers face is finding a planter that seems like the perfect fit, only to discover it either swallows the nursery pot or is entirely too small. Here are a few tips:

  • Room to Grow: Choose a planter that accommodates your plant's current size with some room for growth. A too-small planter can restrict your plant's development, but you also don’t want your plant to be swimming in soil as most like to have their roots very cozy. When choosing the right size planter, think about 2-3 inches bigger than the nursery pot your plant comes in.

  • Proportions: Consider your plant's height and width. Taller, top-heavy plants may require a planter with a wider base to prevent tipping. Most nursery pots come in standard widths, such as 4", 6", 8", or 10". If your planter is wider than the nursery pot and you do not plan on potting directly in your planter, use a foam collar or any suitable material to eliminate wiggle room and keep it from tipping over. This method is called “staging”—keep scrolling to read more about how this works and why it’s our preferred method for potting plants.

  • Trimming the Nursery Pot: Unfortunately many planters are not designed with the nursery pot in mind. Once again, this is an issue if you don’t plan on potting your plant directly into your planter. To ensure your plant fits the planter snuggly, trim the nursery pot's height by an inch or two. This process typically requires a sharp blade, as nursery pots are often made of tough plastic.

Léon & George planters are made of high-fired stoneware, 100% water-sealed so they’ll never damage your floors.

The Importance of Drainage

Drainage is a non-negotiable feature in plant pots. Without it, excess water can accumulate, leading to root rot and other issues. It is crucial that you either purchase a planter with drainage holes or that you set your plant up for proper drainage within its planter without holes. It’s quite easy—keep reading to learn how!

What to Do If Your Pot Has No Drainage

If you have your eyes set on a planter that lacks drainage holes (there are so many beautiful ones out there!), you can still make it work. Add a layer of small rocks , pebbles, or foam to the bottom to elevate your plant and create space for excess water. This prevents your plant from sitting in water for extended periods. Then set the plant inside its nursery pot inside the decorative planter. A block of styrofoam or a similar material also does the trick, rendering drainage holes unnecessary.

This is called “staging”, and it’s our preferred method of potting plants. Why is that? As a start, it helps with airflow for your plant, as many planters will not allow your plant’s roots to easily breathe. It also makes caring for your plants easier, as popping them in and out of their planter is a breeze. We stand by this method so firmly that we even stage when the planter has its own drainage holes!

Read more (and see a diagram) about how to stage your plants here.

Where to Buy High-Quality Pots for Plants

Now that you know what to look for in a planter, where can you find the perfect one? Here are some reputable places to consider:

  • Léon & George: A curated collection of minimalist, high-quality ceramic planters that pair well with any decor style.

  • Light & Ladder: Light & Ladder offers beautifully designed planters that are both unique and functional.

  • Goodee: Goodee is a treasure trove of sustainable and eco-friendly items for the home, including a highly curated selection of plant pots, perfect for the environmentally conscious plant lover.

  • Etsy: Etsy is the place to go for artisanal and unique planters. You'll find a vast assortment of handmade as well as vintage options to suit your style.

In conclusion, selecting the right planter is essential for the health and well-being of your plants. Choose the best material, ensure the planter's size is suitable, and prioritize drainage. With these tips in mind and the right planter in hand, your plants will thrive, and your space will flourish with greenery. Happy planting!


Designed to Thrive

Premium plants, potted and delivered, plus lifetime access to 24/7 Plant Doctor support. Order online at leonandgeorge.com

The Ten Commandments of Braided Money Tree Care
braided money tree sizes

Triple the prosperity! Our Braided Money Trees are available in small, medium, and large sizes.

Are you ready to care for your very own Braided Money Tree? With its striking braided trunk and lush green foliage, the Braided Money Tree is a captivating plant that brings an aura of prosperity and positive energy to any space. They even say it brings good luck, but of course,  we imagine those luck-bearing properties are at their strongest when the plant is thriving!

Bring a wealth of good fortune to your home or office with the Braided Money Tree, and adhere to these Ten Commandments so that you and your plant will flourish for years to come!

Provide abundant light (if you want it to grow!) 

braided money tree light

Braided Money Trees thrive in moderate to bright indirect light.

The Braided Money Tree can be a very fast grower, and will do so in bright, indirect light. Place your plant near a window where it can bask in ample indirect light if you’d like to see it flourish and grow bigger over time. Note that the Braided Money Tree can adapt to medium levels of light, but it will grow more slowly. 

And whatever you do, keep it out of harsh direct sunlight! The Braided Money Tree is a houseplant, not a beach bum, and will quickly burn if left to roast in the sun.

Maintain plenty of humidity 

The Braided Money Tree is no diva, but it does hail from humid environments and as such appreciates a moist atmosphere. Increase humidity levels by regularly misting its leaves or placing a tray of water and pebbles near the plant or a humidifier. This will help recreate its natural habitat.

braided money tree

Elevate your space with lush charm! Braided Money Tees bring a touch of vibrant greenery to any environment.

Keep things cozy

The Braided Money Tree prefers a temperature range between 65°F and 80°F (18°C to 27°C). Shield it from extreme temperature fluctuations and drafts, which can stress the plant. If you’re cold, your plant is probably cold too!

And keep it away from heaters and AC units

A quick path to unattractiveness for most indoor houseplants is placing them right next to air vents. Likewise with the Braided Money Tree– avoid placing it near vents, air conditioners, or heating units, as they can cause dry air and disrupt the plant's health. Optimal conditions include a moderate and consistent temperature throughout the year.

Fertilize with care

Feed your Braided Money Tree with a balanced, water-soluble fertilizer during the growing season (spring and summer). Consider using Boost Vitamine, an all natural plant food that is ideal for Braided Money Trees and other indoor specimens. Follow the instructions and take care not to overdo it! Over-fertilizing can lead to “fertilizer burn” on your plant’s foliage.

Water judiciously

While the Braided Money Tree appreciates regular watering, it dislikes “wet feet” or waterlogged soil. Allow the top inch (2.5 cm) of soil to dry out before watering again. Ensure proper drainage by using a well-draining potting mix and a pot with drainage holes.

money tree prune

Braided Money Trees flourish with occasional trimming, shaping your wealth and growth.

Prune with purpose 

Pruning is essential to maintain the shape and health of your Braided Money Tree, as well as to promote new growth. Trim away any dead or yellowing leaves, as well as leggy growth, to encourage a fuller and more balanced appearance. Use clean and sharp pruning tools to minimize the risk of disease. As always with pruning, never remove more than 30% of the leaves at a time. 

Be vigilant against pests

Plants don’t attract pests, but they can be an attractive home for pests if not cared for properly. Regularly inspect your Braided Money Tree for signs of infestation, such as webbing, tiny crawling insects, or sticky residue. Keep your plant clean with soap specially formulated for indoor plants, and treat any pest issues promptly with organic insecticidal soaps or other appropriate natural remedies like Neem Oil.

Repot wisely

When your Braided Money Tree outgrows its current pot, transfer it to a slightly larger container with fresh, well-draining soil. Repotting every two to three years, preferably in spring, allows the roots to have adequate space for growth and prevents the plant from becoming root-bound. Read our full guide on how to repot your plant.

Embrace plant companions

Consider grouping your Braided Money Tree with other compatible houseplants. Plants in proximity create a microclimate of increased humidity and can benefit each other. Just ensure their light and watering requirements align, and they will thrive together.

parlor palm braided money tree

Pair a Braided Money Tree with a Parlor Palm to create a stunning botanical oasis.

Ready to take on the luck-bearing Braided Money Tree? Follow these ten commandments and we guarantee you will have a lush, flourishing Money Tree in no time!


braided money tree

Designed to Thrive

Premium plants, potted and delivered, plus lifetime access to 24/7 Plant Doctor support. Order online at leonandgeorge.com

The Best Fertilizer For Snake Plants

Help your Snake Plant live its best life with a regular fertilizing routine!

  1. Understanding the NPK Ratio

  2. The Best Plant Food for a Snake Plant

  3. Can Fertilizing My Snake Plant Help It Grow?

  4. When To Fertilize Your Snake Plant

With their striking upright leaves and air-purifying qualities, Snake Plants (Sanseverias) are a popular choice for indoor plant enthusiasts and novices alike. Native to the arid regions of West Africa, they are well-suited to indoor environments due to their ability to tolerate low light conditions and infrequent watering. While Snake Plants are known for their adaptability, providing them with the right nutrients can boost their growth and overall health. Keep reading to learn about the best fertilizer for all varieties of Snake Plants and how to best fertilize these low-maintenance plants effectively.

Understanding the NPK Ratio

Fertilizer labels often display an NPK ratio, representing the ratio of nitrogen (N), phosphorus (P), and potassium (K) in the product. Different plants have specific nutrient requirements, so it's important to choose a fertilizer that matches your Snake Plant's needs.

Snake plants thrive with a balanced, all-purpose liquid fertilizer with an NPK ratio of 10-10-10 or similar. This balanced ratio ensures that your Snake Plant receives essential nutrients for overall growth and health.

The Best Plant Food for a Snake Plant

While various fertilizers with the right NPK ratio can effectively nourish your Snake Plant, consider using a high-quality, all-natural liquid plant food that is gentle enough to use year round. Our Boost Vitaminé is an all-natural plant food that promotes growth, strengthens roots, and enhances overall plant vigor. It's suitable for Snake Plants and many other indoor plants, offering a convenient solution to your plant care needs.

Feed your Snake Plant's inner beauty with the secret to lush leaves: the perfect fertilizer.

Can Fertilizing My Snake Plant Help It Grow?

Snake Plants are primarily grown for their attractive foliage and air-purifying qualities, making them a favorite for those seeking low-maintenance greenery. While Snake Plants can occasionally produce small, fragrant white flowers, especially when grown outdoors, indoor Snake Plants rarely bloom as indoor houseplants. Fertilization may encourage leaf growth and overall plant health but is unlikely to trigger flowering in indoor settings.

By choosing the right fertilizer and following a simple feeding schedule, you can keep your Snake Plant thriving and looking its best. Remember that Snake Plants are hardy and forgiving, making them an excellent choice for both beginners and experienced plant enthusiasts. 

When To Fertilize Your Snake Plant

Timing is key when it comes to fertilizing Snake Plants. These plants experience active growth during the spring and summer months, making this the ideal time to focus on providing them with nutrients. To ensure your Snake Plant receives the nourishment it needs, incorporate a balanced liquid fertilizer into your watering routine every four to six weeks during the growing season.

Liquid fertilizers like the Natural Plant Food are convenient for Snake Plants because they are easy to apply and less likely to cause fertilizer burn (when you give your plant too much fertilizer), provided you follow the package instructions and dilute the fertilizer correctly in water.

As fall and winter approach and your Snake Plant enters a period of slower growth, reduce feeding your Snake Plant to once every two months. During this dormant phase, Snake Plants require fewer nutrients, and over-fertilizing can harm their health.

Good luck! The Snake Plant is an easy-going houseplant that requires little to no maintenance over time, but by giving it a little nutrient boost, you’ll enjoy its beauty for years and years to come!


Designed to Thrive

Premium plants, potted and delivered, plus lifetime access to 24/7 Plant Doctor support. Order online at leonandgeorge.com

Fact or Fiction: Do Houseplants Go Dormant in Winter?

The Snake Plant and Jade Pothos, basking in winter light. Photo by @thenamestesa

With the change of seasons, it's natural to wonder how your beloved houseplants are faring in the winter months. There are many myths and misconceptions about house plants going dormant during winter, and it's time to debunk any myths!

Dormancy in Winter

Do Plants Need Less Care in the Winter?

Repotting in Winter

Temperatures in Winter

Light Conditions in Winter

Dormancy in Winter

While many outdoor plants and trees shed their leaves and go dormant in winter, most common houseplants don't follow the same pattern. Houseplants come from a variety of climates, and many, including many from our collection at Leon & George, are native to tropical regions where winter is just a slightly cooler and drier season. While kept indoors, these conditions are generally kept pretty constant as well, except for shorter days in winter. So, unless your houseplant is specifically adapted to a dormant period, it's likely to keep growing year-round, though it is not uncommon for houseplants to grow much more slowly during the winter months than they do during spring and summer. 

Do Plants Need Less Care in the Winter?

While most houseplants may not go dormant, their growth may slow down during the winter. This can sometimes be mistaken for dormancy, but in reality, your plant is just conserving energy since there is less daylight this time of year. This reduced growth means they require less water and fertilizer, but it doesn't mean you can forget about them. Houseplants still need regular attention and care throughout the year. Consider reducing your watering frequency and amount, and definitely reduce fertilizer use– in fact, most fertilizers are too strong to use during the winter, but our natural plant food is gentle enough to use all year round (just reduce to once per month in the winter!). 

Repotting in Winter

In general, it's best to avoid repotting your houseplants during the winter months. Repotting can stress the plant, and during the winter, they are already dealing with lower light levels and potentially cooler temperatures. Wait until the growing season in spring to give your houseplants a fresh start, and only repot if absolutely necessary, for example, your plant has been overwatered and is experiencing root rot.

Temperatures in Winter

While many common houseplants can often tolerate slightly cooler temperatures in winter, most generally prefer to be kept in a stable, warm environment. Most common houseplants come from tropical regions where temperatures remain relatively constant year-round. Sudden drops in temperature can stress your plants, so try to keep your home in the same temperature range throughout the year. 

Light Conditions in Winter

While some houseplants may require less light during the winter due to their slowed growth, many still need their usual requirements, in some cases plenty of bright, indirect light. Make sure to place your plants near windows where they can receive enough light to keep them happy. If you live in an area with long, dark winters, you might consider supplementing with grow lights to keep your plants thriving, or at the very least, moving your plants around throughout the day to give them the light they need. 

The idea that houseplants universally go dormant in winter is more fiction than fact. It's crucial to understand your specific plant's needs and provide the right care year-round. While your plants might not be as active during the winter, they still rely on you for proper care and attention to remain happy and thrive!


Designed to Thrive

Premium plants, potted and delivered, plus lifetime access to 24/7 Plant Doctor support.

Fiddle Leaf Fig Care: The 10 Commandments

The Fiddle Leaf Fig Tree: a gloriously sculptural plant with fiddle-shaped leaves.

Want your Fiddle Leaf Fig to flourish?

The Fiddle Leaf Fig (Ficus Lyrata) is a stunning houseplant that is known for its finicky nature, and you’ve likely heard of how unforgiving this plant can be towards improper care. This can be intimidating if you have never cared for one before, but rest assured that as one of the most popular indoor plants out there, many newbies have found success in owning and growing a beautiful Fiddle Leaf Fig and its lush, attractive foliage. If you’re new to the game, too, discover invaluable Fiddle-Leaf Fig care insights and techniques shared by our guest writer, Claire Akin, the one and only Fiddle Leaf expert and owner of The Fiddle Leaf Fig Plant Resource Center. As a true authority on this beloved plant variety, Claire's expertise and tips can be of great value to both new and seasoned Fiddle-Leaf owners alike!

1. Provide Proper Drainage

2. How to Water Fiddle Leaf Figs: Don’t Overwater!

3. Give your Fiddle Bright Light

4. Let Them Rest in Winter

5. Leaf Drop: Let Old Leaves Go

6. Create Humidity

7. Repot When Necessary

8. Feed It the Right Plant Food

9. Check-in Regularly & Have the Right Tools at Hand

10. Respond to Issues Right Away

1. Provide Proper Drainage

Your plant’s overall health depends on the health of its root system. Roots need two things to stay happy, water and oxygen. In order for both of these to be in balance your plant needs to be able to breathe properly. As such, one of the first things you need to make sure of when it comes to potted plants, particularly the Fiddle Leaf Fig Tree, is if your planter or pot has a drainage hole. If you have a decorative planter that you wish to use that does not have one simply keep you plant in its plastic nursery pot and slip it inside of the decorative container. At Léon & George, we actually pot all of our plants like this, as it allows us to use sleek and stylish planters and also ensure the root safety and health of our plants.

Apart from drainage, you’ll want to allow a bit of oxygen into the roots. One way to make sure the roots are getting enough oxygen is to aerate the soil every once in a while. All that you need to do this is a chopstick and a moment of spare time.

2. How to Water Fiddle Leaf Figs: Don’t Overwater!

It’s important that you allow your Fiddle-Leaf Fig to dry out a bit between waterings. This simulates the conditions of their native environment and will keep them happy. This may seem like a relatively simple task, but overwatering is where first-time owners of this plant tend to go wrong. Overwatering can lead to more serious issues like root rot, which can cause the quick demise of your plant. Overwatering can also create the perfect habitat for pests like fungus gnats, and lead to weaker root systems that are prone to infestation.

A good rule of thumb is to water your Fiddle Leaf Fig no more than once a week. Always take a moment to check the soil before watering though, your plant may not be as thirsty as you think!

If you want to be certain you’re watering your plant correctly, check out this ultimate guide to watering the Fiddle Leaf Fig, and also consider using a moisture meter!

3. Give your Fiddle Bright Light

Fiddle Leaf Figs absolutely need plenty of bright indirect or filtered light to thrive. These plants will not tolerate low-light areas, and it’s very possible your plant will quickly decline if you try to place it in an area that does not receive much natural light.

The ideal spot for a Fiddle Leaf Fig is near a bright window that receives plenty of indirect light throughout the day, such as a south-facing window. Read our full guide on where to place your Fiddle Leaf Fig to ensure your plant is set up for success!

4. Let Them Rest in Winter

Just like us, our plants notice the changing of the seasons, and will require slight modifications to their care throughout the year. The darker days of winter, for example, result in your plant using less energy. They do not grow as much during this time and therefore need less water. They also do not have the same need for nutrients, so it’s a good idea to fertilize less or stop entirely until the springtime.

However, one thing you will want more of in the winter is sunlight. Depending on the placement of your indoor tree, you may need to change your Fiddle’s location for the winter months if it is no longer getting enough light where you originally placed it.

5. Leaf Drop: Let Old Leaves Go

Your plant is a living being. This means that growth is natural and the loss of old leaves is nothing to mourn. As Fiddle Leaf Figs grow taller and mature, they sometimes drop their lower leaves. So long as you see new shiny new leaves and growth, this is generally not a cause for concern.

That said, if many leaves are dropping rapidly, you could have a problem on your hands. You will have to quickly diagnose the issue to make sure that your Fiddle Leaf Fig is on the right track and does not suffer permanent damage.

6. Create Humidity

Your Fiddle Leaf Fig craves humid conditions. Their ideal range is between 30 to 65 percent humidity. This can be hard to achieve in your home, especially if you run your AC or heater often as they dry out the air. You can try to create these ideal conditions by misting or using a humidifier. Misting every couple of days is a standard practice amongst experienced Fiddle Leaf Fig owners.

7. Repot When Necessary

If you take good care of your Fiddle Leaf Fig, its root system will outgrow its container every few years. It's important to inspect houseplants regularly, and with the Fiddle Leaf Fig, you’ll know it's time to repot if you spot roots peeking out from the bottom or edges of its container. Only repot during its growing season (spring and summer); your plant will not have enough energy in winter to handle such a big change. And don’t forget to always use the appropriate potting soil!

If your Fiddle Leaf Fig is already in the largest planter that your space can accommodate try top dressing the soil. All that you need to do is remove and replace the top four inches of the soil.

Fiddle Leaf Fig Fertilizer

Nourish your plants with this specially-formulated organic liquid plant food. Our Boost Vitaminé is made with potent nutrients from nature to help your plants grow and thrive all year long.

$24

8. Feed It the Right Plant Food

In order to keep new leaves sprouting on your Fiddle Leaf Fig is getting all of the nutrients that it needs. Give them a liquid fertilizer like Fiddle Leaf Fig Plant Food, which has the NPK ratio of 3-1-2 that Fiddles like best. You want to give your plant fertilizer during the growing months, from spring to fall. But be careful not to overdo it! Using too much fertilizer can result in fertilizer burn.

9. Check-in Regularly & Have the Right Tools at Hand

Having a good relationship with your Fiddle Leaf Fig is the best way to ensure that it thrives. Make sure that you take the time to check in with your plant once a week to see how its doing. Rotate to keep a lean from developing. Feel the soil before watering to gauge how much water it actually needs. This is a good time to wipe down and inspect its leaves! Keep your eyes peeled for wilting and brown spots as you clean them.

To ensure that you’re giving your plant the best care you’ll want to use the right tools. Ideally you should have some sharp pruning shears, a watering can, and a moisture meter. As Fiddle Leaf Figs are prone to leaning it can be helpful to have yours on a roomy planter or even one with wheels, this will allow you to rotate it more easily.

10. Respond to Issues Right Away

Fiddle-Leaf Figs spend a lot of energy creating their large viola shaped leaves. So they are slow growers indoors and do not bounce back well from health issues. So you’ll want to act quickly if you spot a brown leaf, mass of insects, or a pronounced lean. Even if you adjust your care do not expect you Fiddle Leaf Fig to show sign of improvement in the winter. Fiddle Leaf Figs can take up to a year to show signs of recovery for certain health issues.

If you have brown edges on the leaves of your Fiddle Leaf Fig that are bothering you do not remove the whole leaf. Instead cut off the spot following the natural shape of the leaf. Given enough time and patience it is possible for your plant to recover from most ailments, and you’ll be a certified green-thumb in no time!

Thank you to resident expert Claire Aiken of the Fiddle Leaf Fig Resource Center! To access comprehensive knowledge and guidance, don't hesitate to acquire your own copy of "The Fiddle Leaf Fig Expert" book and consider checking out The Ultimate Fiddle-Leaf Fig Care Webinar to further enhance your expertise. Your thriving Fiddle Leaf Fig Tree awaits!


Fiddle Leaf Figs

Discover why this classic and sculptural ficus variety is the go-to statement plant for designers and plant lovers alike.

Is Repotting Your Plants an Absolute Must?
Illustration by @kail_bales

Did you know that repotting your houseplants into a bigger container isn’t 100% necessary in most cases? That’s right— it’s optional! After researching and testing what works for best for busy city dwellers and urban gardeners, here’s our rundown on considerations for optimal indoor plant health.

  • Room for growth - the main reason to consider repotting is to give your plants room for growth. If you start to see roots growing out the drainage holes or circling around the top, potting up to a larger size will allow your plant to grow taller. If you want your plant to stay the same height and shape, you can keep it in its current pot size. Note that you may need to trim the plant and/or its roots.

  • Root rot or infestation - another reason you may need to repot your plant is due to root rot or infestation. Root rot is when too much moisture has built up in the roots and they have begun to literally rot. Alternatively, you may have a pest infestation such as mealybugs, spider-mites or other common indoor plant pests, and beyond basic treatments like neem oil and rubbing alcohol, it might be a good idea to repot the plant to ensure you get rid of all the pests and any potential larvae that may be in the soil.

  • Fresh nutrients - the other reason we repot our plants is to give them fresh, nutrient rich soil. Over time, potting soil can become depleted of the minerals and nutrients our plants crave, so even if you don’t want to repot your plant to something bigger, you may still consider giving it fresh new potting soil every few years.

  • Drainage - all plants need drainage so that their roots don’t stay sitting in soggy soil after watering and begin to rot. The plants we buy for our homes are grown in plastic nursery pots that are already pierced for appropriate draining. Many decorative planters that are designed for indoor use don’t have drainage holes, so it’s not advised to repot directly into these. Here’s how to pot a plant in a pot with no drainage hole, which is called staging. Read on for more!

  • Staging - the method we’ve found that works best for keeping your plants healthy and your home stylish is this one. Staging refers to placing your plant, nursery pot and all, inside the decorative planter (so it’s not directly potted in the planter). You can keep your designer ceramics cleaner and your plant comfortable in its nursery pot by simply matching the two to your desired height and finishing the top with a light cover of moss or pebbles. Have a look here to see how staging plants works. This reduces the amount of shock your plant experiences as it settles into your home and is easier for health checks and proper watering. 

If you still think you need to repot, don’t forget to provide your newly repotted plant with plenty of light and a good drink of water just after its been placed in its new home! Avoid fertilizing right away, and be sure to read our guide on what to know before repotting your plant so that you’re fully prepared to set your plant up to thrive.


howtoarrangeindoorplants1.jpg

Indoor plants, potted & delivered

Premium plants paired with stylish ceramics, plus lifetime plant care support. Order online at leonandgeorge.com

Treating Scale And Other Tough Leaf Dwelling Bugs
bird-of-paradise-scale.jpg

How to identify scale on houseplants

Scale insects are small, immobile, and often hard-shelled bugs that appear on leaves and stems and suck out vital nutrients from your plants (yeah, kinda gross). This can cause your plants to lose color, vigor, and in extreme cases, death.

There are two types of scale—armored (hard scale) and unarmored (soft scale). While scale can vary in color, shape and size, the most common type shows as hard brown bumps (armored) on your plant’s leaves and stems. You may also see scale that is white and soft (or unarmored). Keep in mind that because scale latches on to your plant, you will not see it move at all—and removing it thoroughly when there is an infestation can be quite tricky.

Where does scale come from?

Your plant may get scale from many different places. It could be from another contaminated plant, fresh produce brought home from the farmer’s market, or simply from being simply being outside in the warmer months of the year. It’s often unclear where scale comes from, but also keep in mind that unhealthy or neglected plants can be far more susceptible to pest infestations than their healthier counterparts.

How to treat scale on houseplants

Neem oil is our go-to natural pesticide solution for all types of pests. Not sure what Neem oil is? Neem oil is incredibly effective at eradicating infestations because it attacks pests at all stages of development, from larvae to adult.

That said, a full blown scale infestation (because scale, like most common houseplant pests, can reproduce quickly) will require more work than simply dousing with neem oil. You will need to manually remove each scale, and the best way to do this is with rubbing alcohol:

  • Dab a Q-tip in rubbing alcohol and pick off the scale bugs one by one

  • Moisten a paper towel or cotton ball and thoroughly wipe down the more infested areas

  • Continue to use Neem oil on the leaves, stems and base of the plant

  • Repeat this once a week for 3-5 weeks, or until you're no longer finding scale on your plant

Recovery will take some time, but be optimistic — indoor plants can be surprisingly resilient. Once you've controlled the issue, your plant will thank you with color and life springing back into their foliage!

Not sure what your plant has is scale? Read our full guide on identifying and treating common pests.


BIRD OF PARADISE

A popular and easy-care indoor plant for creating that instant jungle atmosphere.